

In this post, we will focus on adding fine-grained authorization (FGA) to your Next.js application. We will check for permissions whenever we request or update data. You'll use Okta FGA, a managed solution for making relationship-based access control (ReBAC) decisions.
This tutorial will explain the steps needed to add a flexible, fine-grained authorization model to your Next.js application.
- Create an Okta FGA account
- Create your first Okta FGA model
- Add the Open FGA SDK to your codebase, and configure it to use your Okta FGA account
- Check for permissions in your application
- Update the data Okta FGA can use to make decisions when making changes in our application.
What You'll Be Building
Together, we'll go through the codebase of a Google Drive-style application that lets users upload images, create folders, and share these images and folders with other users.
The focus of this blog post is not on how to upload files, so we're not going to spend time on this. We're going to have a look at how we can deal with sharing files and folders and make sure each user only sees the files and folders they own or the ones that have been shared with them.
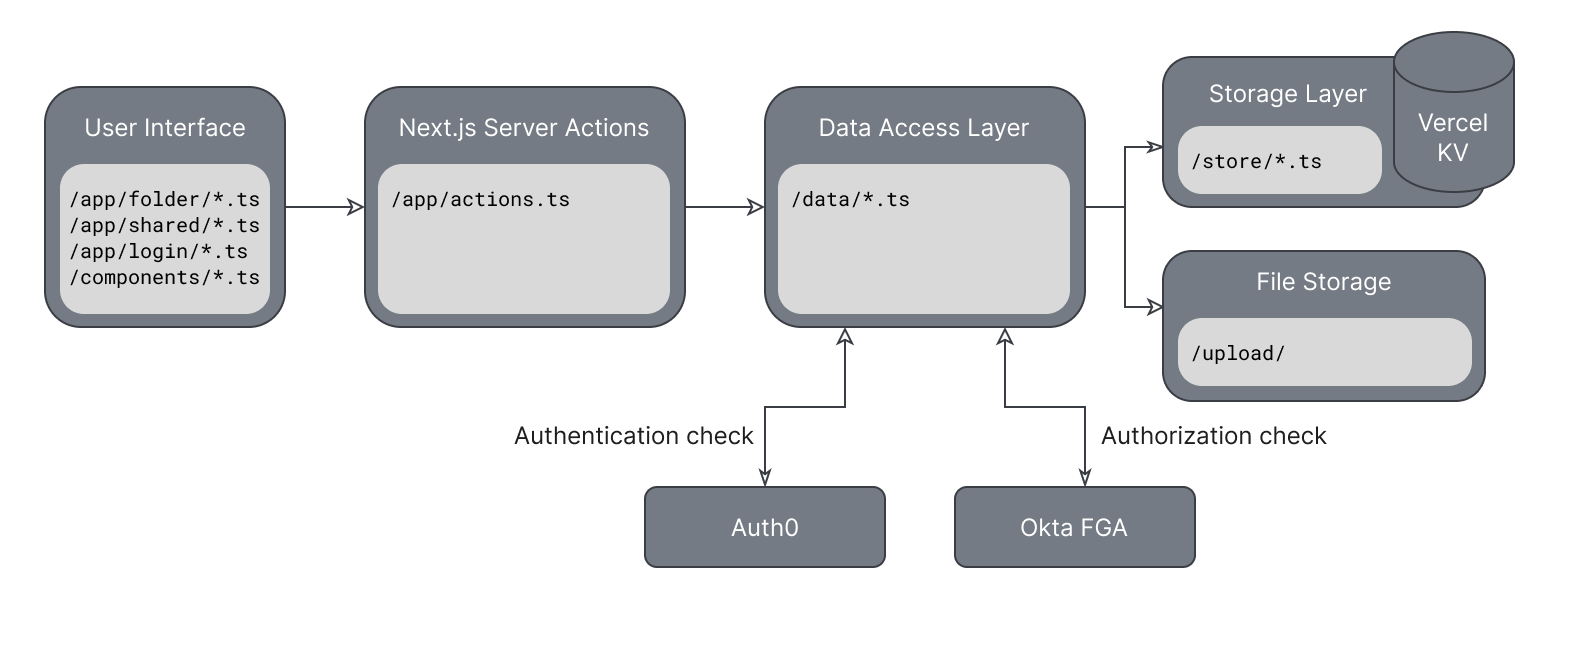
The app is structured as follows:
- The application's pages come from
/src/app/folder/,/src/app/shared/, and/src/app/login/. - Components can be found in
/src/components/. - We use Server Actions to pass data to and from the frontend. These actions live in
/src/app/actions.ts. - There's a Data Access Layer in place to handle fetching and writing data to your Vercel KV store and to upload the files to
/upload/. The code for the Data Access Layer can be found in/src/data. - The code in
/src/store/helps us communicate with the Vercel KV since you'll need to make multiple requests for certain actions.
All these elements together give us an architecture that looks like this:
To follow along, you can download the codebase here or run the following command in your terminal.
git clone git@github.com:oktadev/fga-drive-example.gitThe application relies on Auth0 and Vercel services. If you haven't already, create an account for them:
- Auth0, Create a free Auth0 account.
- Okta FGA uses the same Auth0 account.
- Vercel KV, create a free Vercel account and a KV store through your Vercel dashboard.
What Is Relationship-Based Access Control
One of the most commonly used approaches to authorization is Role-Based Access Control (RBAC), where a role contains a set of permissions and is assigned to each user. This is a simple way of determining what permissions a user has and what actions they should be able to perform within our application.
More complex applications often require a more flexible approach to authorization, where access can be granted on a user and resource level instead of a general resources type, as done with RBAC. Enter Relationship-Based Access Control or ReBAC. Don't let the one extra letter in the acronym fool you; it's a completely different approach to authorization.
Instead of checking a fixed set of permissions assigned to a user via roles, we're going to look at the relationship between a consumer (or group of consumers) and a resource (or group of resources) to determine if they should be able to access a specific resource(s) or perform an action on them.
Because we're looking at the bigger picture and determining relationships between two entities, these relationships often don't need to be explicitly defined.
For example, if a user belongs to a group, it is enough to grant that group access, and all its members will automatically be granted access. The same is true for a group of resources. If a user has access to, for example, a folder, they should automatically get access to all files within that folder without explicitly defining these relationships. These are called indirect relationships as opposed to direct ones.
What Is Okta FGA
Okta FGA is a managed solution by Okta that helps you deal with complex authorization decisions in your application. It uses the OpenFGA modeling language (DSL) and decision engine, designed by Okta and adopted by the Cloud Native Computing Foundation (CNCF).
If you prefer to set up your own instance of OpenFGA, follow the "Setup OpenFGA" document.
Okta FGA provides a set of APIs that let you check for permissions or add more data to the decision engine whenever data changes in your application so the decisions can stay up to date.
The decision engine can check for existing relationships between users and objects, but a user should not always be seen as a literal application user. For example, when checking if a folder is the parent of a file, the parent folder is the user, parent is the relation, and the file is the object. Therefore, in this guide, I will often refer to the user in the context of an Okta FGA check as a consumer and the object as a resource.
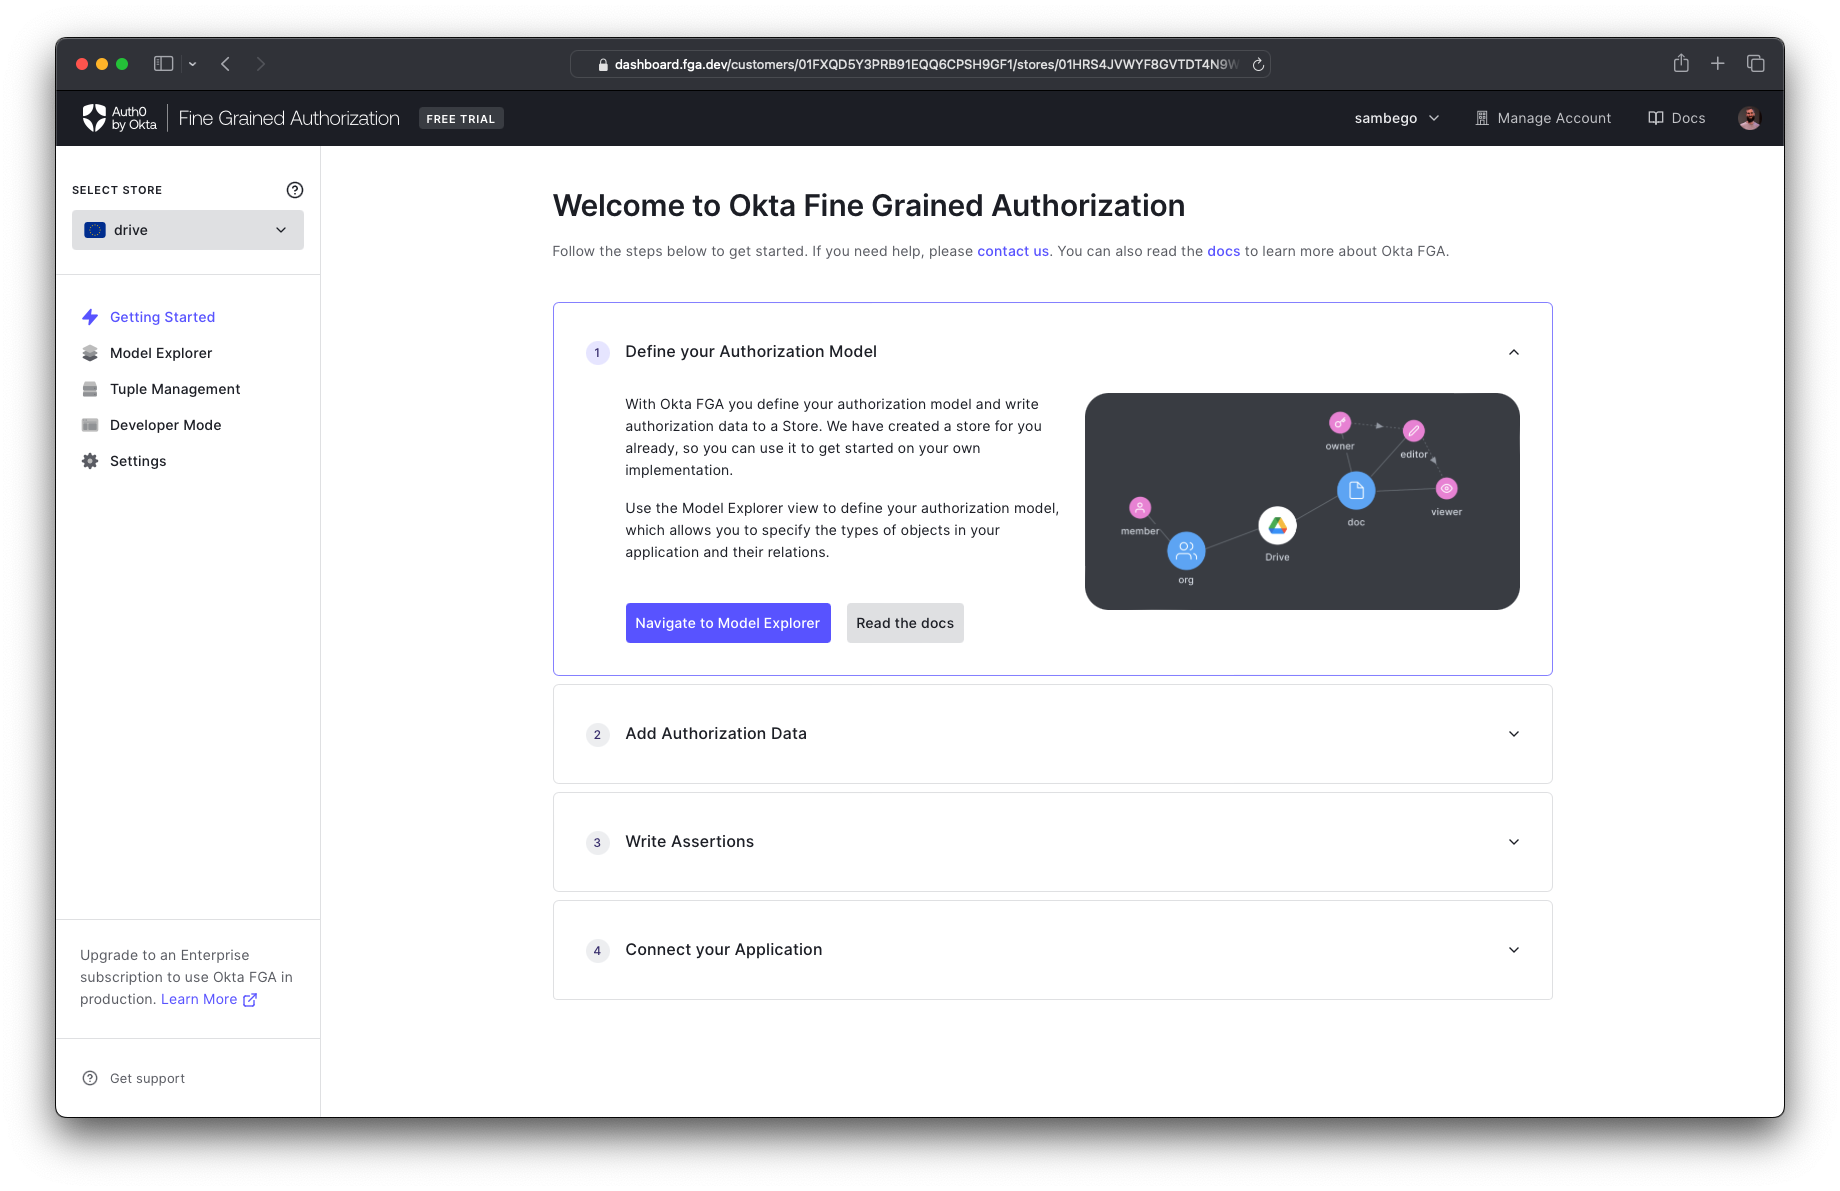
Create an Okta FGA Account
Good news! If you already have an Auth0 account, you can use the same credentials to log in to the Okta FGA dashboard at https://dashboard.fga.dev. If you don't have an Auth0 account, hop over to https://dashboard.fga.dev and create a free account.
Once you are logged in, you should see a dashboard similar to the one below.
Create Your Authorization Model
Okta FGA uses an authorization model to determine all possible relationships it should consider when making a decision. You'll navigate to the Model Explorer page in our dashboard and add the following model to the model editor. Don't forget to hit save!
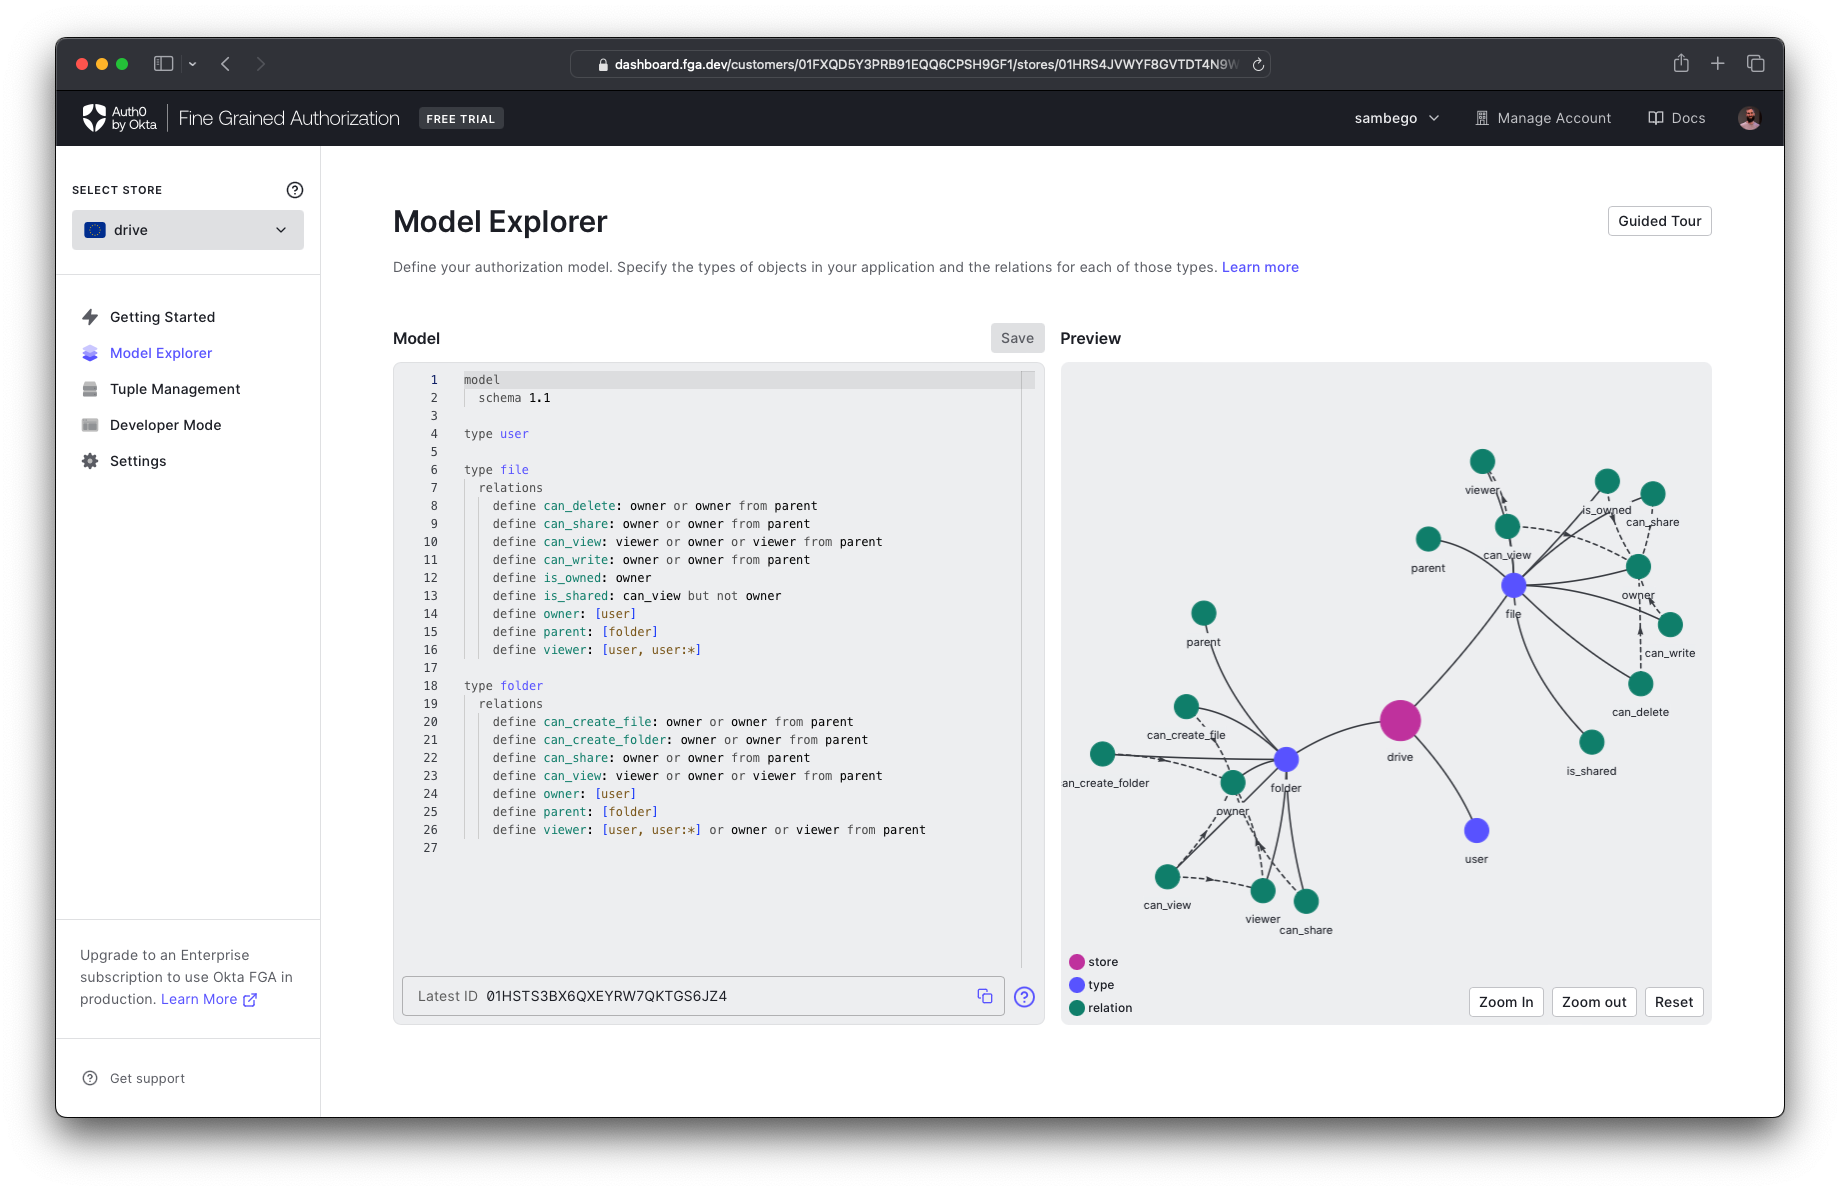
model
  schema 1.1

type user

type file
  relations
    define can_delete: owner or owner from parent
    define can_share: owner or owner from parent
    define can_view: viewer or owner or viewer from parent
    define can_write: owner or owner from parent
    define is_owned: owner
    define is_shared: can_view but not owner
    define owner: [user]
    define parent: [folder]
    define viewer: [user, user:*]

type folder
  relations
    define can_create_file: owner or owner from parent
    define can_create_folder: owner or owner from parent
    define can_share: owner or owner from parent
    define can_view: viewer or owner or viewer from parent
    define owner: [user]
    define parent: [folder]
    define viewer: [user, user:*] or owner or viewer from parent
When you look at this model, you'll notice you defined three types: user, file, and folder. You'll be able to assign relationships between these types. For example, a user can be an owner or viewer of a file or a folder can be a parent of a file (or folder, when nesting folders).
You have also defined some permissions related to actions that can be performed on your types, like can_view or can_share for the file resource type. It's sometimes more future-proof to create relations like this, so if you expand your model in the future, your application can continue to check for these, even if their definition changes.
With your authorization model in place, Okta FGA has half of what it needs to make decisions. The other half is data on your actual relationships, such as which user owns which file or which folder is a parent of which file. You'll do this in our application code whenever you create a new file or folder or share one of them. But first, let's set up the OpenFGA SDK.
Install the SDK
To install the OpenFGA Node.js SDK, you'll run the following command in your terminal.
npm install @openfga/sdkOnce installed, you can create a new OpenFGA client in your codebase. You'll find the client in /src/app/authorization.ts, and it looks something like this:
// [ 📄 /src/app/authorization.ts ]

const fgaClient = new OpenFgaClient({
  apiUrl: process.env.FGA_API_URL,
  storeId: process.env.FGA_STORE_ID,
  authorizationModelId: process.env.FGA_AUTHORIZATION_MODEL_ID,
  credentials: {
    method: CredentialsMethod.ClientCredentials,
    config: {
      apiTokenIssuer: process.env.FGA_API_TOKEN_ISSUER as string,
      apiAudience: process.env.FGA_API_AUDIENCE as string,
      clientId: process.env.FGA_CLIENT_ID as string,
      clientSecret: process.env.FGA_CLIENT_SECRET as string,
    },
  },
});
The client needs some details to connect to our Okta FGA tenant, which you can add to the .env.local file. You'll find these details on the settings page of your Okta FGA dashboard. If you haven't created a set of API credentials before, you can also do this on the settings page.
apiUrl: The url to your Okta FGA in the form ofhttps://api.<region>1.fga.devstoreId: Found in your Okta FGA DashboardauthorizationModelId: Found in your Okta FGA Dashboard, this changes with each update to your modelapiTokenIssuer: This is currently alwaysfga.us.auth0.comwhen using Okta FGAapiAudience: The same as yourapiUrlwith a trailing slash/clientId&clientSecret: Can be found in your Okta FGA Dashboard
The SDK exposes a lot of helpful methods to help you interact with Open FGA, but for this example, you'll focus on these two:
fgaClient.check()checks if there's a relationship between a consumer and a resource; for example, can a user view a certain file.fgaClient.writeTuples()can write new tuples containing data about specific relationships to our OpenFGA store. You'll use this whenever we create a new file, for example.
When you dive deep into the /src/app/authorization.ts file, you'll notice there are some helper methods, but in the end, most of these use one of the two functions above.
Check For A Relationship
When your application requests data, adds more data, or changes existing data, you want to ensure that these actions are actually allowed.
Next.js recommends using a Data Access Layer (DAL) to manage data being pulled from or written to your database or data store. This happens to be the ideal location to check if the current user is Authenticated and Authorized for each action. You can find the Data Access Layer in /src/data.
The OpenFGA exposes the check() and batchCheck() methods to check for a relationship before we perform the actions above.
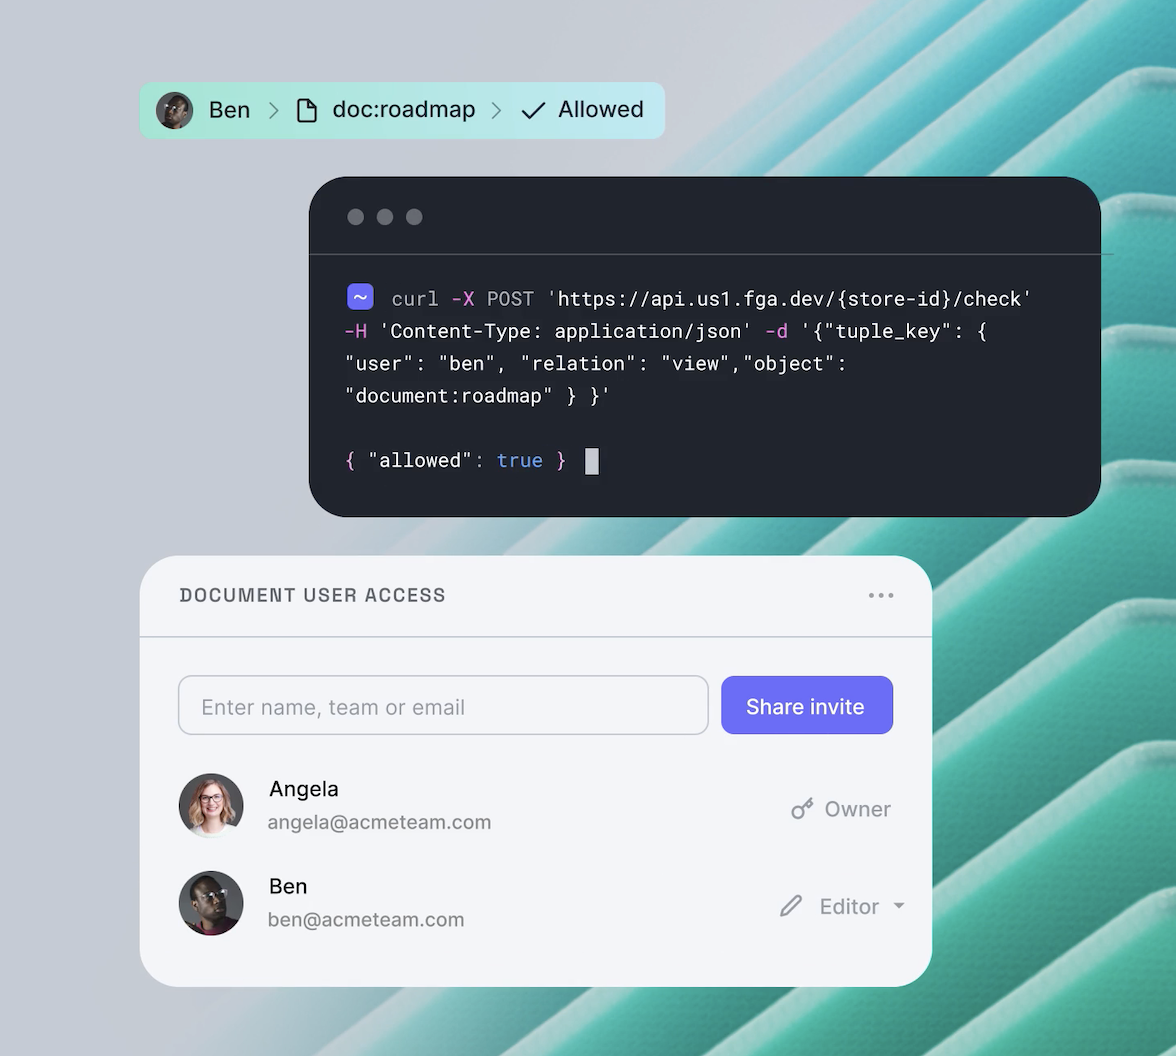
For example, when you request a file, you'll want to make sure that the current user is allowed to see it. Your authorization model defined a relation can_view that specified that either a user that has a viewer or owner relationship defined to the file or a user that is the owner of a parent folder of the file should be able to view the file.
So let's check for the can_view relationship using the check() method.
// [ 📄 /src/data/files.ts ]

export async function getFileDTO(
  fileId: string,
): Promise<{ file?: StoredFile; error?: unknown }> {
  try {
    if (await !isAuthenticated()) {
      return { error: "Unauthorized" };
    }

    const userId = await getUserId();
    // 👇 Check for a "can_view" relation in Okta FGA
    const { allowed } = await fgaClient.check({
      user: `user:${userId}`,
      relation: "can_view",
      object: `file:${fileId}`,
    });
    // 👆

    if (!allowed) {
      return { error: "Forbidden" };
    }

    const file = await getFileFromStore(fileId);

    if (file) {
      return { file };
    }

    return { error: "No file found" };
  } catch (error) {
    return { error };
  }
}
Here, you're checking if a user has a can_view relationship to a specific file. The check() method will return an object containing the decision as an allowed property.
Create a New Relationship Tuple
Whenever you add, update, or delete some of the data your application works with, you want to make sure your Okta FGA instance knows about these changes so it can continue to make accurate decisions. You do this by adding or deleting tuples from the Okta FGA Store.
Whenever a user adds a new file or folder, you'll notice we create 2 new tuples, e.g., /src/data/files.ts line 188.
The first tuple defines the current user as the owner of the file or folder. The second tuple sets the parent folder as the parent of a new file or folder. For example
// [ 📄 /src/data/files.ts ]

export async function uploadFileDTO(
  parent: string,
  file: File,
): Promise<{ files?: Array<StoredFile>; error?: unknown }> {
  try {
    //...
    await writeFile(filePath, fileBuffer);
    const files = await createFileInStore(fileId, parent, uploadedFile);

    if (files) {
      // 👇 write new tuples to Okta FGA
      await fgaClient.writeTuples([
        {
          user: `user:${userId}`,
          relation: "owner",
          object: `file:${fileId}`,
        },
        {
          user: `folder:${parent}`,
          relation: "parent",
          object: `file:${fileId}`,
        },
      ]);
      // 👆
      return { files };
    }

    return { error: "No files uploaded" };
  } catch (error) {
    return { error };
  }
}
From this point onward, each check to make sure our user can view this file will return true.
Whenever a user decides to share a file or folder with another user, you also write a new tuple like:
// [ 📄 /src/data/files.ts ]

export async function shareFileDTO(
  file: string,
  email: string,
): Promise<{ file?: string; error?: unknown }> {
  try {
    ...

    try {
      // Check the Auth0 management API for a user with the given email address
      const { data } = await auth0ManagementClient.usersByEmail.getByEmail({
        email,
        fields: "user_id",
      });

      // No known user with the email address, return an error
      if (data.length === 0) {
        return { error: "A user with this email address does not exist." };
      }

      // 👇 Write a new tuple to Okta FGA
      await fgaClient.writeTuples([
        {
          user: `user:${data[0].user_id}`,
          relation: "viewer",
          object: `file:${file}`,
        },
      ]);
      // 👆

      return { file };
    } catch (error) {
      return { error };
    }
  } catch (error) {
    return { error };
  }
}
Once this tuple has been written to your store, a check for a relation can_view between the user with the passed userId, and this file will return true.
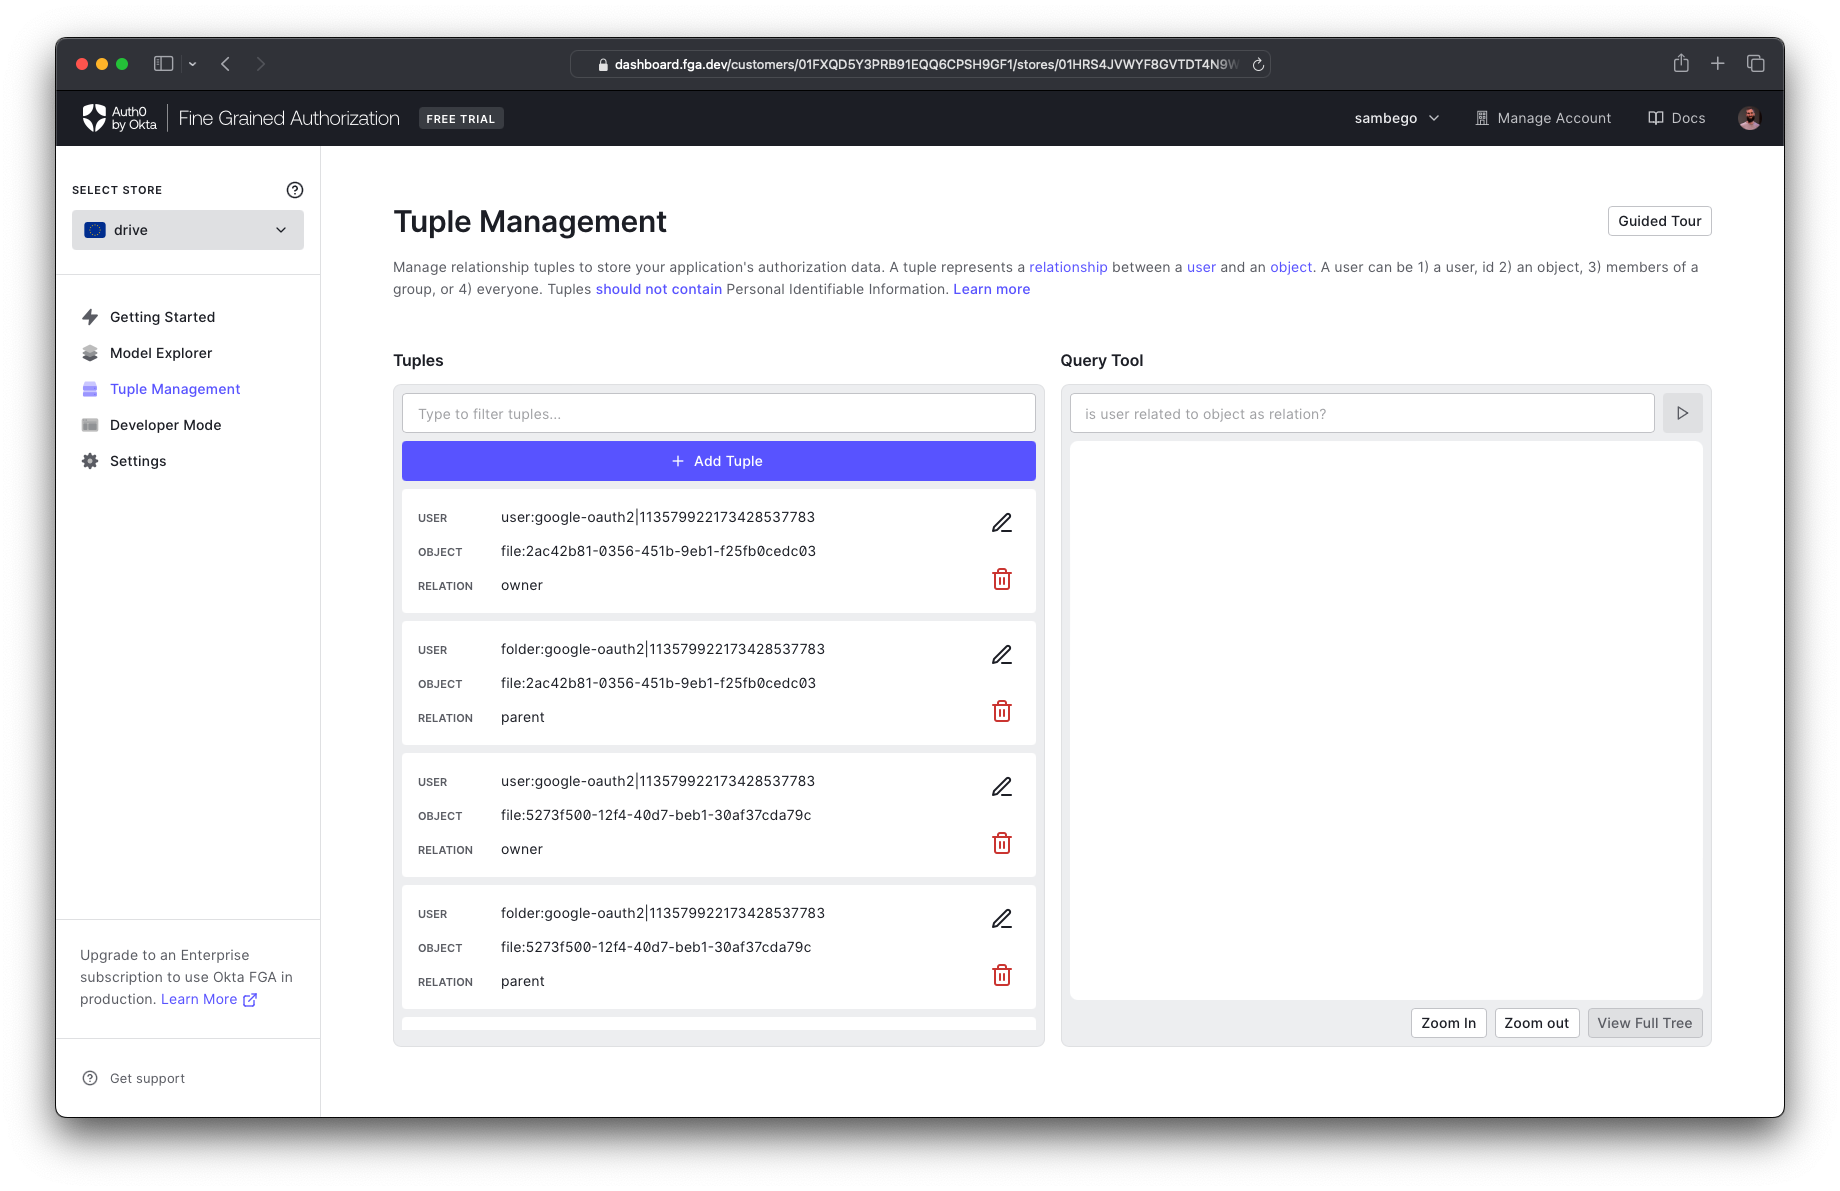
You can view and manage all created tuples on the tuple management page of your Okta FGA dashboard.
List Objects With A Certain Relationship
On the /shared page, you'd like to show all files shared with you. The OpenFGA SDK has a convenient method that can list all objects with a certain relation. In your case, you're interested in all files that have a relation of is_shared to your user.
You can call the listObjects() method to get a list of shared file IDs that you can then fetch from your data store.
// [ 📄 /src/data/files.ts ]

export async function getAllSharedFilesDTO(): Promise<{
  files?: Array<ReadableStoredFile>;
  error?: unknown;
}> {
  try {
    ...
    // 👇 List all files with an "is_shared" relation
    const sharedFiles = await fgaClient.listObjects({
      user: `user:${userId}`,
      relation: "is_shared",
      type: "file",
    });
    // 👆
    ...
  } catch (error) {
    console.error(error);
    return { error: "Something went wrong." };
  }
}
Next Steps
You've successfully implemented fine-grained authorization into your Next.js application. You can check for relationships between resources and consumers and create new tuples that inform Okta FGA about new or changed relationships.
Next, you can play around with the authorization model and adapt it to your needs, look at conditional relations, or even create context-aware relations.


