Transactional Authorization with Authorization Code Flow
Highly Regulated Identity enables Transactional Authorization with the Authorization Code Flow by applying step-up multi-factor authentication (MFA) to authorize a transaction. Step-up MFA challenges the user with a second authentication factor to explicitly authorize the transaction details of a one-time operation, which is useful in use cases that require financial-grade security:
Securing sensitive operations executed from your own services, such as approving bank transfers, access to operations history, and changes in access credentials.
Securing sensitive operations requested from third-party services, such as approving digital payments and allowing one-time access for account verification.
This article walks you through the end-to-end journey of approving a bank transfer. The same transactional authorization flow can be applied to other use cases.
Prerequisites
Before getting started, follow the instructions in Configure Rich Authorization Requests to register the authorization_details.types for your API or resource server.
End-to-end flow
The following diagram shows the end-to-end flow for Transactional Authorization with Contextual SCA. There are four main phases:
Securely redirect the user to Auth0 with the transaction details. In this step, avoid revealing sensitive information on the front channel (e.g. the browser).
Apply dynamic policy after the user authenticates. Using Actions, you can dynamically decide on the next steps based on the transaction details and other information you may get from sources such as external APIs. To learn more, read Apply dynamic policy.
Challenge the user with a second authentication factor and show transaction details for the user to explicitly approve. This step depends on the authentication factor you chose to apply using Actions.
Get the access token and proceed with the sensitive operation. Your API validates the approved transaction details associated with the access token.
We will go through each phase in detail in the following sections.
Communicate transaction details and redirect to Auth0
The user first accesses your web application after authenticating with Auth0. Following our example use case, the user then requests a money transfer to one of their contacts.
To meet financial-grade security standards, Highly Regulated Identity uses Pushed Authorization Requests (PAR) to hide transaction details from the browser. Instead of sending query parameters through the browser to the /authorize endpoint, PAR directly sends parameters from your backend to a special /par endpoint using a POST request. To learn how to set it up, read Configure Pushed Authorization Requests.
In the PAR request body, transaction details are sent as part of the authorization_details JSON object:
"authorization_details": [
 {
   "type": "money_transfer",
   "instructedAmount": {
     "amount": 150,
     "currency": "USD"
   },
   "sourceAccount": "xxxxxxxxxxx1234",
   "destinationAccount": "xxxxxxxxxxx9876",
   "beneficiary": "Hanna Herwitz",
   "subject": "A Lannister Always Pays His Debts"
 }
]
Was this helpful?
Use Actions to inspect the authorization_details to determine which authentication factors to use based on the transaction. To learn more about authorization_details and how to use it along PAR, read Authorization Code Flow with Rich Authorization Requests.
If you want to meet FAPI 1 Advanced Security compliance requirements, you must also use public key cryptography to authenticate the backend against the /par or the /token endpoint. This is more secure than sending a Client Secret. Auth0 offers the following public key cryptography authentication methods:
After receiving a successful response to your PAR request, redirect the user to your Auth0 tenant’s /authorize endpoint. Add the request_uri parameter received in the PAR response and the client_id as the only query parameters, thus effectively hiding any sensitive information from the browser.
Apply dynamic policy
When the user logs in without using SSO and the browser hits your Auth0 tenant’s /authorize endpoint, Auth0 will attempt to authenticate the user. In our example of approving a bank transfer, Auth0 has already authenticated the user to access your web application. However, when a third party redirects the user, such as for a digital payment, Auth0 presents a login screen to the user. To learn more about the authentication flow, read the Authenticate documentation.
Once Auth0 has successfully authenticated the user, Auth0 triggers post-login Actions, which expose transaction details about the user, app, authentication factor(s) used, and more in the post-login event object. Within the post-login event object, the event.transaction.requested_authorization_details property contains details about the authorization request that were received in the previous step.
Use the post-login event object to decide how you want to proceed with the transaction. For example, you can send transaction details to an external risk engine, and after evaluating the risk level, determine whether to request step-up authentication using sms, as illustrated in the following code sample.
exports.onExecutePostLogin = async (event, api) => {
  if (event.transaction?.requested_authorization_details.some(e => e.type === 'money_transfer')) {
      const axios = require('axios');

      //details to contact risk evaluation engine
      const risk_url = 'https://risk.example.org/score';
      const risk_options = {
        headers: {
          'Content-Type': 'application/json'
        }
      };

      const tx_data = {
        email: event.user.email,
        authorization_details: event.transaction?.requested_authorization_details
      };

      //send operation details to risk evaluation engine
      var risk = await axios.post(risk_url, tx_data, risk_options);

      //if it is a risky operation use push to authorize
      if (risk.data.score >= 2) {
        api.authentication.challengeWith({ type: 'push-notification', options: {otpFallback: false}});

      }
    }
};
Was this helpful?
Challenge the user to get transaction details approval
You can customize what authentication factor to use depending on factors enrolled by the user, factors already satisfied by the session, and/or your own preferences. You can also provide alternatives for the user to choose from. To learn more, read Customize MFA Selection in New Universal Login.
Additionally, for SMS, email, and WebAuthn, you can customize the consent screen that Auth0 presents to the user with the information you want to show from authorization_details and other transaction details. To learn more, read Configure Rich Authorization Requests. For push notifications, this does not apply as the mobile application is the one showing the transaction details to the end user.
The following sections explain the different authentication factors that you can configure for transactional authorization.
Push notifications
Send a push notification to a user’s enrolled mobile device while Auth0 prompts the user with the Multi-Factor Authentication (MFA) waiting screen on the consumption device (e.g. the laptop where the transaction originated).
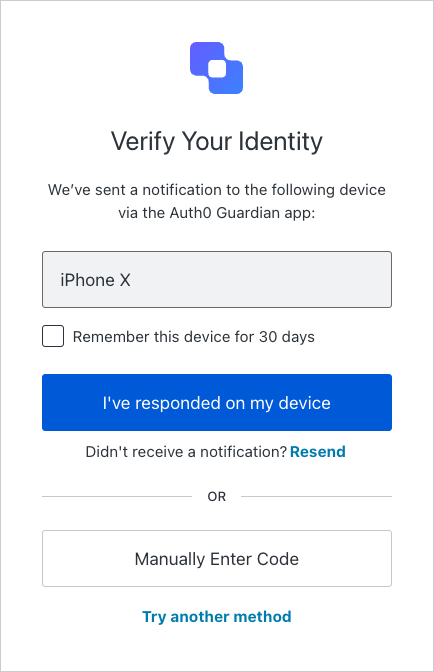
For push notifications, the mobile application is responsible for showing the transaction details to the user for explicit approval. When triggering a push notification, you can forbid the option to fallback by manually entering an OTP by adding the option otpFallback: false.
To display the authorization_details to the user, the mobile application must retrieve them from the txlnkid parameter. The Auth0 Guardian SDK passes the txlnkid parameter from the tenant to the mobile application via a push notification.
After the mobile application receives the push notification via the Guardian SDK, it can fetch the consent details, which includes the authorization_details, from the Auth0 Consent API:
let device: AuthenticationDevice = // the object you obtained when enrolling
if let consentId = notification.transactionLinkingId {
    Guardian
        .consent(forDomain: {yourTenantDomain}, device: device)
        .fetch(consentId: consentId, notificationToken: notification.transactionToken)
        .start{result in
            switch result {
            case .success(let payload):
                let authorizationDetails = payload.requestedDetails.authorizationDetails
            case .failure(let cause):
                // something went wrong
        }
    }
}
Was this helpful?
if (notification.getTransctionLinkingId() != null) {
    guardian
      .fetchConsent(notification, enrollment)
      .start(new Callback<Enrollment> {
        @Override
        void onSuccess(RichConsent consentDetails) {
          List<Map<String, Object>> authorizationDetails = consentDetails
                .getRequestedDetails()
                .getAuthorizationDetails();
        }

        @Override
        void onFailure(Throwable exception) {
          if (exception instanceof GuardianException) {
            GuardianException guardianException = (GuardianException) exception;
            if (guardianException.isResourceNotFound()) {
              // there is no consent associated with the transaction
            }
          }
          // something went wrong
        }
      });
}
Was this helpful?
From the post-login Action, you can call api.multifactor.enable() before api.authentication.challengeWith() to remove the option to remember this device and force the user to validate the push challenge for all transactions. To learn more, read Action Triggers: post-login - API object.
Once the user approves or declines the operation, the mobile application can allow or reject the MFA challenge. The transaction progresses to the Complete the operation phase.
SMS, Email, or WebAuthn
You can also set up phone, email, or WebAuthn as authentication factors to challenge the user. For these authentication factors, Auth0 prompts the user with the corresponding MFA waiting screen. After the user validates the challenge on the MFA waiting screen, Auth0 shows the transaction details to the user for explicit approval. Remember you have to Configure Rich Authorization Requests for the approval step to work properly.
For the phone authentication factor, Auth0 sends a verification code to the user through SMS or voice. The following screenshot shows the MFA waiting screen after Auth0 sent the code through SMS:
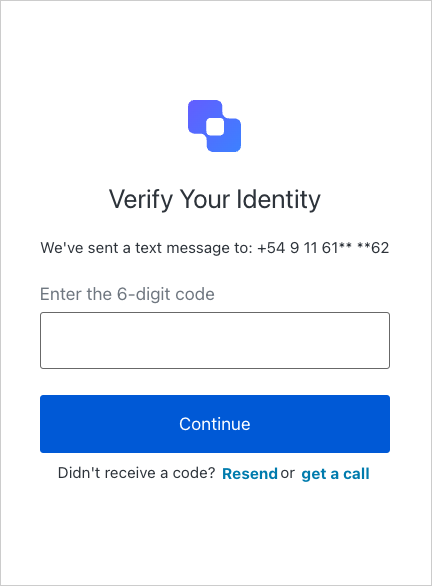
The user then receives the SMS with the verification code.
After the user inputs the verification code in the MFA waiting screen, Auth0 prompts the user with the transaction details on a consent screen. Once the user approves or declines the transaction details, the transaction progresses to the Complete the operation phase.
Email and WebAuthn use the same transactional approval flow and similar MFA waiting and explicit approval screens.
No Challenge
If you don’t challenge the user with a second authentication factor, Auth0 prompts the user with the consent screen to get explicit approval for the transaction details.
Complete the operation
To complete the operation, Auth0 follows the standard Authorization Code Flow. If the transaction is approved, the user browser is redirected to your application with an authorization code, which is then exchanged for an access token encrypted using JSON Web Encryption. The access token contains the authorization_details that you originally passed. The following code sample shows the contents of a decrypted access token:
{
 "iss": "https://my_tenant.auth0.com/",
 "sub": "auth0|me",
 "aud": "https://myapi.zewobnak.com",
 "iat": 1683661385,
 "exp": 1683747785,
 "azp": "my_client",
 "transaction_linking_id": "ce4842e8-2894-418a-b1f9-39a330cd4911",
 "authorization_details": [
   {
     "type": "money_transfer",
     "instructedAmount": {
       "amount": 150,
       "currency": "USD"
     },
     "sourceAccount": "xxxxxxxxxxx1234",
     "destinationAccount": "xxxxxxxxxxx9876",
     "beneficiary": "Hanna Herwitz",
     "subject": "A Lannister Always Pays His Debts",
   }
 ]
}
Was this helpful?
Pass the access token to the API that facilitates the money transfer. The API then checks the access token’s authorization_details to verify the transaction details, such as the amount, sender, destination, and more. Once verified, the money transfer successfully executes, and you should see the approval screen.
If the transaction is rejected at any step, the user browser displays an access_denied error code.