
While modern SDKs and libraries abstract much of the complexity of OAuth 2.0, a good understanding of the underlying authorization request structure remains essential for developers. When issues arise, such as unexpected redirects, token rejection, or other error messages, having insight into the raw request helps in troubleshooting.
This mostly depends on what type of developer you are, of course. It's like opening the hood of your car to diagnose a problem. You don't have to be a mechanic or even an engineer to understand every little detail of your car's engine. But being able to determine whether the engine is overheating because of insufficient coolant or the car won't start because a battery cable has come loose can help you speed up the troubleshooting process, sometimes even without the need for expert intervention.
Let's take a look at what's under the hood of an OAuth 2.0 authorization request.
The Authorization Request Under X-Ray
I assume you have a basic understanding of OAuth 2.0. If not, you can read a quick introduction to the authorization framework and its flows. If you want to go more in depth, check out OAuth 2.0 and OpenID Connect: The Professional Guide.
While this article mentions OAuth 2.0, you will also find details related to OpenID Connect and other OAuth extensions. This is because it’s very common to see the two protocols interconnected. After all, OpenID Connect is nothing but an OAuth 2.0 specialization.
It all starts when a client application redirects a user's browser to the authorization server to begin the authorization process. The authorization request is usually a GET HTTP request sent to the authorization endpoint of the authorization server, although it may be a POST HTTP request too.
The following picture shows a typical authorization request:
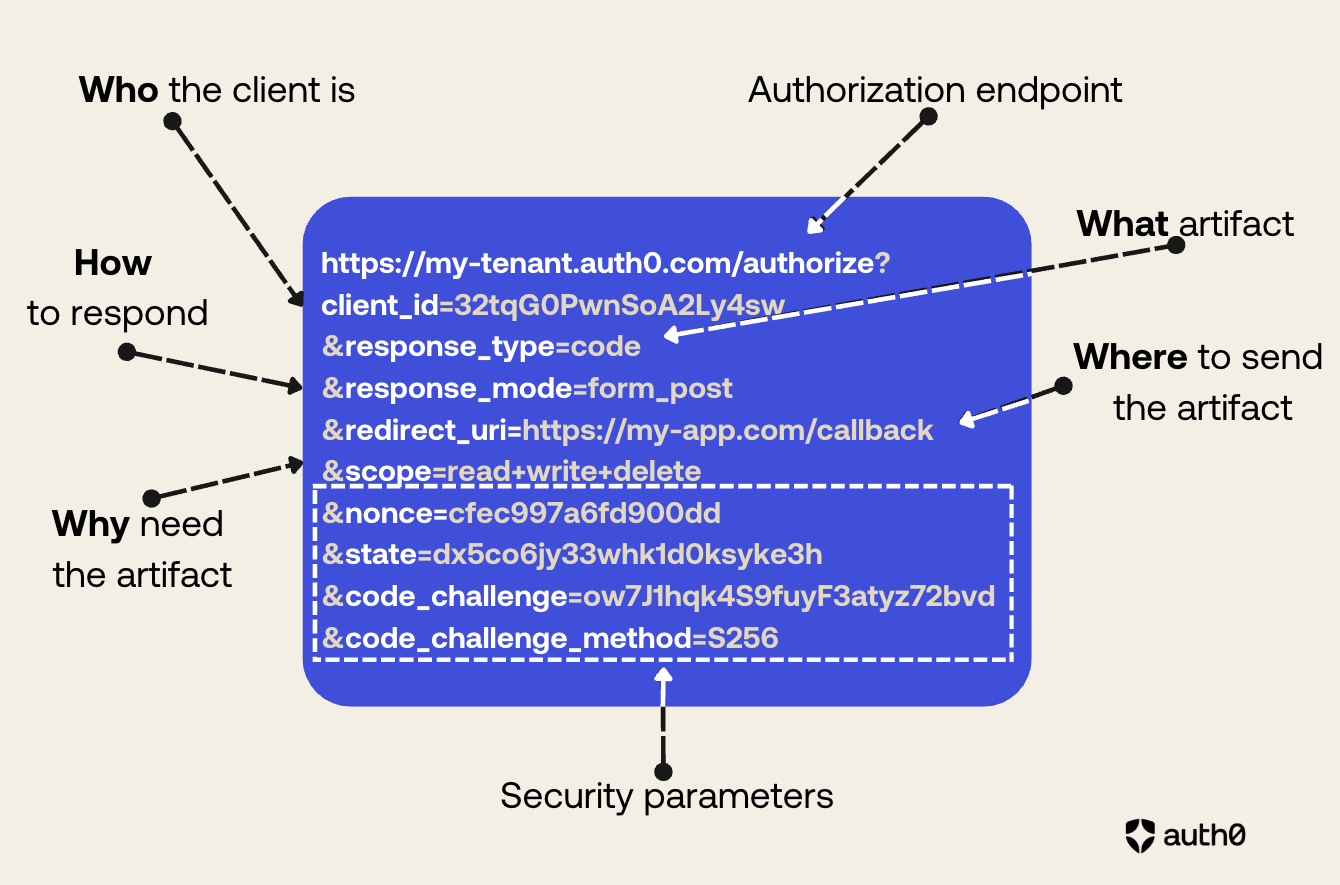
As you can see from the picture above, the authorization request structure expresses what the client application wants to achieve. You can highlight the main elements of its structure with something vaguely reminiscent of the 5 Ws of journalism:
- Who is making the request?
- What artifact is requested?
- How is the artifact returned?
- Where will the artifact be sent?
- Why is the artifact needed?
In addition to these fundamental elements of the request, there are other elements that help improve its security posture.
The Core of an Authorization Request
With reference to the authorization request example mentioned in the previous section, let’s break down the elements that compose it.
The authorization endpoint
The first element of the request we analyze is the authorization server URL: https://my-tenant.auth0.com/authorize.
This is an ordinary URL that includes the authorization server’s domain (my-tenant.auth0.com) and the authorization endpoint (/authorize). As in any common HTTP request, this URL identifies the server’s endpoint to which the client is sending its authorization request.
In the URL example, I’ve used an Auth0 subdomain as the authorization server domain, but in general it will be the domain where the authorization server is reachable. In the context of Auth0, you can use your custom domain, for example.
Regarding the authorization endpoint, while the /authorize endpoint is pretty common, this name is not required by the specifications, which leaves OAuth 2.0 server implementors free to use the name they prefer.
The client ID
The parameter client_id responds to the question, Who is making the request? It identifies the client application that submits the authorization request. The authorization server generates this ID for your application and uses it to retrieve its specific configuration settings.
This is a required parameter.
The response type
The parameter response_type answers the question, What artifact is requested? It specifies the type of authorization flow desired and determines what information will be returned by the authorization server (the artifact).
The parameter can take one of the predefined values code or token. The value code indicates that the client application wants to receive an authorization code, and consequently use the Authorization Code flow or its variant with PKCE. The value token requests an access token and refers to the Implicit flow, which is generally no longer recommended except in very specific cases.
The parameter response_type can also have a custom value as a sequence of strings separated by spaces. For example, OpenID Connect, which is an extension of OAuth 2.0, defines the value id_token and some combinations of values.
This parameter is required.
The response mode
The parameter response_mode tells the authorization server how the requested artifact should be returned. This parameter has been added later to the original OAuth 2.0 specification, and its possible values are:
fragment. This value tells the authorization server to attach the requested artifact as a fragment to theredirect_uri(see below). In other words, you will get for example an authorization code as follows:https://my-app.com/callback#we7fhHdi2rl6Adywyy1p0ffThe value
fragmentis associated with the Implicit flow and is not recommended for several reasons, including information leaking and size limitations.query. This value tells the authorization server to return the requested artifact as a parameter of the query string of theredirect_uri. The following is an example of authorization code returned as a parameter in the query string:https://my-app.com/callback?code=we7fhHdi2rl6Adywyy1p0ffReturning the artifact as a parameter of the query string has similar security concerns as the fragment option, although techniques like Proof Key for Code Exchange (PKCE) help mitigate the risks.
form_post. This value requests the authorization server to return the artifact as an HTML form value and send it via POST. This value has been added to overcome the security concerns affecting thefragmentandquerymodes.
The following is an example of response from the authorization server:
HTTP/1.1 200 OK
Content-Type: text/html;charset=UTF-8
Cache-Control: no-cache, no-store
Pragma: no-cache

<html>
 <head><title>Submit This Form</title></head>
 <body onload="javascript:document.forms[0].submit()">
  <form method="post" action="https://my-app.com/callback">
    <input type="hidden" name="state"
     value="DcP7csa3hMlvybERqcieLHrRzKBra"/>
    <input type="hidden" name="id_token"
     value="eyJhbGciOiJSUzI1NiIsImtpZCI6IjEifQ.eyJzdWIiOiJqb2huIiw
       iYXVkIjoiZmZzMiIsImp0aSI6ImhwQUI3RDBNbEo0c2YzVFR2cllxUkIiLC
       ...
       0uVAwBBb772-86HpAkGWAKOK-wTC6ErRTcESRdNRe0iKb47XRXaoz5acA"/>
  </form>
 </body>
</html>
The response_mode parameter is optional, so what is the default response mode from the authorization server when the parameter is not specified? It depends on the response type sent by the client application. The following table summarizes the default response mode corresponding to each response_type value:
| response_type | default response_mode |
|---|---|
| code | query |
| token | fragment |
| id_token | fragment |
| code token | fragment |
| code id_token | fragment |
| id_token token | fragment |
| code id_token token | fragment |
Note that the upcoming OAuth 2.1 specification will deprecate the
tokenresponse type, so all the response types containingtokenwill be deprecated as well.
The redirect URI
The redirect_uri parameter specifies where the authorization server will send the artifact. This is a very important parameter that defines the exact address in your application where the artifact is expected to be returned. Since this URL will receive sensitive data (authorization code or tokens), it is imperative to use HTTPS. OAuth 2.0 and OpenID Connect are strict about redirect_uri validation: the URI specified in the request must be an exact match of a pre-registered value on the authorization server. This strictness prevents malicious actors from hijacking tokens by redirecting them to an unintended location.
This parameter is required.
The scopes
The scope parameter explains why the client application is submitting this request. Consider that OAuth 2.0 (and consequently OpenID Connect) enables a client to work on behalf of a user, so the client must specify the user permissions it needs to perform its activities.
The value of the scope parameter is a sequence of strings separated by spaces expressing the needed permissions. OAuth 2.0 does not define the syntax of these strings, so you can freely define them. However, OpenID Connect defines a few reserved scopes.
This parameter is optional, however it is highly recommended to use it to enforce the principle of least privilege. If you don’t specify the scope parameter in your authorization request, the resulting behavior is up to the specific authorization server.
The Security Parameters
The parameters described in the previous section are the core parameters of an authorization request. They reflect the essential elements the authorization server needs to formulate a response after the user’s approval.
However, additional parameters are crucial too to guarantee the security of the request/response transaction. Let’s explore the most common ones.
The state
The state parameter has a unique value generated by the client application. Its primary function is to maintain session state between the client’s request and the server’s response, and to mitigate Cross-Site Request Forgery (CSRF) attacks. The authorization server must include the same value in its response to the client to ensure that it’s related to the original request.
This parameter is not mandatory but recommended.
The nonce
The nonce parameter has been introduced by the OpenID Connect specifications and it acts as an alternative to the state parameter for preventing CSRF and token injection attacks. Its unique value is generated by the client at request time. The authorization server will include the exact value of the nonce parameter in the nonce claim of the ID token. By comparing the value of the parameter with the value contained in the ID token, the client application is guaranteed that the ID token comes from its original request.
This parameter is required for the Implicit flow and in some cases of the Hybrid flow, while it’s optional in other flows.
The PKCE protection
An authorization request can include the code_challenge and code_challenge_method parameters. These parameters are needed to implement Proof Key for Code Exchange (PKCE), an OAuth 2.0 extension that prevents authorization code interception attacks.
To implement PKCE, the client application generates a unique code_verifier value and sends its hashed version (code_challenge) to the authorization server. The client also includes the code_challenge_method parameter to let the authorization server know what hashing algorithm it used. The possible values for the code_challenge_method parameter are:
plain, which means no hash,S256, which means that the SHA256 algorithm has been used.
The S256 value is the recommended value.
When the client application will exchange the authorization code for an access token, it will provide the code_verifier to prove it is the original requester.
PKCE also acts as a protection measure against CSRF attacks, so it may be used as an alternative to the state and the nonce parameters, assuming that the authorization server supports it.
The code_challenge parameter is required for public client like mobile and browser apps using the Authorization Code flow and unable to secure client secrets. While optional for confidential clients, it’s highly recommended.
Additional Parameters
The parameters discussed so far can be considered the minimum essential parameters for formulating an authorization request and ensuring its security. However, you may encounter other parameters whose necessity and meaning depend on specific contexts. We won't examine all the other possible parameters you might find in an authorization request, but we'll simply mention a few to give you an idea of what to expect
The prompt
The prompt parameter has been introduced by OpenID Connect and tells how the authorization server should interact with the user during authentication. Its possible values are:
none. The authorization server must not display an authentication window. If the user is not already authenticated, an error will be returned.login. The authorization server prompts the user for authentication even if they are already authenticated.consent. The authorization server prompts the user for their consent before returning back to the application client.select_account. The authorization server prompts the user to select an account if they have multiple of them.create. The authorization server shows the user creation form instead of the login form.
Values for the prompt parameter can be combined. For example, you can find prompt=login consent, which tells the authorization server to always show the login and the consent forms. Of course, you can’t combine other values with none.
The login hint
The login_hint parameter tells the authorization server what username to use to authenticate the user. Its value is used by the authorization server to prepopulate the login form. For example, you can find login_hint=john.doe@example.com, telling the authorization server to show a login form with the username set to john.doe@example.com.
The request URI
The request_uri parameter has been introduced by the Pushed Authorization Requests (PAR) specification. This is a special parameter because it essentially replaces all other parameters except client_id. It is used in specific contexts where a high level of security is required. To learn more, I recommend reading this article about Pushed Authorization Requests (PAR).
In short, PAR allows the client application to pre-register an authorization request and receive a request identifier from the authorization server. The request_uri parameter allows you to specify the identifier of the already registered request and thus express the authorization request, as in the following example:
https://my-tenant.auth0.com/authorize?
client_id=32tqG0PwnSoA2Ly4sw
&request_uri=urn%3Aietf%3Aparams%3Aoauth...4ltcg4eY28s
The authorization server will use the identifier specified in the request_uri parameter to detect the registered authorization request and consider the associated parameters.
Want to get up to speed with OAuth2 and OpenID Connect?
Download the free ebook
Conclusion
Understanding the anatomy of the OAuth 2.0 authorization request is a foundational skill for any developer working with modern authentication and authorization. While SDKs simplify much of the implementation, knowing the purpose of each parameter—from client_id and response_type to scope and nonce—empowers you to troubleshoot effectively, design secure applications, and adapt to evolving standards like OAuth 2.1 and OpenID Connect. This knowledge moves you beyond simply using a library to truly mastering the underlying security flows that protect your applications and users.
About the author

Andrea Chiarelli
Principal Developer Advocate
I have over 20 years of experience as a software engineer and technical author. Throughout my career, I've used several programming languages and technologies for the projects I was involved in, ranging from C# to JavaScript, ASP.NET to Node.js, Angular to React, SOAP to REST APIs, etc.
In the last few years, I've been focusing on simplifying the developer experience with Identity and related topics, especially in the .NET ecosystem.