TL;DR: The official Auth0 MCP Server is available now. We’ll go over how you can use Claude Desktop, Cursor, Windsurf and other MCP Clients to securely manage your Auth0 tenant using natural language. Learn more with our Get Started guide.
We want to make it easier for you to secure your apps with Auth0. Maybe you use an AI tool to help test your code, write documentation, or just “vibe code” your way through a new proof-of-concept app. Imagine saying to your favorite AI tool:
“I want to create a mobile app with passkey and Google Sign-In, and access to an API with these scopes…”
and having Auth0 set up everything for you automatically.
Well, now you can.
We’re excited to introduce the Auth0 MCP Server, which enables AI tools like Claude Desktop, Cursor, Windsurf and other MCP Clients to securely configure your Auth0 tenant using natural language through the Model Context Protocol (MCP).
With the Auth0 MCP Server, you can delegate tasks like creating applications, configuring APIs, or deploying Auth0 Actions without exposing credentials and without interrupting your flow to interact with the Auth0 Dashboard.
MCP is just the bridge, what really matters is how effortlessly you can now configure Auth0.
If you want to understand more about MCP in general and how auth plays a role in the world of MCP read the following guide:
Discover the Model Context Protocol (MCP) and its authorization mechanisms. Learn how to use API keys, OAuth 2.1 implementation, and best practices for secure LLM API connections.
What Is the Auth0 MCP Server?
MCP is an open protocol that standardizes how AI applications talk and pass context along to an LLM. With the Auth0 MCP Server, you can use commands like the one below in the supported AI client of your preference:
“Create a new Auth0 application named staging-app with a callback URL of https://staging.example.com/callback.”
The Auth0 MCP Server will receive the request in the MCP format and turn them into actual Auth0 Management API calls while enforcing secure authentication, scoping, and permissions through OAuth 2.0.
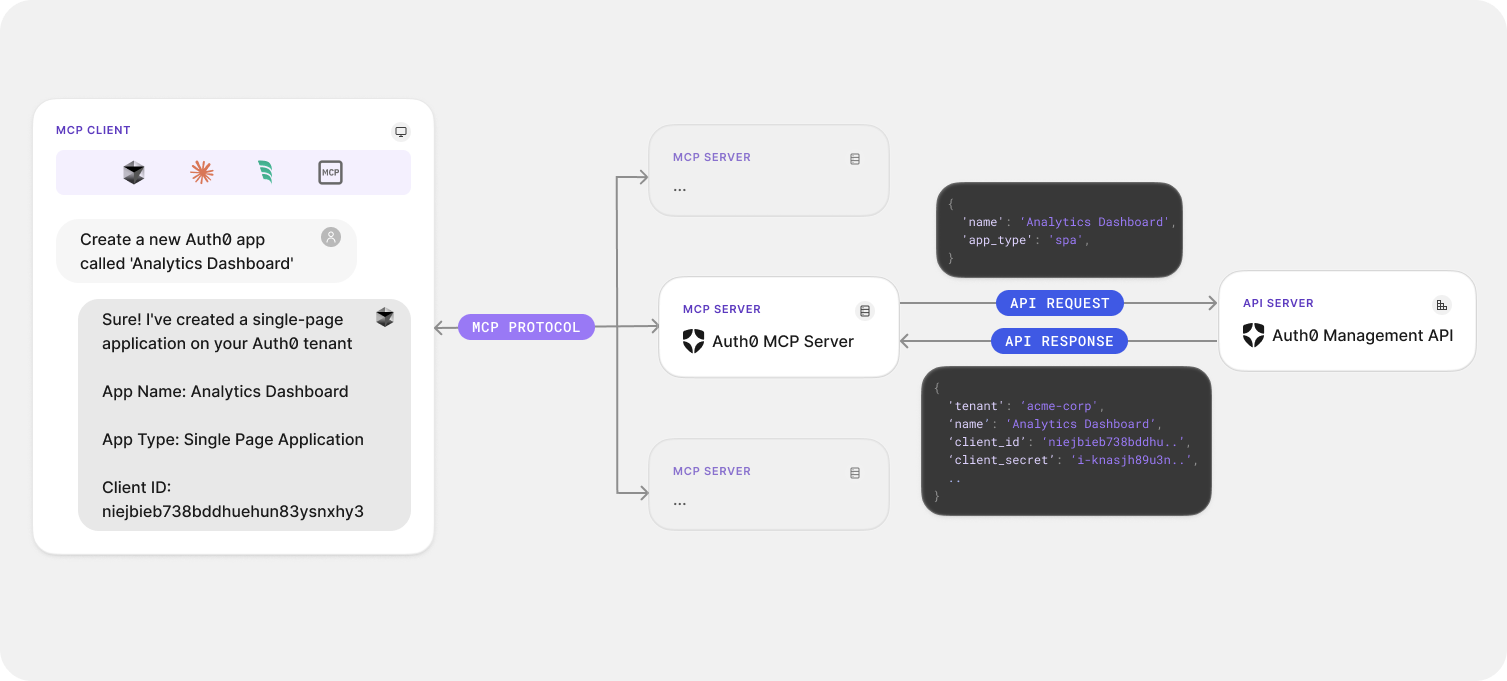
This means you can delegate identity management operations to your favourite supported AI tool without handing over raw API tokens or direct access to the Auth0 Management API.
What You Can Do with Auth0 MCP Server
With the Auth0 MCP Server, your AI tool can:
- List and manage Auth0 applications – List, create, update or Applications (Web Apps, Native, and SPAs)
- Access and configure APIs (Resource Servers) – Create, update or APIs
- Inspect tenant-level Auth0 Actions – List, update, or deploy Auth0 Actions in a tenant
- Interact with Tenant Logs – Get and search logs
- Manage Forms – List, create, update, or Auth0 Forms
These capabilities mean that Claude Desktop, Cursor, and others can become your personal Auth0-assistant, setting up configurations so that you can secure applications with Auth0 even faster. Imagine building your application in Cursor while telling Cursor to create the corresponding Auth0 Application with the necessary Callback URL and Logout URLs configuration in a single message.
Auth0 MCP Server Key Features
Secure Authentication
Uses Device Authorization Flow to give all supported AI tools scoped-access to your Auth0 account. This allows you to manage applications, APIs, Auth0 Actions, and more by prompting your AI tool to do so.
Protected Credentials
Stores credentials securely in the system keychain, preventing unauthorized access. Only the Auth0 MCP Server has access to the Auth0 access token and refresh token stored.
Comprehensive Tools
Supports a collection of operations for your Auth0 tenant management. CRUD operations for your APIs and applications protected with Auth0 through the Management API, deployment of tenant-level Auth0 Actions, and more. See the complete list of operations available here.
Seamless Integration
Follows the standard Model Context Protocol and allows you to work directly with any supported MCP Client. The Auth0 MCP Server setup will take care of making all the configuration for you so you can start prompting right away in Claude Desktop, Cursor, and Windsurf.
How The Auth0 MCP Server Works
Under the hood, the Auth0 MCP Server serves as a bridge between the MCP JSON schema and the Auth0 Management API.
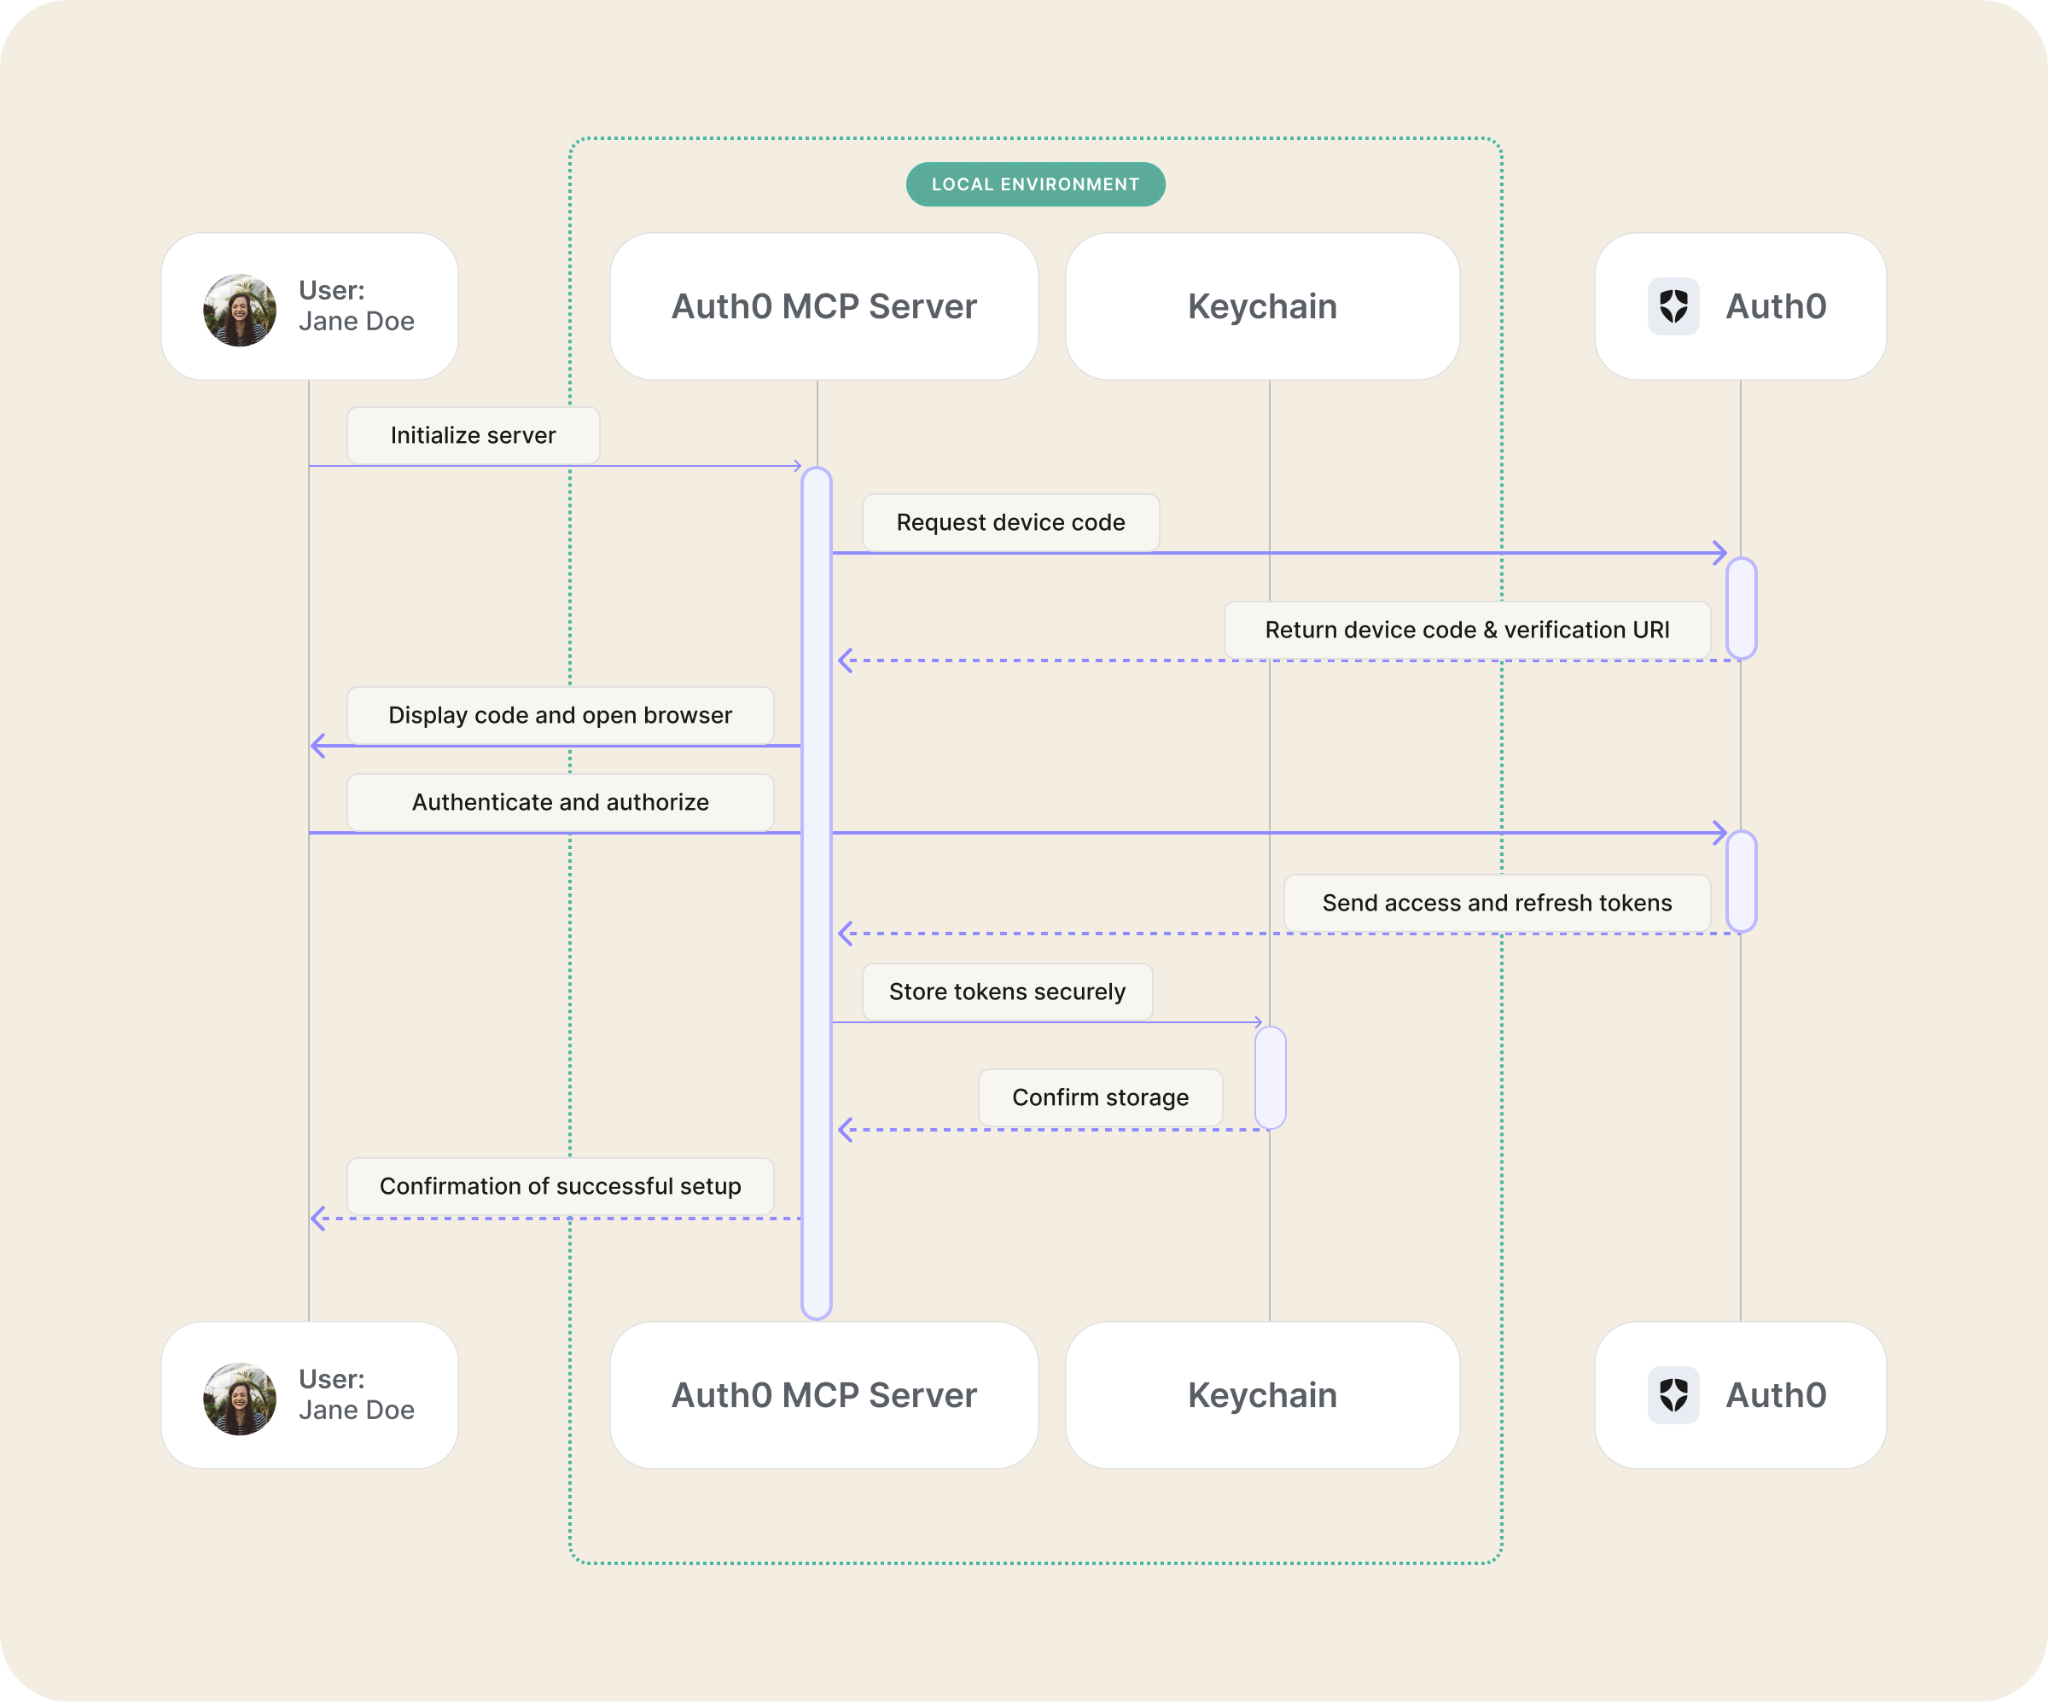
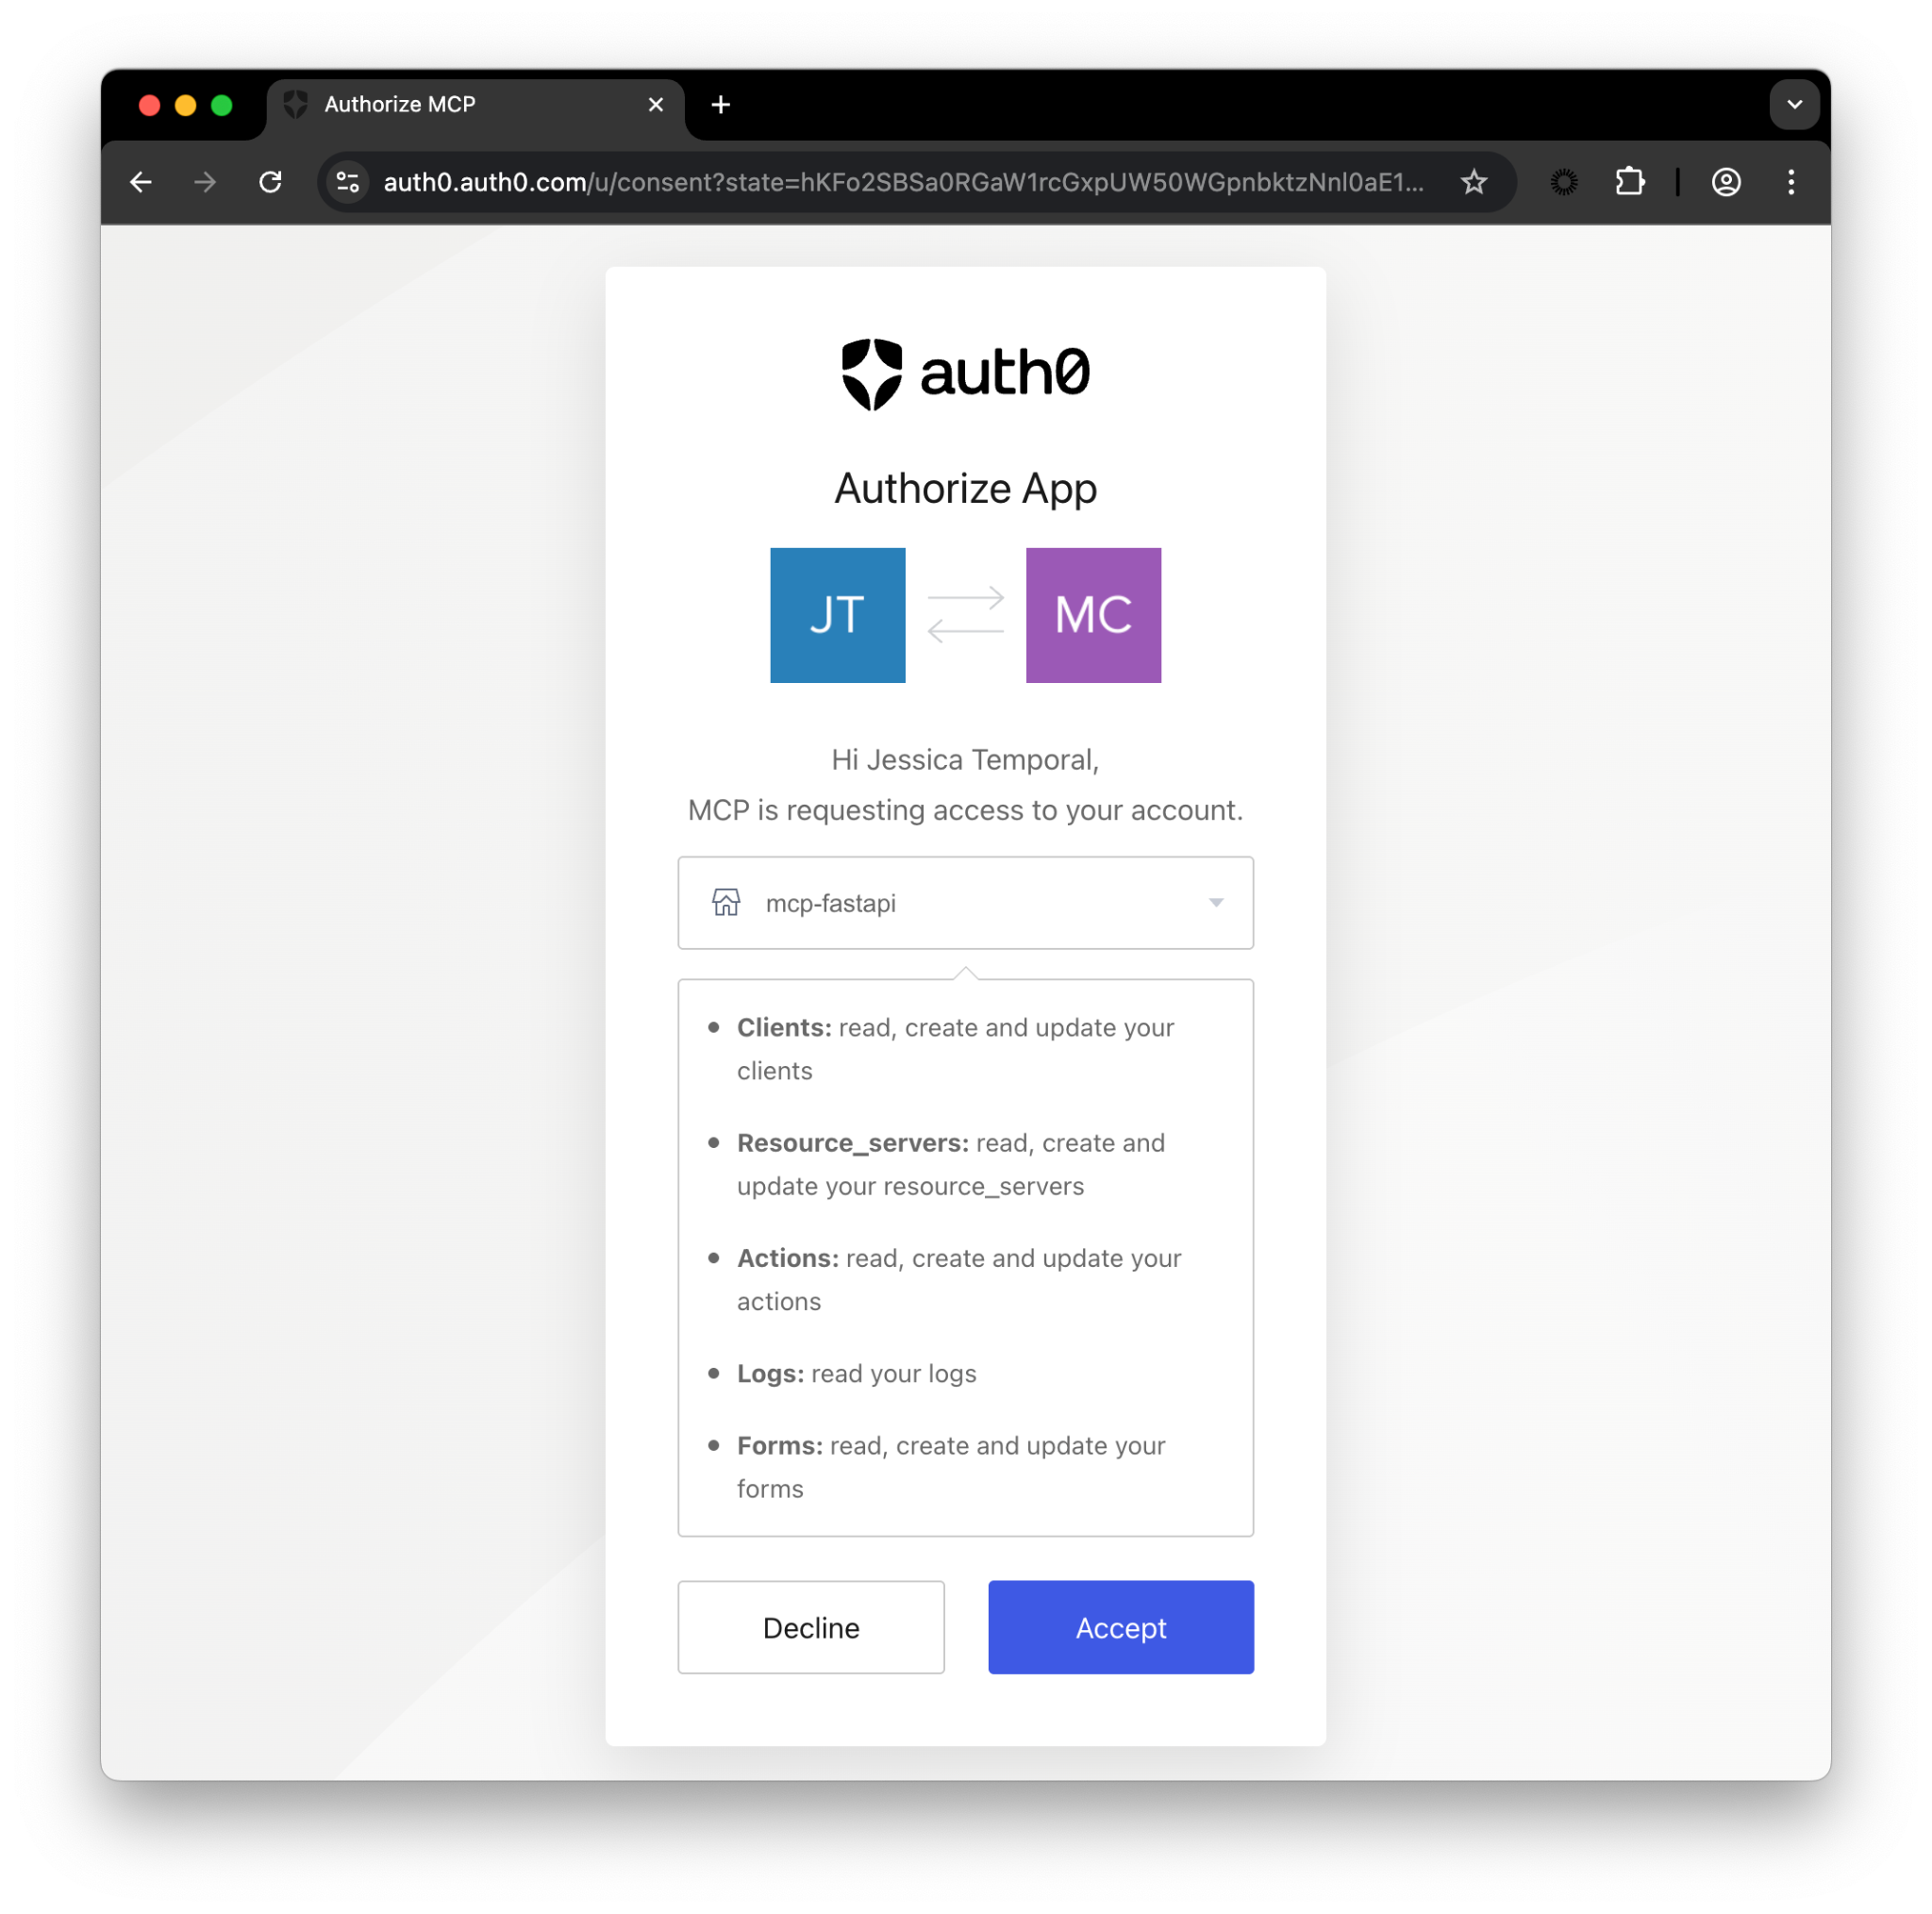
When you initialize the Auth0 MCP Server you’ll go through the device authorization flow: a browser window will open up for you to authenticate to Auth0 and choose your tenant. After authenticating, your credentials will be safely stored in your system’s keychain or equivalent app depending on your operating system. Once configuration is done, you’ll be able to interact with Auth0 through any supported AI tool and all of that without having to copy your API key.
No matter which tool you are using, all of them will follow a similar collection of steps as outlined above.
Getting Started with the Auth0 MCP Server
To get started with the Auth0 MCP Server, follow the steps below.
Prerequisites
- Node.js v18+
- Claude Desktop, Cursor, or Windsurf, or your favorite MCP host.
- Auth0 account
Install and Configure
Install and initialize the Auth0 MCP Server with a single command:
npx @auth0/auth0-mcp-server init
Then, you need to restart your tool for the updates to take effect. That’s it.
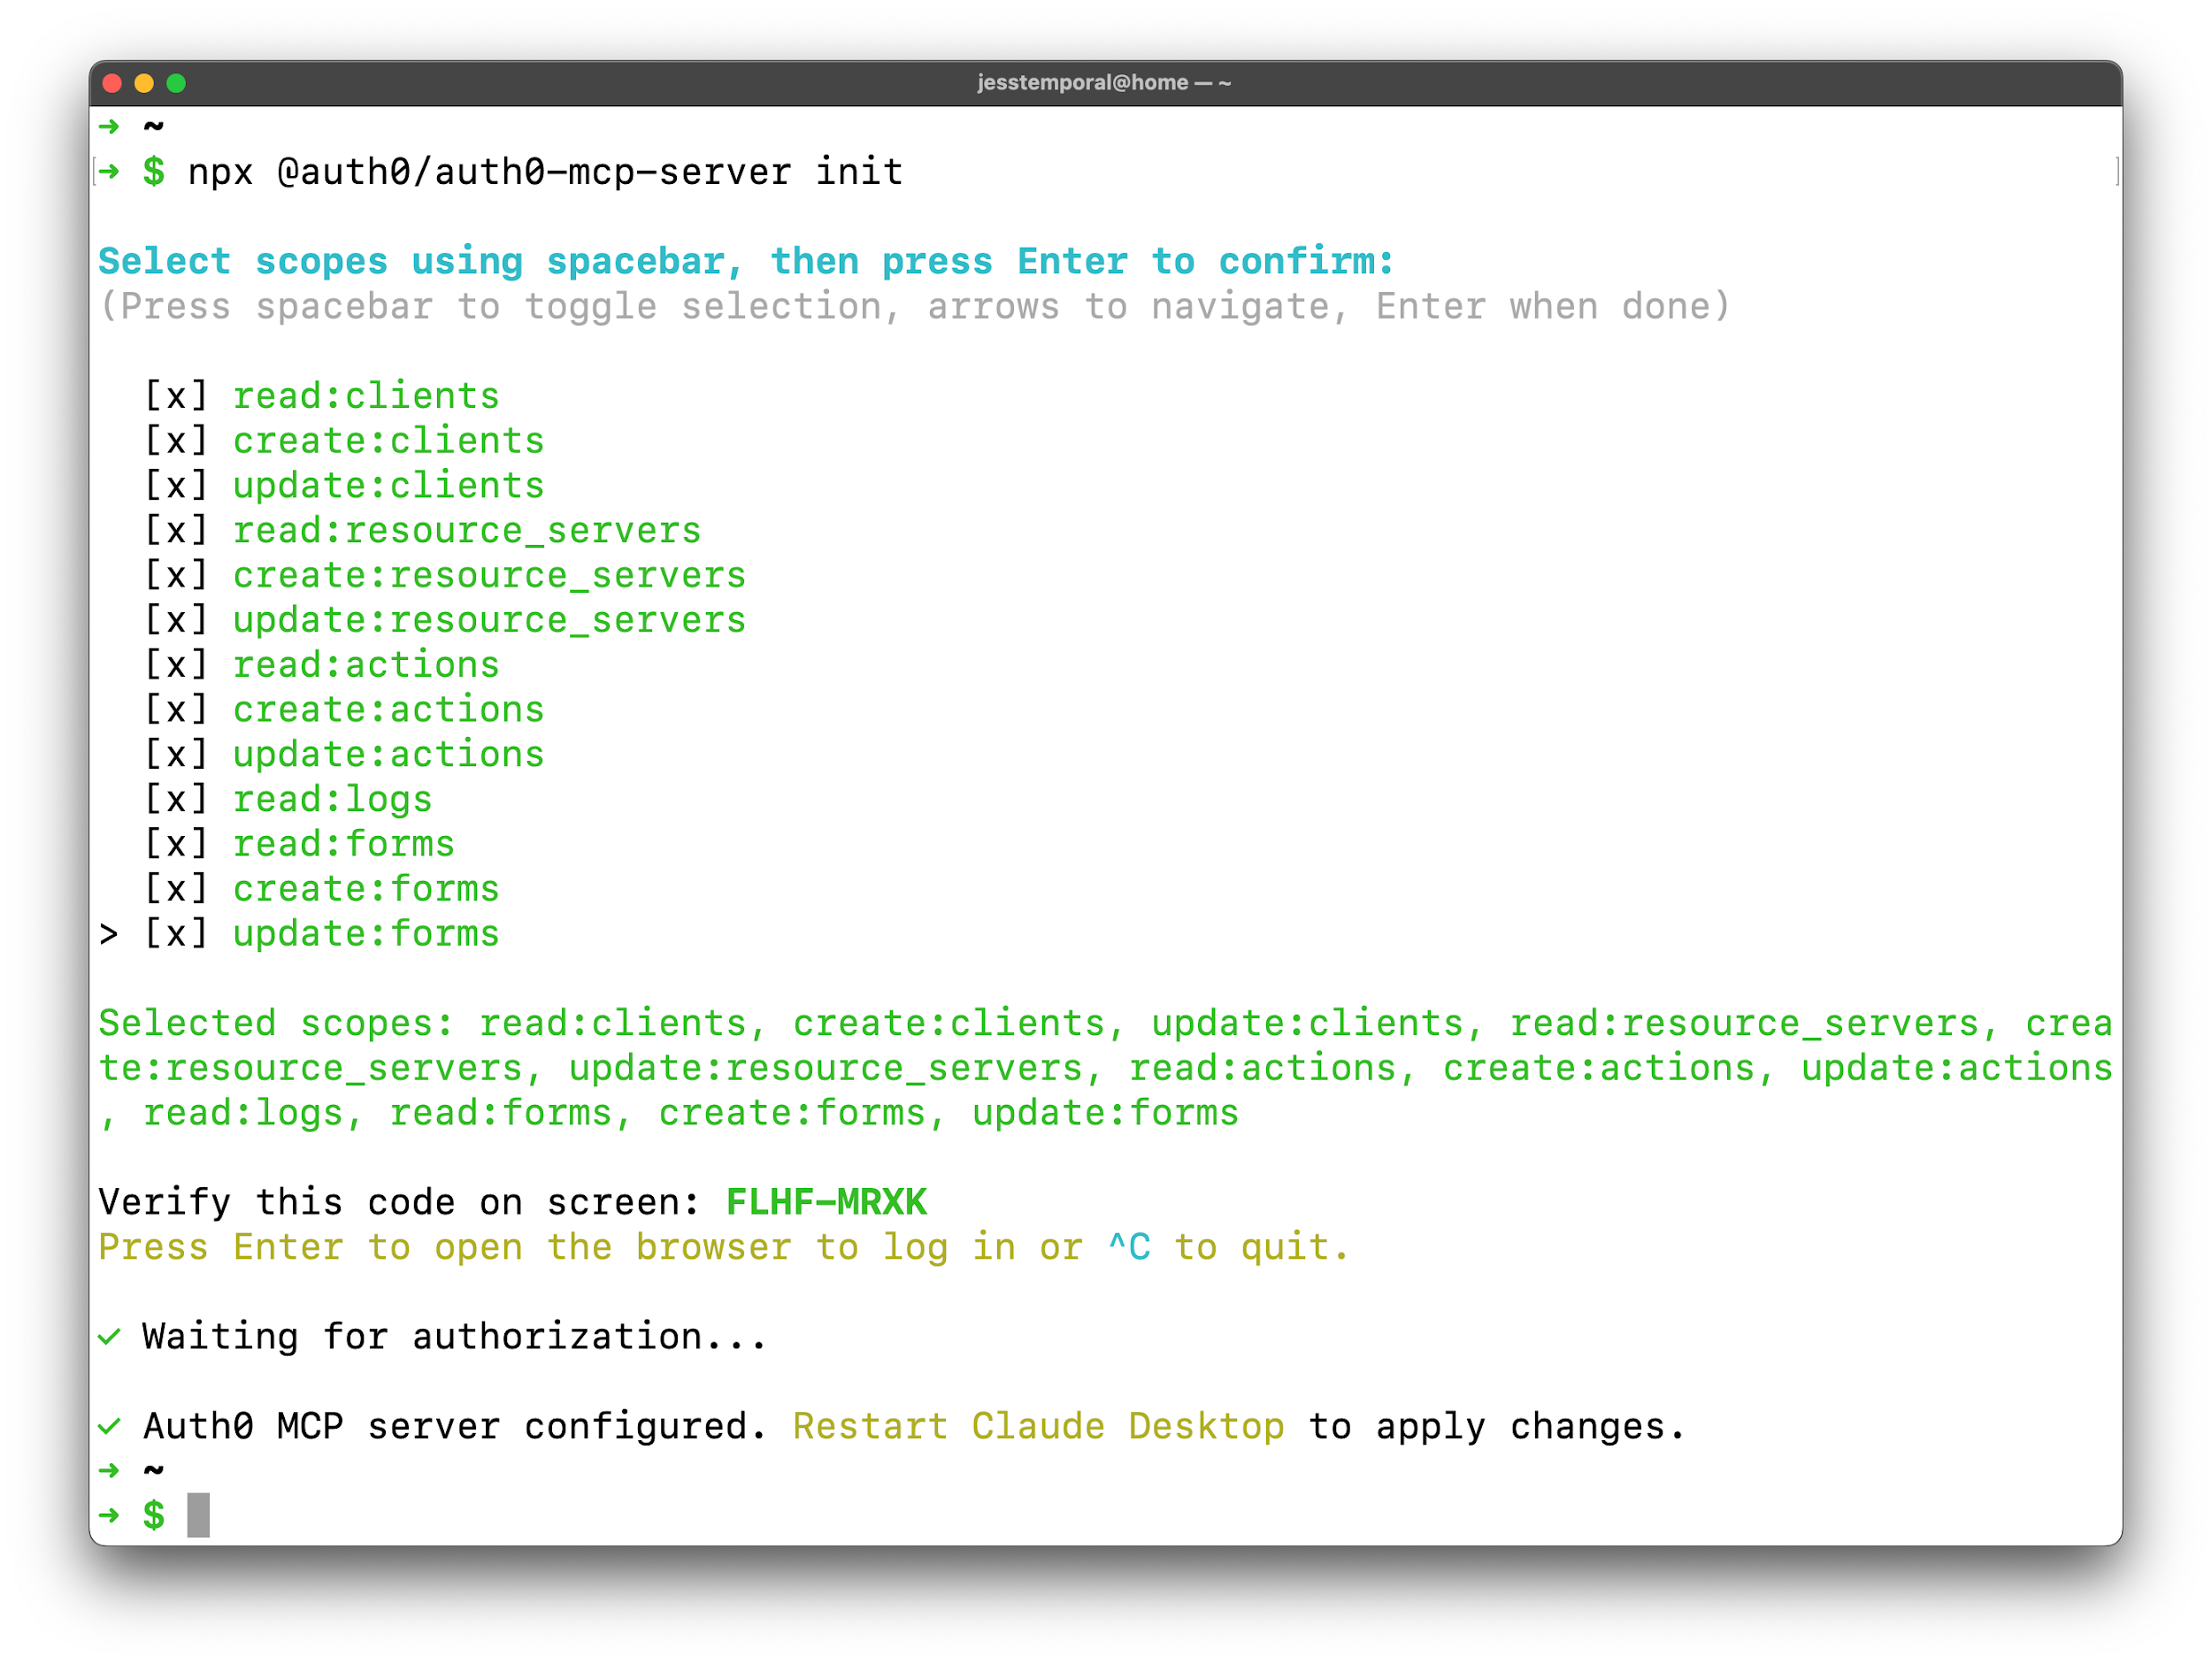
The initialization will:
- Start the device authorization flow;
- Open your browser for you to authenticate with Auth0, select your preferred Auth0 tenant, and confirm permissions on the consent screen;
- Store your credentials (Auth0 access token and refresh token) securely in your system's keychain;
- Create configurations for Claude Desktop to use the Auth0 MCP Server.
Since the stored credentials are an Auth0 access token and a refresh token, you don’t have to authenticate every time you want to use the MCP Server. The server will take care of getting new access tokens when they expire. Additionally, if you want to change the tenant you are currently using, run the init command again, this will allow you to select a different tenant.
The MCP Host you are using e.g.: Claude Desktop, identifies which MCP Server you want to use based on your prompt. The MCP Host will then use the configuration files to interact with that MCP Server. This is what a configuration file for Claude Desktop looks like:
{
  "mcpServers": {
    "auth0": {
      "command": "npx",
      "args": [
        "-y",
        "@auth0/auth0-mcp-server",
        "run"
      ],
      "capabilities": [
        "tools"
      ],
      "env": {
        "DEBUG": "auth0-mcp",
        "PATH": "..."
      }
    }
  }
}
For instructions on how to set up other clients read this documentation.
Let’s take a look at what happens when you want to use Cursor with the Auth0 MCP Server to secure a FastAPI web app:
- You initialize the Auth0 MCP Server passing Cursor as the client like so:
npx @auth0/auth0-mcp-server init --client cursor
And go through the authentication and selection of your tenant
- Then you open Cursor and implement your web app in FastAPI like you normally would and protect it using Auth0
Once implemented, you prompt Cursor to create a new Auth0 application with a prompt similar to this:
“Create a new Auth0 web app application named ‘My FastAPI App’, with a Callback URL http://localhost:4040/callback and an Allowed Logout URL http://localhost:4040 and make sure it is OIDC compliant and set the JWT to use
algRS256”In the background Cursor identifies the MCP Server you are trying to use then asks you to allow it to run the tool. Cursor shows you the parameters it is going to use, something like this:
{
  "name": "My FastAPI App",
  "app_type": "regular_web",
  "callbacks": [
    "http://localhost:4040/callback"
  ],
  "allowed_logout_urls": [
    "http://localhost:4040"
  ],
  "oidc_conformant": true,
  "jwt_configuration": {
    "alg": "RS256"
  }
}
You should double check the parameters, and then you can give your consent for Cursor to run the MCP tool call. It then passes the request in the MCP transport format to the Auth0 MCP Server
- The Auth0 MCP Server then maps the request from Cursor to the action in the Auth0 Management API and makes the request using the access tokens stored in the system’s keychain;
- Auth0 then checks the credentials and sends back the information to the Auth0 MCP Server which in turn passes the information in the MCP transport to Cursor;
- Cursor then takes the received information and transforms it in a natural language answer using the LLM to show the information of your recently created, it even asks if it should add that to your application environment.
You can see all of this happening in the video below:

This way Cursor never has access to the access tokens and the Auth0 MCP Server is the only one responsible for interacting with the Auth0 Management API.
Now that you’ve seen how it works you can tell that the possibilities are endless: Can you imagine telling your favorite AI IDE to build a mobile application with Auth0 and the application being built for you without you having to do any setup? We plan to cover this and how to leverage the Auth0 MCP Server with AI tools in future blog posts.
Recap
Most developers today are leveraging AI tools to write and test code even faster.
With the Auth0 MCP Server your MCP Hosts can safely, reliably, and intelligently manage your Auth0 configurations using natural language.
Identity management should be integrated in these tools so developers won’t compromise on security and still keep their productivity levels high.
Share feedback, ideas, and use cases below. We are looking forward to seeing what you’ll build and how you’ll use the Auth0 MCP Server.
Try It Now 👉 Check out the source code on GitHub and our Get Started guide
About the author

Jessica Temporal
Sr. Developer Advocate