TL;DR: Learn how to build and secure a Go API with JSON Web Tokens (JWTs) and consume it with a modern React UI. Users will authenticate on the React side with Auth0 and then make a request to the Go API by sending their access token along with the request. Check out the GitHub repo for the full code now.
Why Golang
Golang, or simply Go, is an open source programming language developed by Google for building modern software. Go is a language designed to get stuff done efficiently and fast. The key benefits of Golang include:
- Strongly typed and garbage collected
- Blazing fast compile times
- Concurrency built-in
- Extensive standard library
Go makes every attempt to reduce both the amount of typing needed and the complexity of its syntax. Variables can be declared and initialized easily with := syntax, semicolons are unnecessary, and there is no complex type hierarchy.
“. @golang is highly opinionated. The result is clean and easy to follow code.”
Tweet This
In this tutorial, you will be building a RESTful API in Go, so knowledge of the Go language is a prerequisite. It is out of the scope of this tutorial to cover the fundamentals of the Go programming language. If you are new to Go, check out the masterfully crafted Tour of Go, which covers everything from the basics to advanced topics such as concurrency, and then, you’ll be ready to proceed with this tutorial. If you are already somewhat familiar with Go, on the other hand, then let’s build an API!
Go is an excellent choice for building fast and scalable RESTful APIs. The net/http standard library provides key methods for interacting via the HTTP protocol. And augmented with the Gorilla Toolkit, you'll have an API up and running in no time. The app you are building today is called “We R VR.” The app allows virtual reality enthusiasts to provide feedback to developers on the games and experiences they are building.
Idiomatic Go prefers small libraries over large frameworks and the use of the standard library whenever possible. This article will adhere to these idioms as much as possible to ensure that the code samples are applicable across the Go ecosystem. With that said, a couple of handy libraries such as gorilla/mux for routing and dgrijalva/jwt-go for JSON Web Tokens will be used to speed up development.
Interested in getting up-to-speed with JWTs as soon as possible?
Download the free ebook
Golang frameworks
Before jumping into the code, I do want to point out that while idiomatic Go tends to shy away from large frameworks, it does not mean that no frameworks are written in Go. Beego, Gin Gionic, Echo, and Revel are just some of the more traditional web/api frameworks available. Since the net/http standard package already provides so much functionality, these frameworks tend to be built on top of it or at least use parts of the net/http package. Therefore, learning any or all of them will still be beneficial, as the skills will be applicable throughout your Go career.
Building an API in Go
Let's get started! First, you need to install Go.
Once Go is installed, there are two options to finish setup: Go Modules or GOPATH.
Setting up your GOPATH workspace can be a bit cumbersome, so Go introduced a new dependency management system, Go Modules, in version 1.11. This tutorial won't go too in depth about either setup method, but here are some excellent resources if you'd like to know more:
For this tutorial, we're going to use Go modules. Go ahead and set that up now. Make a new directory where the project will be stored. Next, create the main.go file, which will be your application starting point. Finally, initialize the Go modules for the project. This can be named anything for tutorial purposes, but normally you'd want this to be a repository URL (without the http://) because this allows the module to be available at that URL in case the code needs to be shared.
mkdir go-vr-auth
cd go-vr-auth
touch main.go
go mod init github.com/auth0-blog/go-vr-auth
For simplicity, you will write your entire application in your main.go file. Open up the main.go file that was just created and paste in the following:
package main

// Import our dependencies. We'll use the standard HTTP library as well as the gorilla router for this app
import (
    "encoding/json"
  "github.com/gorilla/mux"
  "net/http"
)

func main() {
  // Here we are instantiating the gorilla/mux router
  r := mux.NewRouter()

  // On the default page we will simply serve our static index page.
  r.Handle("/", http.FileServer(http.Dir("./views/")))
  // We will setup our server so we can serve static assest like images, css from the /static/{file} route
  r.PathPrefix("/static/").Handler(http.StripPrefix("/static/", http.FileServer(http.Dir("./static/"))))

  // Our application will run on port 8080. Here we declare the port and pass in our router.
  http.ListenAndServe(":8080", r)
}
Create two folders in the same directory that the main.go file is in and name them views and static. In the views folder, create a new file called index.html. Set up a simple index.html page with the following:
<!DOCTYPE html>
<head>
  <title>We R VR</title>
</head>
<body>
  <h1>Welcome to We R VR</h1>
</body>
Before you can run your application, you need to pull in the dependencies specified in main.go. In your terminal, run:
go get
Run the server with:
go run main.go
View it in browser at http://localhost:8080 and it should display "Welcome to We R VR"!
Note:
go runwill compile our code, create the binary file, and run it. For more information about Go commands, check out this excellent article, An Overview of Go Tooling.
Defining the API
With the foundation now in place, you can now define your API routes. This demo will stick to GET and POST requests. In addition to defining the routes, you’ll also implement a handler function called NotImplemented, which will be the default handler for routes with no custom functionality yet. Add this additional code to the main.go file now.
// imports here
func main(){
  // ...
    r := mux.NewRouter()
  r.Handle("/", http.FileServer(http.Dir("./views/")))

  ////////
  // NEW CODE
  ////////
  // Our API is going to consist of three routes
  // /status - which we will call to make sure that our API is up and running
  // /products - which will retrieve a list of products that the user can leave feedback on
  // /products/{slug}/feedback - which will capture user feedback on products
  r.Handle("/status", NotImplemented).Methods("GET")
  r.Handle("/products", NotImplemented).Methods("GET")
  r.Handle("/products/{slug}/feedback", NotImplemented).Methods("POST")

  // ...
}

// Here we are implementing the NotImplemented handler. Whenever an API endpoint is hit
// we will simply return the message "Not Implemented"
var NotImplemented = http.HandlerFunc(func(w http.ResponseWriter, r *http.Request){
  w.Write([]byte("Not Implemented"))
})
The Go API is shaping up nicely. Now restart the server (go run main.go) and try to access each of the three routes. For now, each route returns a 200 OK with the message Not Implemented. Go ahead and add the implementation for those now.
Adding functionality
You have your routes in place, but currently, they do nothing. Let’s change that. In this section, you will add the expected functionality to each of the routes.
// imports here

/* We will first create a new type called Product
   This type will contain information about VR experiences */
type Product struct {
    Id int
    Name string
    Slug string
    Description string
}

/* We will create our catalog of VR experiences and store them in a slice. */
var products = []Product{
  Product{Id: 1, Name: "World of Authcraft", Slug: "world-of-authcraft", Description : "Battle bugs and protect yourself from invaders while you explore a scary world with no security"},
  Product{Id: 2, Name: "Ocean Explorer", Slug: "ocean-explorer", Description : "Explore the depths of the sea in this one of a kind underwater experience"},
  Product{Id: 3, Name: "Dinosaur Park", Slug : "dinosaur-park", Description : "Go back 65 million years in the past and ride a T-Rex"},
  Product{Id: 4, Name: "Cars VR", Slug : "cars-vr", Description: "Get behind the wheel of the fastest cars in the world."},
  Product{Id: 5, Name: "Robin Hood", Slug: "robin-hood", Description : "Pick up the bow and arrow and master the art of archery"},
  Product{Id: 6, Name: "Real World VR", Slug: "real-world-vr", Description : "Explore the seven wonders of the world in VR"}}

func main() {
  // ...
}

var NotImplemented = http.HandlerFunc(func(w http.ResponseWriter, r *http.Request) {
    w.Write([]byte("Not Implemented"))
})

/* The status handler will be invoked when the user calls the /status route
   It will simply return a string with the message "API is up and running" */
var StatusHandler = http.HandlerFunc(func(w http.ResponseWriter, r *http.Request){
  w.Write([]byte("API is up and running"))
})

/* The products handler will be called when the user makes a GET request to the /products endpoint.
   This handler will return a list of products available for users to review */
var ProductsHandler = http.HandlerFunc(func(w http.ResponseWriter, r *http.Request){
  // Here we are converting the slice of products to JSON
  payload, _ := json.Marshal(products)

  w.Header().Set("Content-Type", "application/json")
  w.Write([]byte(payload))
})

/* The feedback handler will add either positive or negative feedback to the product
   We would normally save this data to the database - but for this demo, we'll fake it
   so that as long as the request is successful and we can match a product to our catalog of products we'll return an OK status. */
var AddFeedbackHandler = http.HandlerFunc(func(w http.ResponseWriter, r *http.Request){
  var product Product
  vars := mux.Vars(r)
  slug := vars["slug"]

  for _, p := range products {
      if p.Slug == slug {
          product = p
      }
  }

  w.Header().Set("Content-Type", "application/json")
  if product.Slug != "" {
    payload, _ := json.Marshal(product)
    w.Write([]byte(payload))
  } else {
    http.Error(w, http.StatusText(http.StatusNotFound), http.StatusNotFound)
  }
})
With your functions in place, go back to the routes and update them with the appropriate handler functions:
// ...

func main(){
  // ...
  r.Handle("/status", StatusHandler).Methods("GET")
  r.Handle("/products", ProductsHandler).Methods("GET")
  r.Handle("/products/{slug}/feedback", AddFeedbackHandler).Methods("POST")
  // ...
}
// ...
Restart the server and you should now see the products listed at http://localhost:8080/products. This means the handler is working correctly. But what exactly is a handler?
Handlers / middleware
In Go, middleware is referred to as handlers. It is abstracted code that runs before the intended code is executed. For example, you may have a logging middleware that logs information about each request. You wouldn't want to implement the logging code for each route individually, so you would write a middleware function that gets inserted before the main function of the route is called that would handle the logging.
“In Go, middleware is referred to as handlers.”
Tweet This
You will use custom handlers further down in the tutorial to secure your API.
Middleware libraries
This tutorial has been sticking to net/http as much as possible for its implementation, but there are many options for handling middleware in Auth0. You've seen the pure implementation in Golang by wrapping the middleware function around the intended function. Negroni and Alice are two excellent alternatives to handling middleware in Golang.
Now that you have your API set up, you can shift focus to the frontend, which is what will consume the API.
Building the UI with React
An API is only as good as the frontend that consumes it. In this tutorial, you will build your UI with React. Because this tutorial is primarily focused on Go, it won't go into too much detail about the ins-and-outs of the React application. However, the complete instructions showing how to build the React portion will be listed, so you can still follow along if you don't have React experience. If you're interested in a beginner's guide, check out the official React tutorial. The Golang API will work with any frontend, so feel free to implement the UI with any frontend technology you are comfortable with.
“An API is only as good as the frontend that consumes it.”
Tweet This
Getting started
If you don't already have a frontend in mind and want to follow this tutorial, go ahead and set up a default React App using create-react-app. Navigate to the static folder that you created earlier and run:
npx create-react-app .
cd static
npm start
First, install the dependencies needed on the React side.
npm install react-router-dom @auth0/auth0-spa-js bootstrap react-icons
@auth0/auth0-spa-js— Auth0's JavaScript SDK for SPAsreact-router-dom— React's router packagebootstrap— For quick styling (optional)react-icons— Add icons to the app (optional)
Now set up the components.
Setting up components
Your application will allow the user to view and leave feedback on VR products. Users must be logged in before they can leave feedback.
You will need to build 3 components:
App— to launch the applicationHome— will be displayed for non-logged in usersLoggedIn— will display the products available for review for authenticated users
First, create a new folder inside src called components.
mkdir src/components
Now make the two component files (App already exists):
cd src/components
touch Home.js LoggedIn.js
Setting up Auth0
Because some of the components will be depending on the authentication state, go ahead and set up the Auth0 React wrapper. Create a new file in src called react-auth0-spa.js:
cd ..
touch react-auth0-spa.js
Open it up and paste in the following:
// src/react-auth0-spa.js
import React, { useState, useEffect, useContext } from "react";
import createAuth0Client from "@auth0/auth0-spa-js";
const DEFAULT_REDIRECT_CALLBACK = () =>
  window.history.replaceState({}, document.title, window.location.pathname);
export const Auth0Context = React.createContext();
export const useAuth0 = () => useContext(Auth0Context);
export const Auth0Provider = ({
  children,
  onRedirectCallback = DEFAULT_REDIRECT_CALLBACK,
  ...initOptions
}) => {
  const [isAuthenticated, setIsAuthenticated] = useState();
  const [user, setUser] = useState();
  const [auth0Client, setAuth0] = useState();
  const [loading, setLoading] = useState(true);
  const [popupOpen, setPopupOpen] = useState(false);
  useEffect(() => {
    const initAuth0 = async () => {
      const auth0FromHook = await createAuth0Client(initOptions);
      setAuth0(auth0FromHook);
      if (window.location.search.includes("code=") &&
          window.location.search.includes("state=")) {
        const { appState } = await auth0FromHook.handleRedirectCallback();
        onRedirectCallback(appState);
      }
      const isAuthenticated = await auth0FromHook.isAuthenticated();
      setIsAuthenticated(isAuthenticated);
      if (isAuthenticated) {
        const user = await auth0FromHook.getUser();
        setUser(user);
      }
      setLoading(false);
    };
    initAuth0();
    // eslint-disable-next-line
  }, []);
  const loginWithPopup = async (params = {}) => {
    setPopupOpen(true);
    try {
      await auth0Client.loginWithPopup(params);
    } catch (error) {
      console.error(error);
    } finally {
      setPopupOpen(false);
    }
    const user = await auth0Client.getUser();
    setUser(user);
    setIsAuthenticated(true);
  };
  const handleRedirectCallback = async () => {
    setLoading(true);
    await auth0Client.handleRedirectCallback();
    const user = await auth0Client.getUser();
    setLoading(false);
    setIsAuthenticated(true);
    setUser(user);
  };
  return (
    <Auth0Context.Provider
      value={{
        isAuthenticated,
        user,
        loading,
        popupOpen,
        loginWithPopup,
        handleRedirectCallback,
        getIdTokenClaims: (...p) => auth0Client.getIdTokenClaims(...p),
        loginWithRedirect: (...p) => auth0Client.loginWithRedirect(...p),
        getTokenSilently: (...p) => auth0Client.getTokenSilently(...p),
        getTokenWithPopup: (...p) => auth0Client.getTokenWithPopup(...p),
        logout: (...p) => auth0Client.logout(...p)
      }}
    >
      {children}
    </Auth0Context.Provider>
  );
};
This wrapper creates functions that easily integrate with the rest of the React components to allow the user to log in and log out as well as display user information.
Now create another file that will help handle redirects after a user signs in.
Create a new file called history.js in the src directory.
touch history.js
Now paste in the following:
// src/history.js

import { createBrowserHistory } from "history";
export default createBrowserHistory();
Next, you need to integrate the Auth0 SDK into the React application.
Open up src/index.js and replace it with:
// src/index.js
import 'bootstrap/dist/css/bootstrap.css';
import React from "react";
import ReactDOM from "react-dom";
import App from "./App";
import * as serviceWorker from "./serviceWorker";
import { Auth0Provider } from "./react-auth0-spa";
import config from "./auth_config.json";
import history from "./history";

// A function that routes the user to the right place
// after login
const onRedirectCallback = appState => {
  history.push(
    appState && appState.targetUrl
      ? appState.targetUrl
      : window.location.pathname
  );
};

// Wrap App in the Auth0Provider component
// The domain and client_id values will be found in your Auth0 dashboard
ReactDOM.render(
  <Auth0Provider
    domain={config.domain}
    client_id={config.clientId}
    redirect_uri={window.location.origin}
    onRedirectCallback={onRedirectCallback}
  >
    <App />
  </Auth0Provider>,
  document.getElementById("root")
);

serviceWorker.unregister();
This wraps the <App> component in the <Auth0Provider> component. You now need to fill in the domain and client_id values.
If you haven't already, sign up for a free Auth0 account now.
Try out the most powerful authentication platform for free.
Get started →- Once you're in the dashboard, click on Create Application in the top right corner.
- Name your application "React Go App" or anything you'd like.
- Select "Single Page Web Applications", and click "Create".
- Click on "Settings".
- Scroll down and fill in Allowed Callback URLs, Allowed Logout URLs, and Allowed Web Origins with
http://localhost:3000or whatever you're using for your React application. - Click "Save changes" and scroll back up to the top.
You need to grab the Client ID and Domain values and pull them into your React app.
Instead of dropping these straight into src/index.js, create a new file, auth_config.json in the src directory:
touch auth_config.json
These aren't necessarily sensitive values, but it's still best practice to not commit them to a GitHub repository. With this new file, you can add it to your .gitignore to keep it out of your repo.
Open up the newly created auth_config.json and paste in the following:
{
  "domain": "YOUR_DOMAIN",
  "clientId": "YOUR_CLIENT_ID"
}
Replace these two values with the two from your own Auth0 dashboard.
Now go ahead and fill in the components to see it all come together.
App component
The App component is going to kick off your React application. Open up src/components/App.js and replace it with:
import React from 'react';
import './App.css';
import Home from './components/Home.js';
import LoggedIn from './components/LoggedIn.js';
import { useAuth0 } from "./react-auth0-spa";

const App = () => {
  const { isAuthenticated } = useAuth0();

  const { loading } = useAuth0();

  if (loading) {
    return <div>Loading...</div>;
  }

  return (
    <div className="App">
      {!isAuthenticated && (
        <Home />
      )}

      {isAuthenticated && <LoggedIn />}
    </div>
  );
};

export default App;
Home component
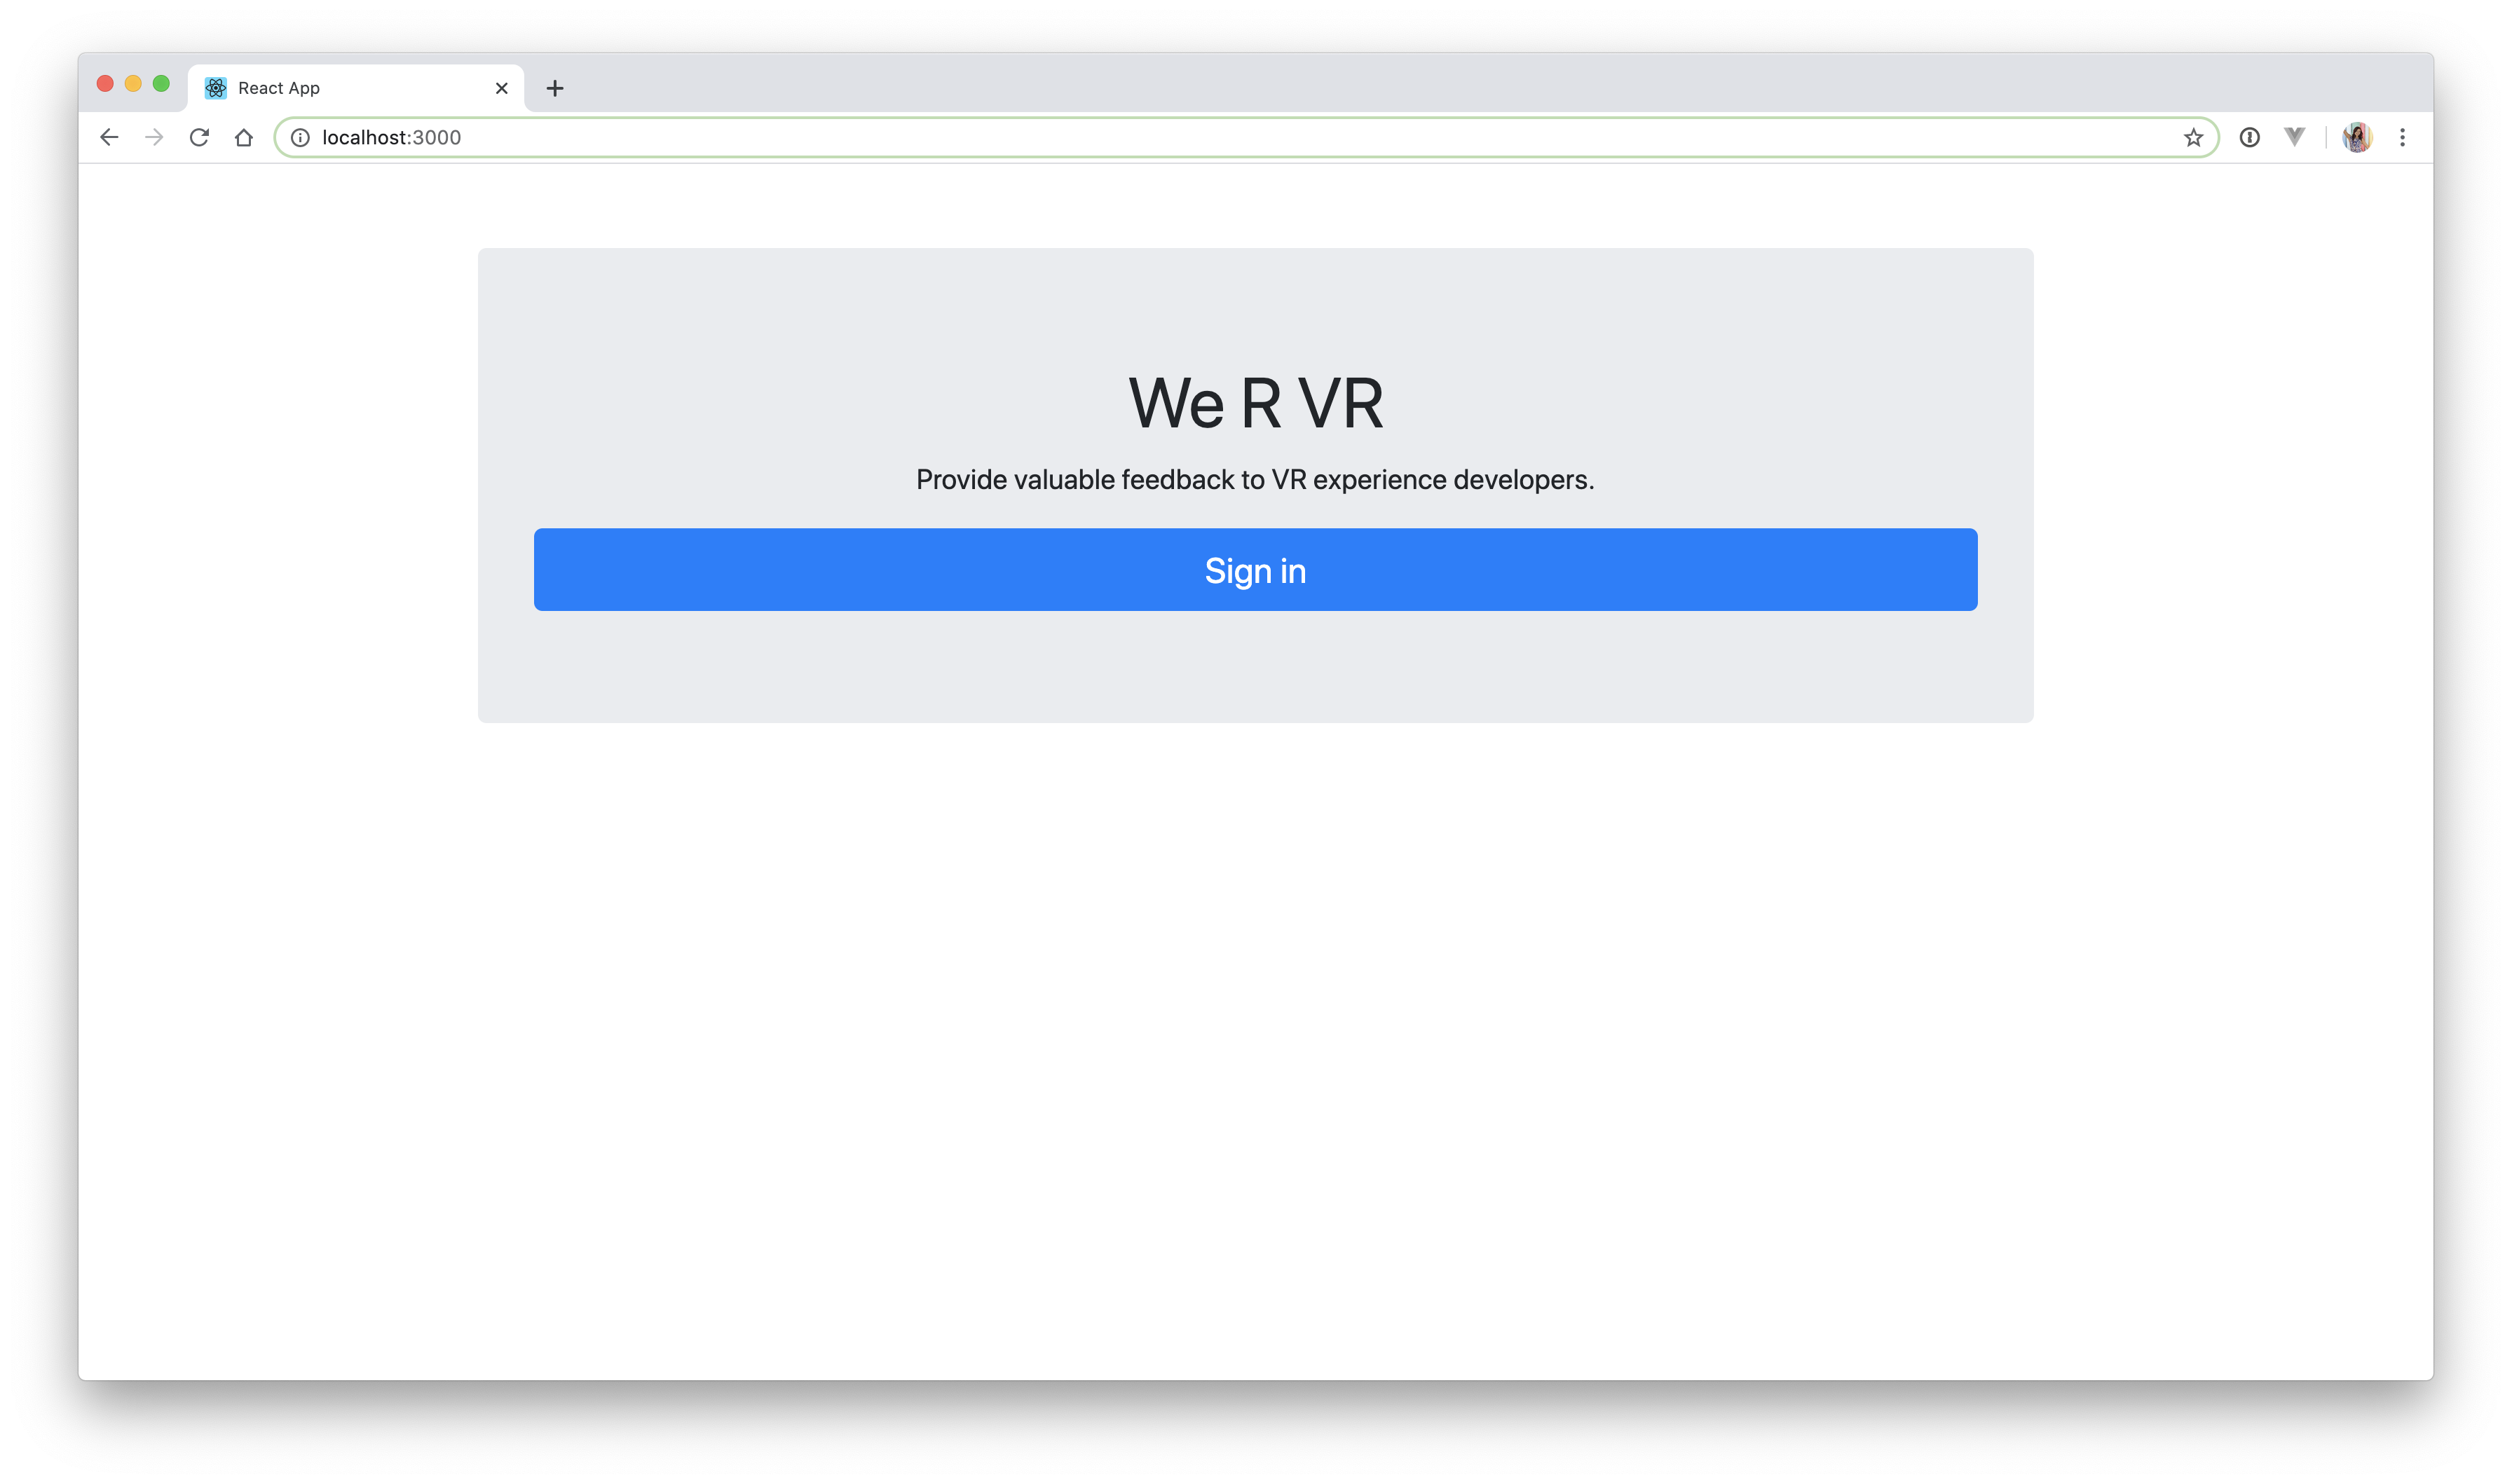
The Home component will be displayed when a user is not yet logged in. Open up src/components/Home.js and paste in:
import React, { Fragment } from "react";
import { useAuth0 } from "../react-auth0-spa";

const Home = () => {
  const { isAuthenticated, loginWithRedirect, logout } = useAuth0();
  return (
    <Fragment>
      <div className="container">
        <div className="jumbotron text-center mt-5">
          <h1>We R VR</h1>
          <p>Provide valuable feedback to VR experience developers.</p>
          {!isAuthenticated && (
            <button className="btn btn-primary btn-lg btn-login btn-block" onClick={() => loginWithRedirect({})}>Sign in</button>
          )}
        </div>
      </div>
    </Fragment>
  );
};

export default Home;
LoggedIn component
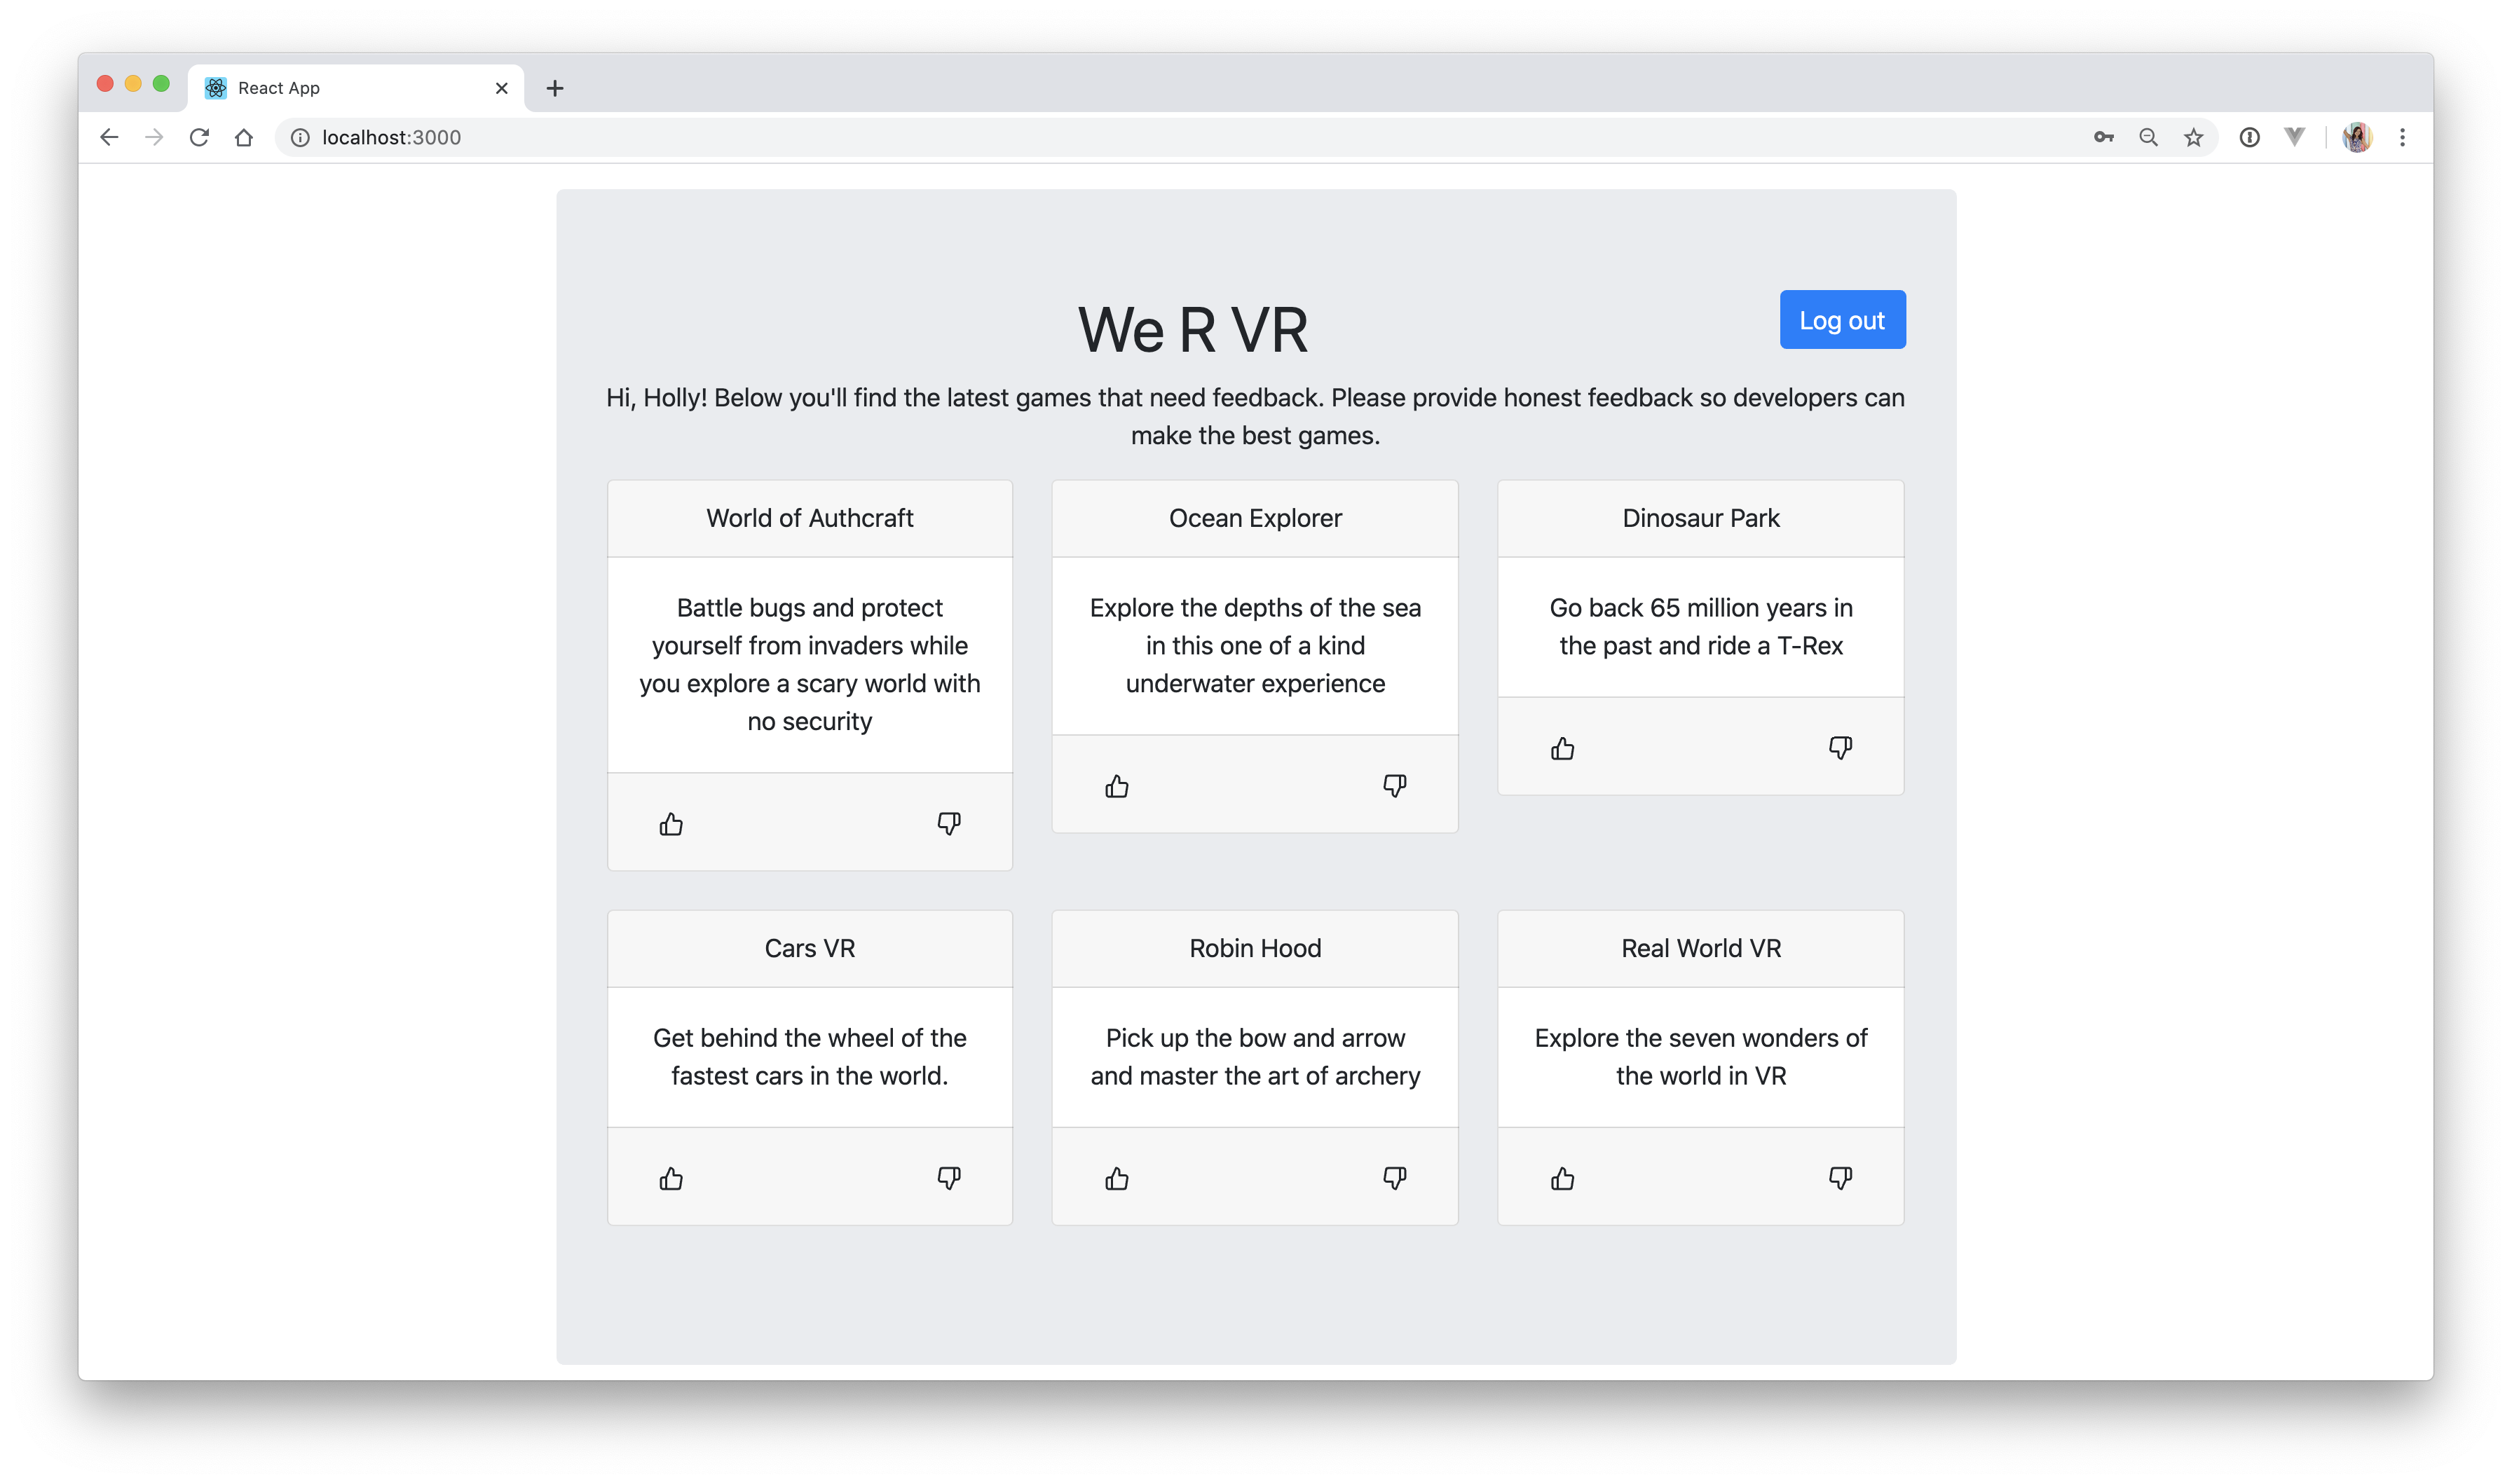
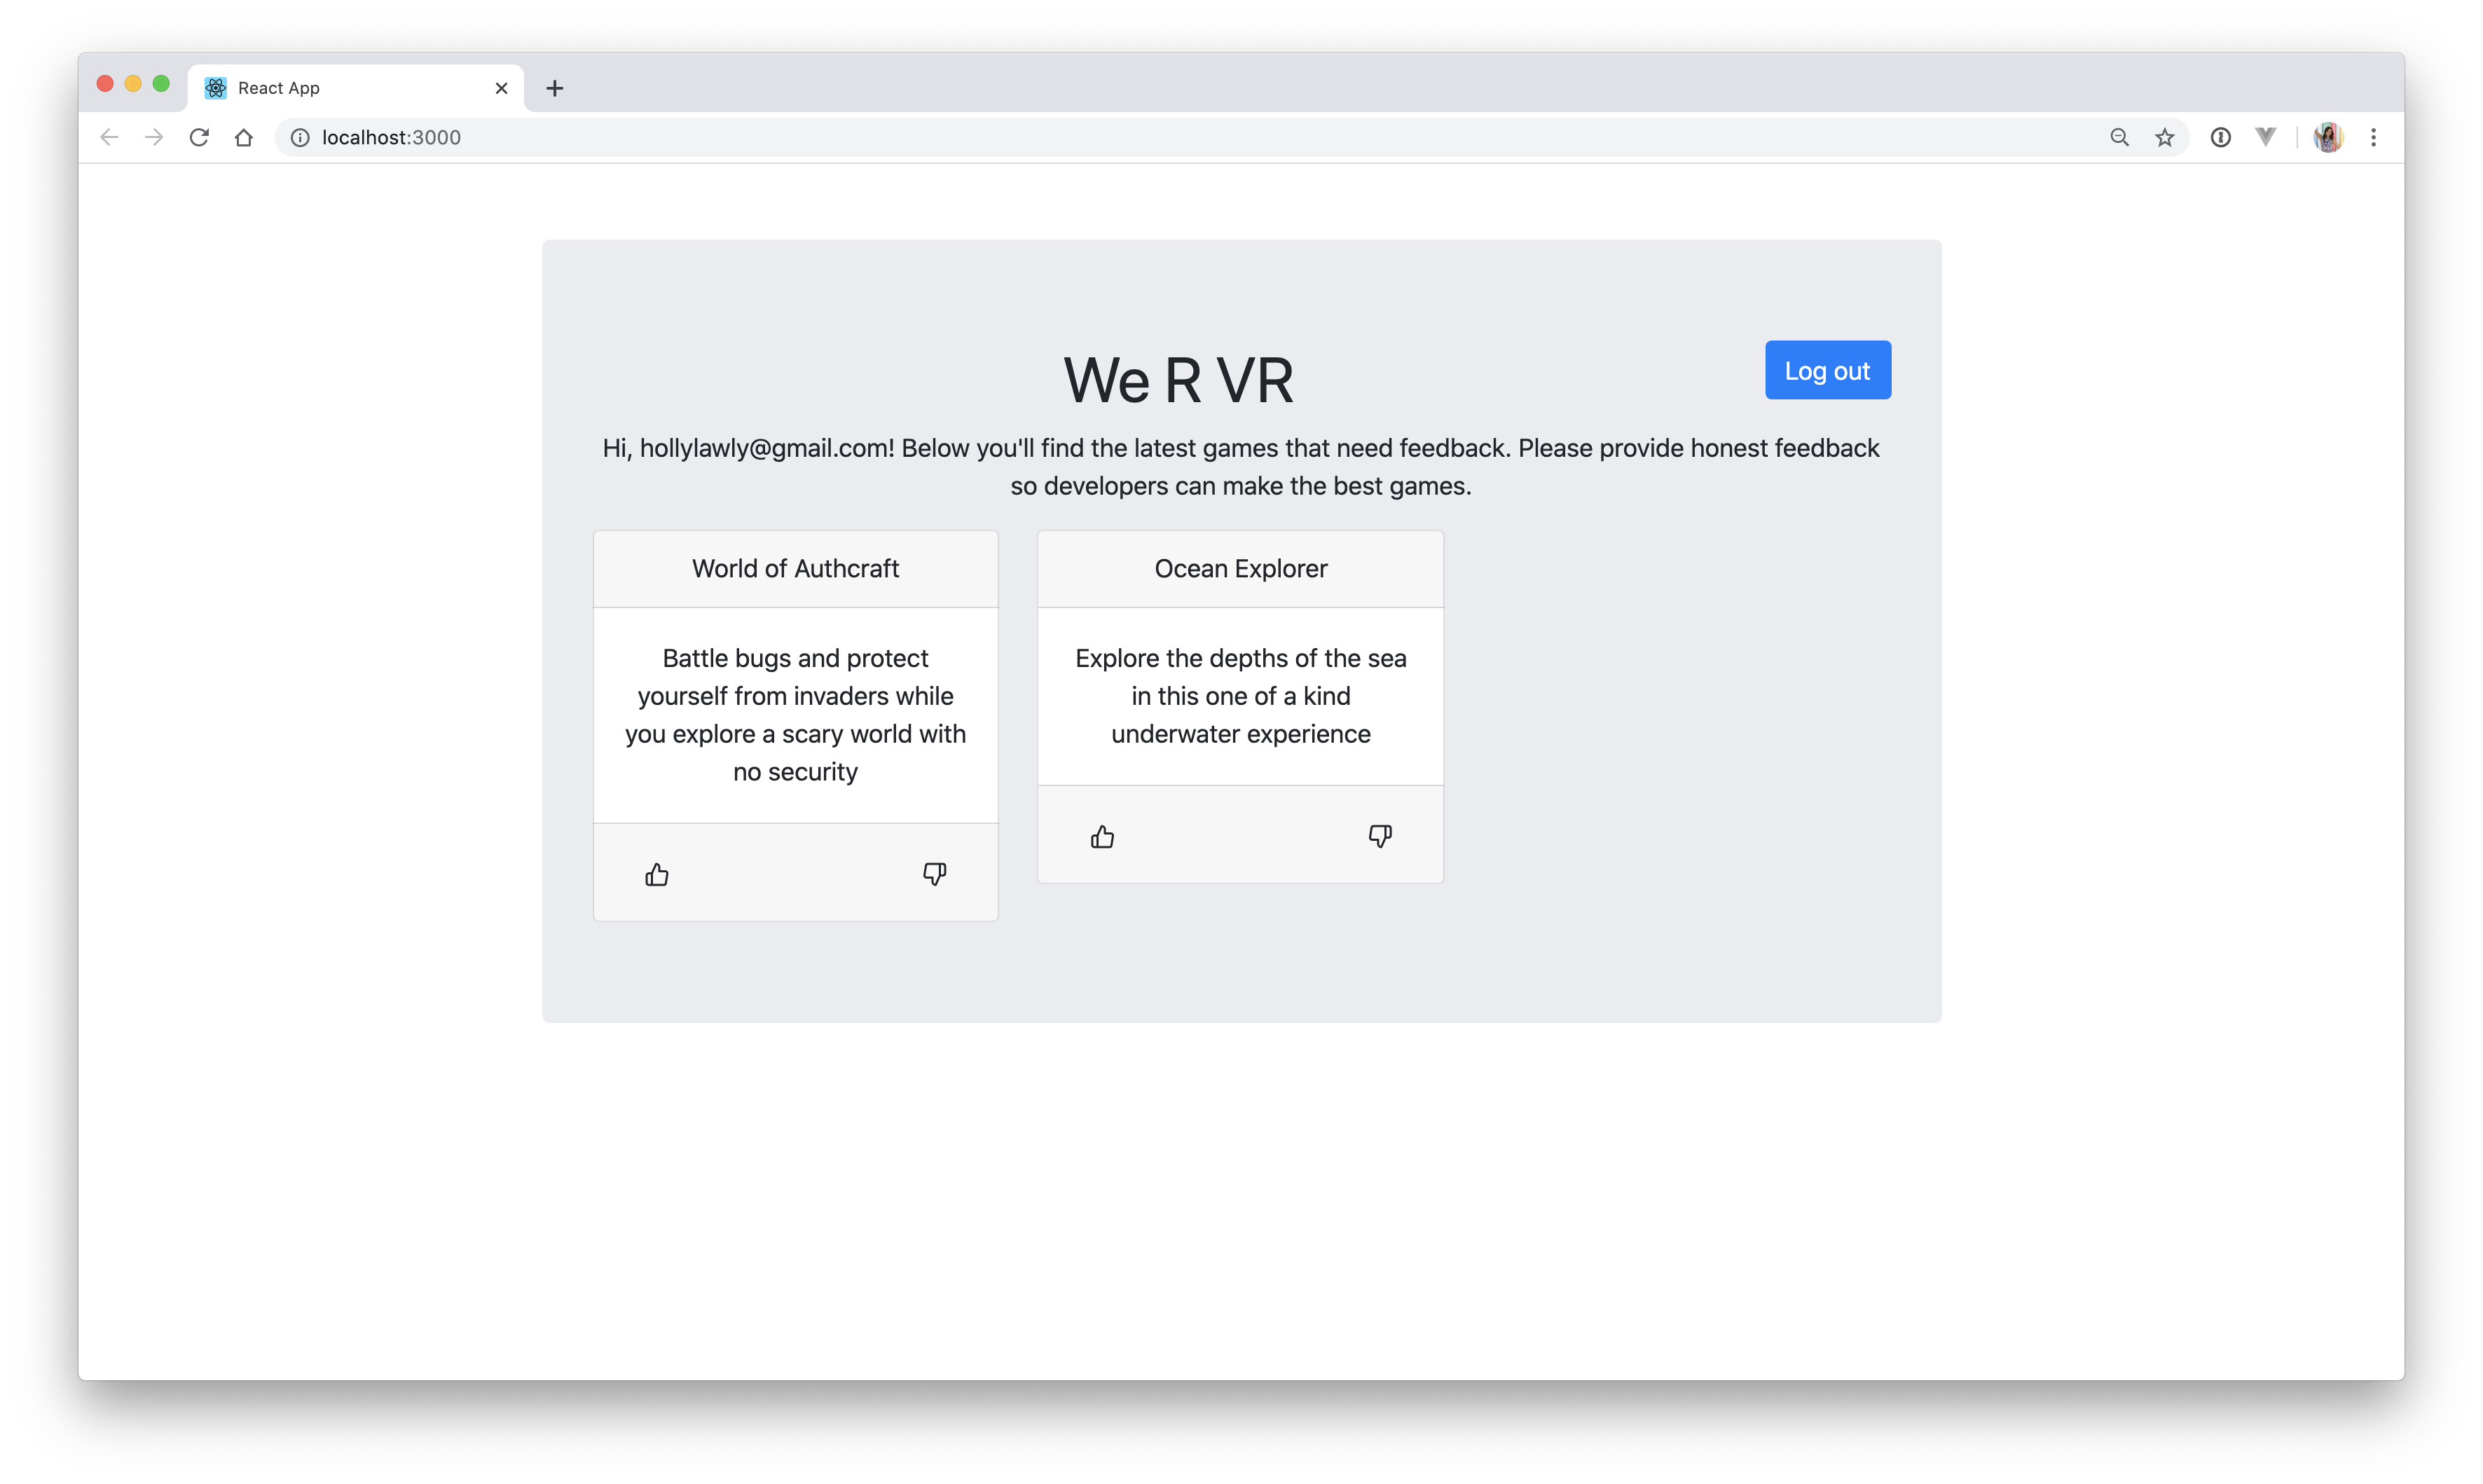
The LoggedIn component will be displayed when a user has a valid access token, which means they are logged in. This could be split into multiple components, but this tutorial will just keep it all together for simplicity. Open src/components/LoggedIn.js and paste in the following:
import React, { useState } from "react";
import { useAuth0 } from "../react-auth0-spa";
import { FiThumbsUp, FiThumbsDown } from 'react-icons/fi';

const LoggedIn = () => {
  const [voted, setVoted] = useState(['']);
  const [products, setProducts] = useState([
    {
      id: 1,
      Name: "World of Authcraft",
      Slug: "world-of-authcraft",
      Description:
        "Battle bugs and protect yourself from invaders while you explore a scary world with no security",
    },
    {
      id: 2,
      Name: "Ocean Explorer",
      Slug: "ocean-explorer",
      Description:
        "Explore the depths of the sea in this one of a kind underwater experience",
    },
  ]);

  const { getTokenSilently, loading, user, logout, isAuthenticated } = useAuth0();

  const vote = (type) => {
    alert(type);
  }

  if (loading || !user) {
    return <div>Loading...</div>;
  }

  return (
    <div className="container">
      <div className="jumbotron text-center mt-5">
        {isAuthenticated && <span className="btn btn-primary float-right" onClick={() => logout()}>Log out</span>}
        <h1>We R VR</h1>
        <p>
          Hi, {user.name}! Below you'll find the latest games that need feedback. Please provide honest feedback so developers can make the best games.
        </p>
        <div className="row">
          {products.map(function (product) {
            return (
              <div className="col-sm-4">
                <div className="card">
                  <div className="card-header">
                    {product.Name}
                    <span className="float-left">{voted}</span>
                  </div>
                  <div className="card-body">{product.Description}</div>
                  <div className="card-footer">
                    <a onClick={() => vote("Upvoted")} className="btn btn-default float-left">
                        <FiThumbsUp />
                    </a>
                    <a onClick={() => vote("Downvoted")} className="btn btn-default float-right">
                      <FiThumbsDown />
                    </a>
                  </div>
                </div>
              </div>
            );
          })}
        </div>
      </div>
    </div>
  );
};

export default LoggedIn;
There is currently some mock product data used for display purposes. Once you connect this to your backend, you'll pull this data from the API instead.
Note: Never rely on the frontend to protect sensitive data. Hard-coded data like this will still be accessible if someone reads through your source code. Any data that you want protected should always be sent from the backend, pending proper authorization.
Now it's time to test this out. Start the React application in the terminal with:
npm start
You can now sign in and view the page with the two sample games. Click on the thumbs up or down icons, and it will fire an alert.
Because you only want authorized users to be able to view and interact with the VR game data, you need to secure it from the backend. Go ahead and jump back to the Golang side and set that up.
Authorization with Golang
Adding authorization will allow you to protect your API. Since your app deals with projects that are in active development, you don’t want any data to be publicly available.
You've already accomplished the first step, which requires the user to sign in to your React application. The next step is to pull the data from the Go application, but only if the user has a valid access token.
First, clean up the Go API code from the previous section. Replace everything in main.go with the following:
package main

// Import our dependencies. We'll use the standard HTTP library as well as the gorilla router for this app
import (
  "encoding/json"
  "errors"
  "github.com/auth0/go-jwt-middleware"
  "github.com/dgrijalva/jwt-go"
  "github.com/gorilla/handlers"
  "github.com/gorilla/mux"
  "github.com/rs/cors"
  "net/http"
)

/* We will first create a new type called Product
   This type will contain information about VR experiences */
type Product struct {
    Id          int
    Name        string
    Slug        string
    Description string
}

var products = []Product{
    Product{Id: 1, Name: "World of Authcraft", Slug: "world-of-authcraft", Description: "Battle bugs and protect yourself from invaders while you explore a scary world with no security"},
    Product{Id: 2, Name: "Ocean Explorer", Slug: "ocean-explorer", Description: "Explore the depths of the sea in this one of a kind underwater experience"},
    Product{Id: 3, Name: "Dinosaur Park", Slug: "dinosaur-park", Description: "Go back 65 million years in the past and ride a T-Rex"},
    Product{Id: 4, Name: "Cars VR", Slug: "cars-vr", Description: "Get behind the wheel of the fastest cars in the world."},
    Product{Id: 5, Name: "Robin Hood", Slug: "robin-hood", Description: "Pick up the bow and arrow and master the art of archery"},
    Product{Id: 6, Name: "Real World VR", Slug: "real-world-vr", Description: "Explore the seven wonders of the world in VR"},
}

func main() {

  jwtMiddleware := jwtmiddleware.New(jwtmiddleware.Options{
        // Will fill in next
  })

    r := mux.NewRouter()

    r.Handle("/", http.FileServer(http.Dir("./views/")))
  r.PathPrefix("/static/").Handler(http.StripPrefix("/static/", http.FileServer(http.Dir("./static/"))))

  r.Handle("/products", jwtMiddleware.Handler(ProductsHandler)).Methods("GET")
    r.Handle("/products/{slug}/feedback", jwtMiddleware.Handler(AddFeedbackHandler)).Methods("POST")

  // For dev only - Set up CORS so React client can consume our API
  corsWrapper := cors.New(cors.Options{
        AllowedMethods: []string{"GET", "POST"},
        AllowedHeaders: []string{"Content-Type", "Origin", "Accept", "*"},
  })

    http.ListenAndServe(":8080", corsWrapper.Handler(r))
}

var ProductsHandler = http.HandlerFunc(func(w http.ResponseWriter, r *http.Request) {
    payload, _ := json.Marshal(products)

    w.Header().Set("Content-Type", "application/json")
    w.Write([]byte(payload))
})

var AddFeedbackHandler = http.HandlerFunc(func(w http.ResponseWriter, r *http.Request) {
    var product Product
    vars := mux.Vars(r)
    slug := vars["slug"]

    for _, p := range products {
        if p.Slug == slug {
            product = p
        }
    }

    w.Header().Set("Content-Type", "application/json")
    if product.Slug != "" {
        payload, _ := json.Marshal(product)
        w.Write([]byte(payload))
    } else {
        http.Error(w, http.StatusText(http.StatusNotFound), http.StatusNotFound)
    }
})
You still have your products struct and two endpoints to GET products and POST feedback. You also have two handlers. Since you're updating this application to use Auth0 for authorization and authentication, a new handler, jwtMiddleware, has been added. This will wrap around the endpoints you want to protect. You also need to enable CORS to allow cross-origin requests so that the React client can consume the API.
Note: If you find that some of the imports disappear on save, make sure that your code editor isn't set to remove unused imports on save. In VS Code, open up your "User Settings" and search for
gofmt. If it's set togoreturn, change that togofmt.
Create the middleware
Next, create the middleware that will be applied to your endpoints. This middleware will check if an access token exists and is valid. If it passes the checks, the request will proceed. If not, a 401 Authorization error is returned.
First, you need to define the structs to be used in the middleware. In main.go, add the following underneath the imports section:
package main

import (
  // ...
)

type Response struct {
    Message string `json:"message"`
}

type Jwks struct {
    Keys []JSONWebKeys `json:"keys"`
}

type JSONWebKeys struct {
    Kty string   `json:"kty"`
    Kid string   `json:"kid"`
    Use string   `json:"use"`
    N   string   `json:"n"`
    E   string   `json:"e"`
    X5c []string `json:"x5c"`
}
The JSONWebKeys struct holds fields related to the JSON Web Key Set for this API. These keys contain the public keys, which will be used to verify JWTs.
Create the middleware now so that you can see how these are used. In main.go, find the empty jwtMiddleware and replace it with:
// imports
// ...

func main() {
  jwtMiddleware := jwtmiddleware.New(jwtmiddleware.Options {
    ValidationKeyGetter: func(token *jwt.Token) (interface{}, error) {
      // Verify 'aud' claim
      aud := "YOUR_API_IDENTIFIER"
      checkAud := token.Claims.(jwt.MapClaims).VerifyAudience(aud, false)
      if !checkAud {
          return token, errors.New("Invalid audience.")
      }
      // Verify 'iss' claim
      iss := "https://YOUR_DOMAIN/"
      checkIss := token.Claims.(jwt.MapClaims).VerifyIssuer(iss, false)
      if !checkIss {
          return token, errors.New("Invalid issuer.")
      }

      cert, err := getPemCert(token)
      if err != nil {
          panic(err.Error())
      }

      result, _ := jwt.ParseRSAPublicKeyFromPEM([]byte(cert))
      return result, nil
    },
    SigningMethod: jwt.SigningMethodRS256,
  })

  // ...
}

// ...
You have the new auth0/go-jwt-middleware middleware function that will validate tokens coming from Auth0. There are some values here that you'll need to fill in, so take note of those, and you'll come back to them once setup is finished.
Next, you need to create the function to grab the JSON Web Key Set and return the certificate with the public key. Still in main.go, add this function at the very bottom after AddFeedbackHandler():
// main.go

// imports here
// ...

func main() {
  // ...
}

func getPemCert(token *jwt.Token) (string, error) {
    cert := ""
    resp, err := http.Get("https://YOUR_DOMAIN/.well-known/jwks.json")

    if err != nil {
        return cert, err
    }
    defer resp.Body.Close()

    var jwks = Jwks{}
    err = json.NewDecoder(resp.Body).Decode(&jwks)

    if err != nil {
        return cert, err
    }

    for k, _ := range jwks.Keys {
        if token.Header["kid"] == jwks.Keys[k].Kid {
            cert = "-----BEGIN CERTIFICATE-----\n" + jwks.Keys[k].X5c[0] + "\n-----END CERTIFICATE-----"
        }
    }

    if cert == "" {
        err := errors.New("Unable to find appropriate key.")
        return cert, err
    }

    return cert, nil
}
Now that the middleware is set up, you need to apply it to the endpoints you want to protect.
Apply the middleware
Scroll to where you defined the routes in the main.go file and you'll find that the jwtMiddleware has already been applied on the /products and /products/{slug}/feedback endpoints:
r.Handle("/products", jwtMiddleware.Handler(ProductsHandler)).Methods("GET")
r.Handle("/products/{slug}/feedback", jwtMiddleware.Handler(AddFeedbackHandler)).Methods("POST")
Any private endpoints that you want to protect in the future should also use jwtMiddleware.
Add the imports
Now bring in the Auth0 JWT Middleware package and the CORS package that you added to your imports earlier.
auth0/go-jwt-middleware— Auth0 package that fetches your Auth0 public key and checks for JWTs on HTTP requestsrs/cors— CORS is anet/httphandler implementing CORS specification in Go
In the terminal in the root of the Go project, install these new packages with:
go get
Note: You can alternatively run
go build main.gohere, which will also grab the dependencies and compile.
Setting up the Auth0 API
Now you need to register your Go API with Auth0. If you haven't already, sign up for a free Auth0 account.
Navigate to the APIs section and create a new API by clicking the Create API button.
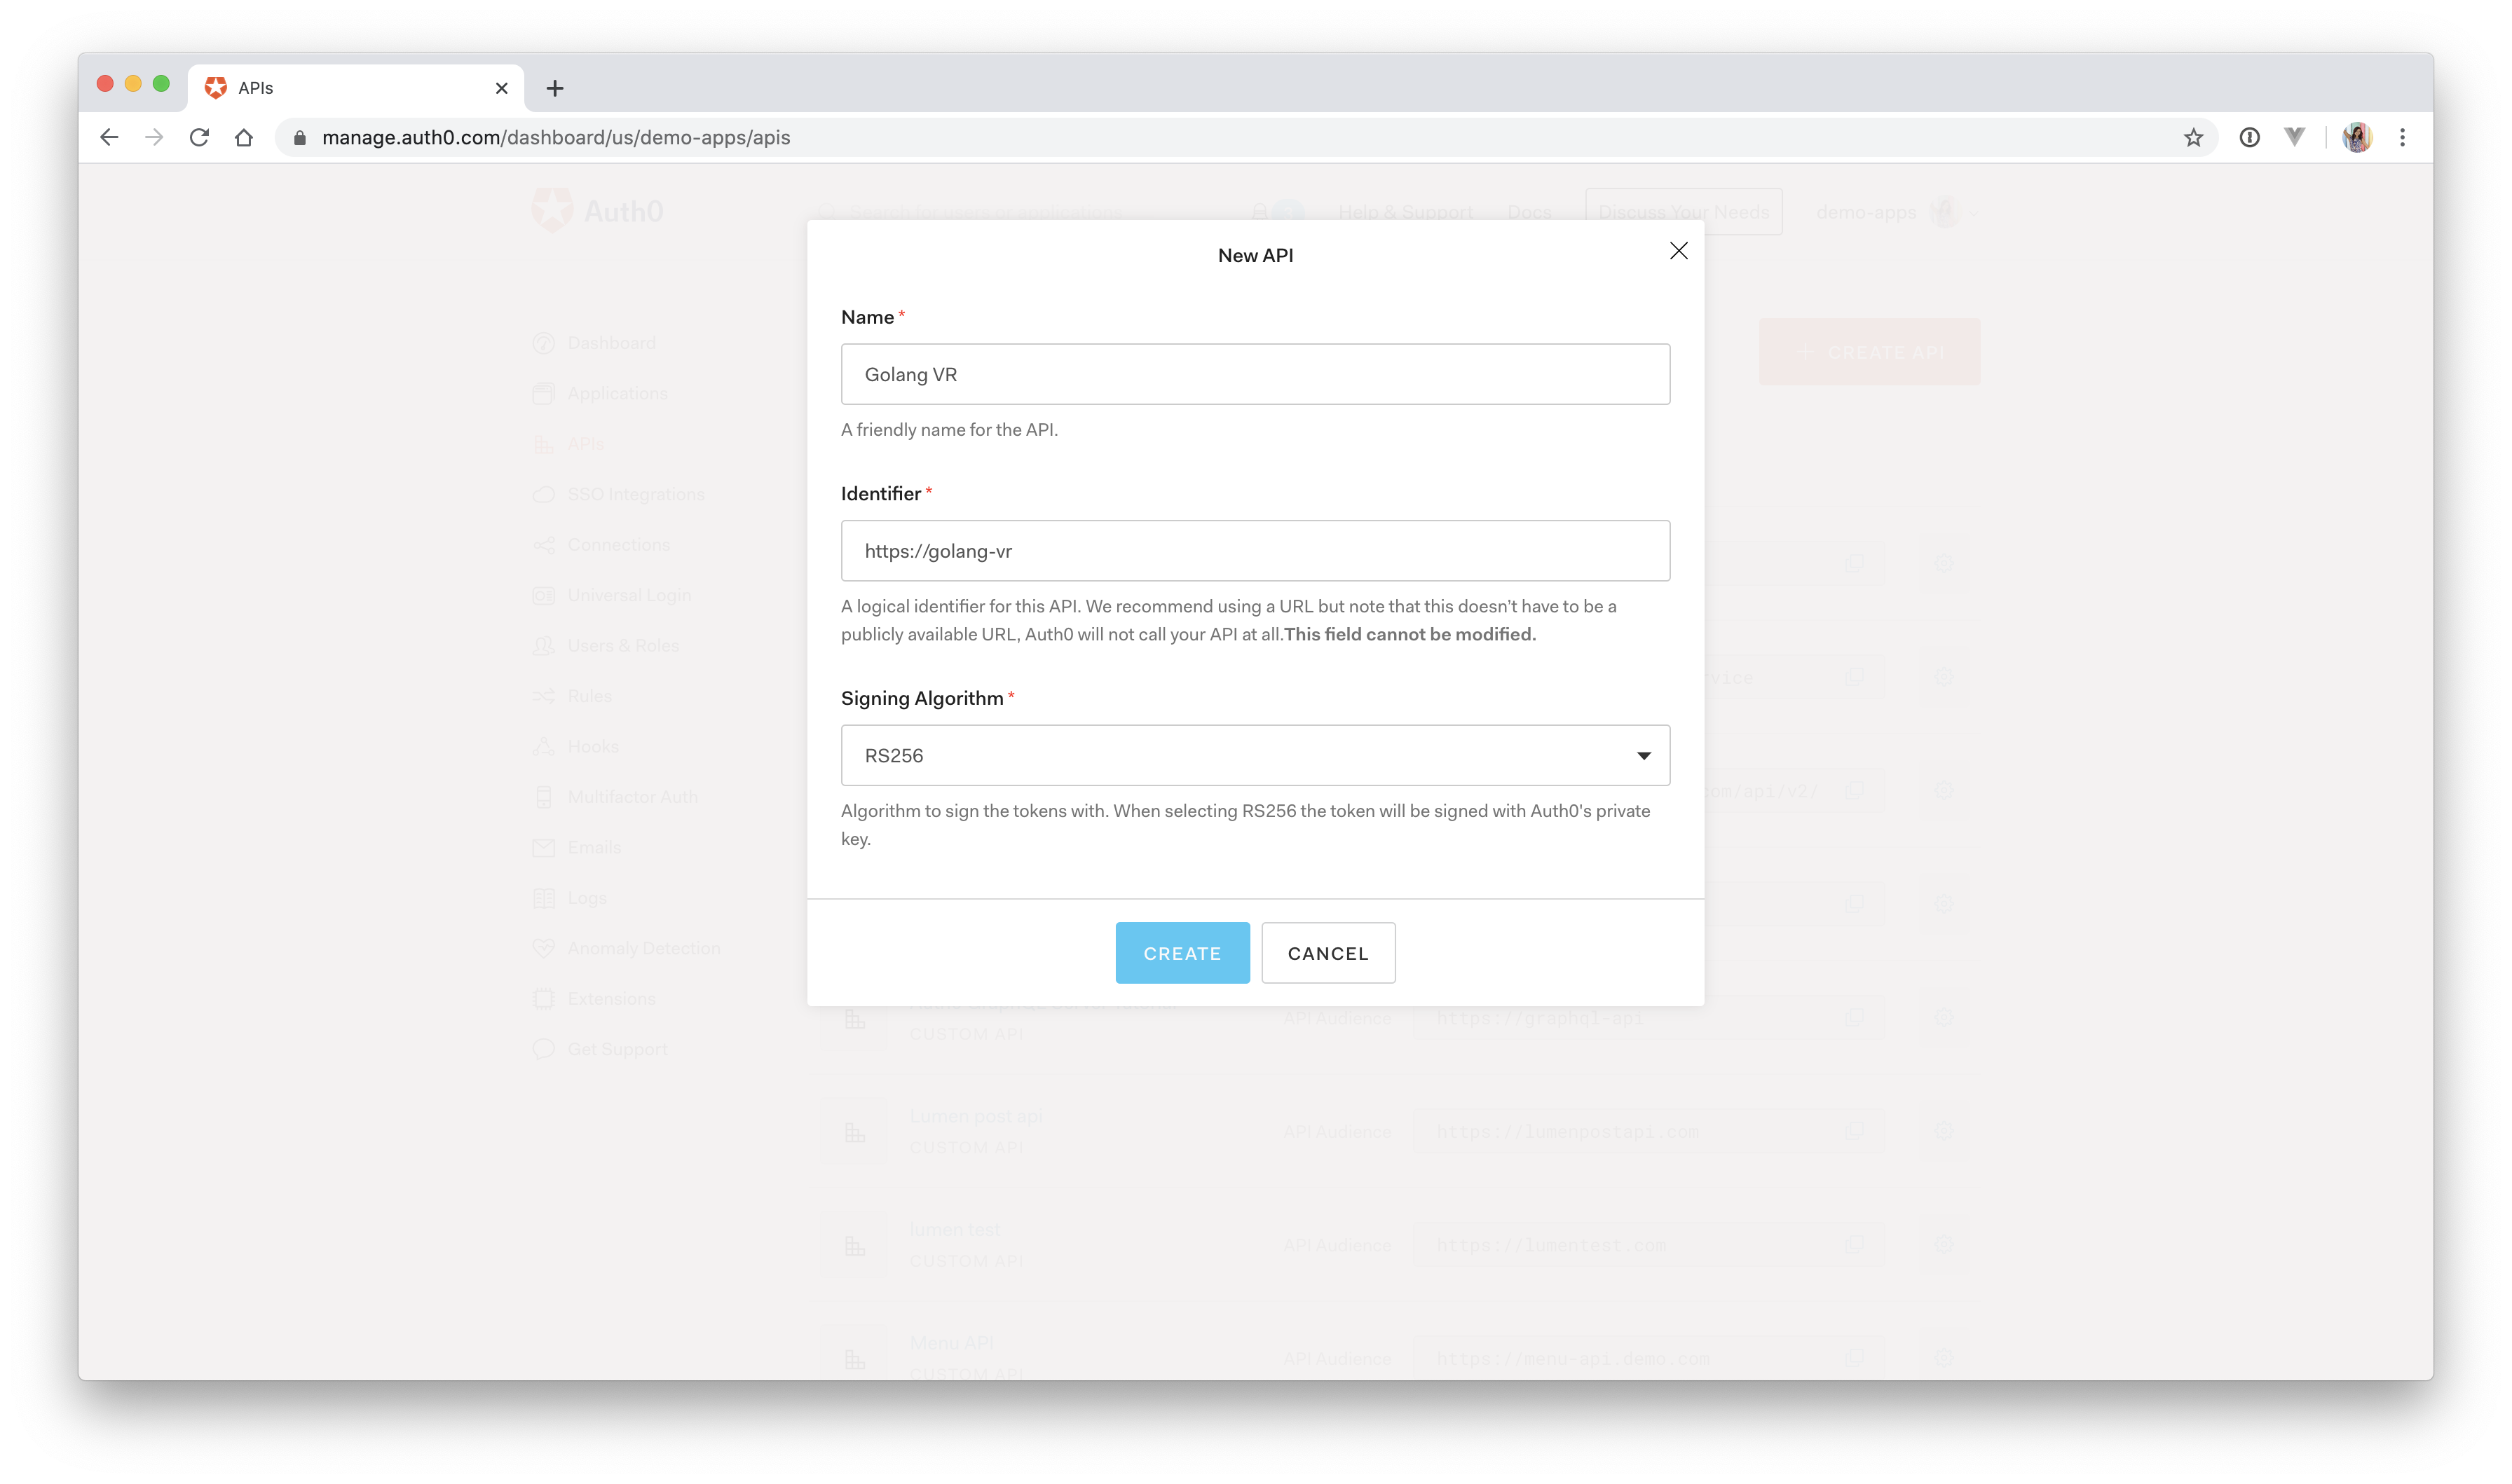
Give your API a Name and an Identifier. These can be anything you'd like, but for the Identifier, it's best to use a URL format for naming convention purposes. This doesn't have to be a publicly available URL, and Auth0 will never call it. You can leave the Signing Algorithm as is (RS256). Once you have that filled out, click Create.
Back in main.go, there are some values that need updating. In your Auth0 dashboard, you can easily find these by clicking on Quick Start and looking that the sample C# code listed.
Grab the value for options.Authority and copy it. Now back in main.go in jwtMiddleware, there's a variable called aud. Replace YOUR_API_IDENTIFIER with the value you copied from your Auth0 dashboard. This is your API identifier.
Next, copy the value of options.Audience from your Auth0 dashboard and replace https://YOUR_DOMAIN/ with it.
Note: Make sure you include the trailing slash here.
Now scroll down to getPemCert() and find this line:
resp, err := http.Get("https://YOUR_DOMAIN/.well-known/jwks.json")
Replace YOUR_DOMAIN with the copied value.
The final step here is to rerun the application. This can be done in your terminal with:
go run .
Now the application is ready to test!
Testing it out
You can use a tool like Postman to test that access control is working properly. If you don't have Postman, check out the next section to test with cURL.
Testing with Postman
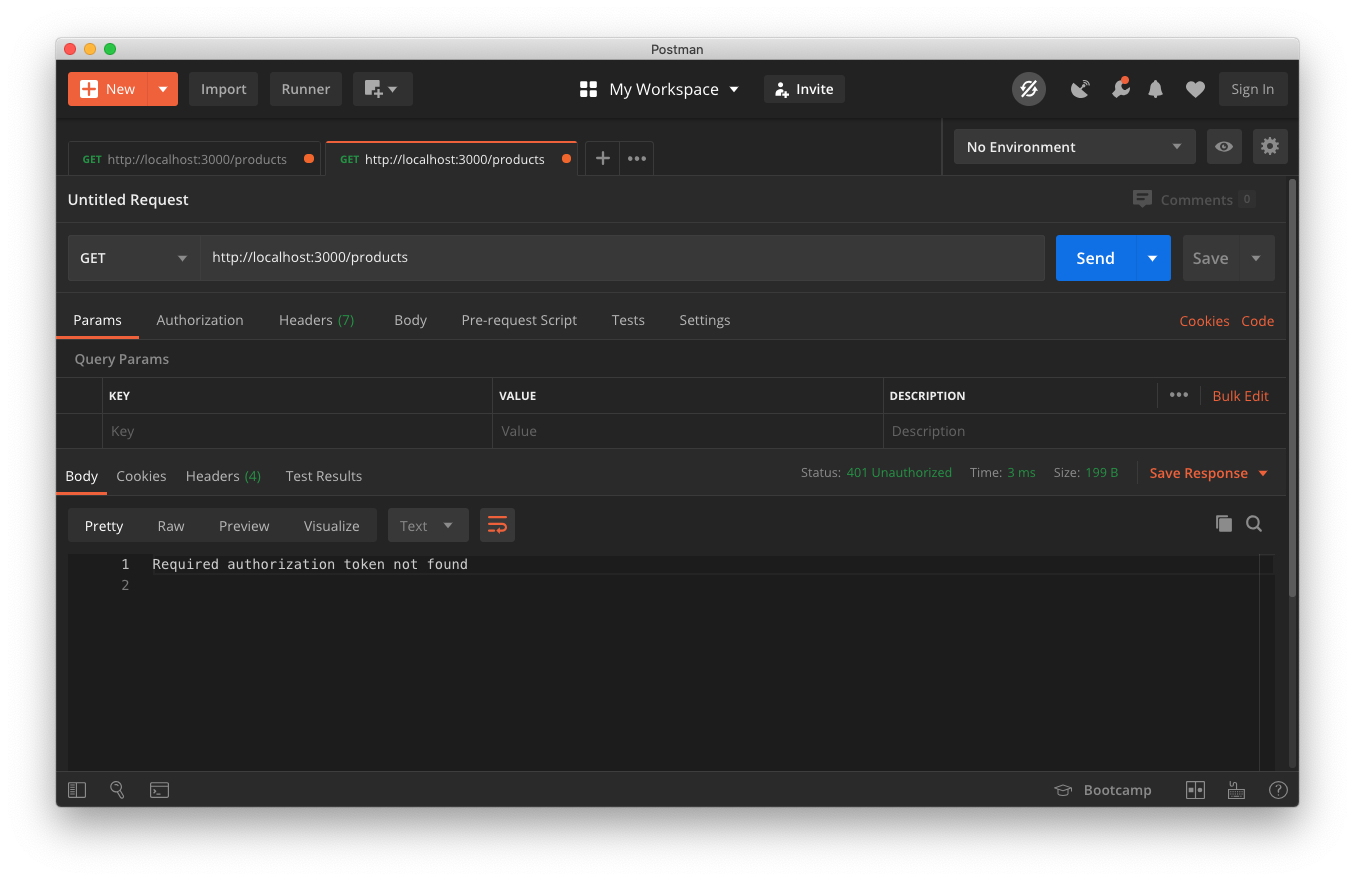
Your /products endpoint is currently protected and requires a valid token to access. Let's make sure this works as expected. In Postman, paste in http://localhost:8080/products, make sure it's set to a GET request, and click "Send". You should get back this response: Required authorization token not found.
Now try sending an access token along with the request. Back in your Auth0 dashboard, go to the API that you created earlier. Click on the Test tab and scroll down to where it says Response. Copy the value of the access token.
Back in Postman, click on Headers and fill in the first row as follows:
- KEY — Authorization
- VALUE — Bearer pasteyourtokenhere
Click Send, and the products list should be returned!
Testing with cURL
This can also be tested straight from the command line with cURL. Just replace yourtokenhere with your test token and then paste it into your terminal.
curl --request GET \
  --url http://localhost:8080/products \
  --header 'authorization: Bearer yourtokenhere'
Connecting React and Go
So you now have users able to sign in on the React side and API authorization implemented on the backend. The final step is to connect the two. The goal here is that a user will sign into the frontend, and then you'll send their token to the backend with the request for product data. If their access token is valid, then you'll return the data.
To accomplish this, you only need to update the React side.
Calling the Go API with React
Open up the React project and look at the LoggedIn.js file. Right now, you have the products data hard-coded in here. The problem with this is that a user can still easily find this data if they wanted, even though you want them to be signed in to view it.
If you're curious how this is possible, make sure your React app is running, and then go to http://localhost:3000/static/js/main.chunk.js in your browser (incognito so you can make sure you're not signed in). Now search for "World of Authcraft", and sure enough, there is the data.
This is why it's always essential to serve private data from the backend where the code isn't accessible. To do this, you need to make an HTTP request from your frontend to your backend to get the products. This request must be accompanied by a valid access token. So once the user signs in, you'll pass their access token along with the request.
In src/index.js, updated ReactDOM.render() as follows:
ReactDOM.render(
  <Auth0Provider
    domain={config.domain}
    client_id={config.clientId}
    redirect_uri={window.location.origin}
    audience={config.audience}     // NEW - specify the audience value
    onRedirectCallback={onRedirectCallback}
  >
    <App />
  </Auth0Provider>,
  document.getElementById("root")
);
You're adding an audience value here, so you have to update your auth_config.json file with that value:
{
  "domain": "YOUR_DOMAIN",
  "clientId": "YOUR_CLIENT_ID",
  "audience": "YOUR_API_IDENTIFIER"
}
The audience can be found back in the Auth0 dashboard. Click on the Go API you created earlier and then copy the value for Identifer under Settings. Paste this in as audience.
Next, open up LoggedIn.js and replace it with the following:
import React, { useState, useEffect } from "react";
import { useAuth0 } from "../react-auth0-spa";
import { FiThumbsUp, FiThumbsDown } from "react-icons/fi";

const LoggedIn = () => {
  const [products, setProducts] = useState([]);
  const [voted, setVoted] = useState({
    "world-of-authcraft": "",
    "ocean-explorer": "",
    "dinosaur-park": "",
    "cars-vr": "",
    "robin-hood": "",
    "real-world-vr": "",
  });

  const {
    getTokenSilently,
    loading,
    user,
    logout,
    isAuthenticated,
  } = useAuth0();

  useEffect(() => {
    const getProducts = async () => {
      try {
        const token = await getTokenSilently();
        // Send a GET request to the server and add the signed in user's
        // access token in the Authorization header
        const response = await fetch("http://localhost:8080/products", {
          headers: {
            Authorization: `Bearer ${token}`,
          },
        });

        const responseData = await response.json();

        setProducts(responseData);
      } catch (error) {
        console.error(error);
      }
    };

    getProducts();
  }, []);

  const vote = async (slug, type, index) => {
    try {
      const token = await getTokenSilently();
      // Send a POST request to the Go server for the selected product
      // with the vote type
      const response = await fetch(
        `http://localhost:8080/products/${slug}/feedback`,
        {
          method: "POST",
          headers: {
            Authorization: `Bearer ${token}`,
          },
          body: JSON.stringify({ vote: type }),
        }
      );
      // Since this is just for demonstration and we're not actually
      // persisting this data, we'll just set the product vote status here
      // if the product exists
      if (response.ok) {
        setVoted({
          ...voted,
          [slug]: [type],
        });
      } else console.log(response.status);
    } catch (error) {
      console.error(error);
    }
  };

  if (loading || !user) {
    return <div>Loading...</div>;
  }

  return (
    <div className="container">
      <div className="jumbotron text-center mt-5">
        {isAuthenticated && (
          <span
            className="btn btn-primary float-right"
            onClick={() => logout()}
          >
            Log out
          </span>
        )}
        <h1>We R VR</h1>
        <p>
          Hi, {user.name}! Below you'll find the latest games that need
          feedback. Please provide honest feedback so developers can make the
          best games.
        </p>
        <div className="row">
          {products.map(function (product, index) {
            const prodSlug = product.Slug;
            return (
              <div className="col-sm-4" key={index}>
                <div className="card mb-4">
                  <div className="card-header">{product.Name}</div>
                  <div className="card-body">{product.Description}</div>
                  <div className="card-footer">
                    <a onClick={() => vote(product.Slug, "Upvoted", index)}
                      className="btn btn-default float-left">
                      <FiThumbsUp />
                    </a>
                    <small className="text-muted">{voted[prodSlug]}</small>
                    <a onClick={() => vote(product.Slug, "Downvoted", index)}
                      className="btn btn-default float-right">
                      <FiThumbsDown />
                    </a>
                  </div>
                </div>
              </div>
            );
          })}
        </div>
      </div>
    </div>
  );
};

export default LoggedIn;
Here's what changed:
getProducts()— Instead of hardcoding the data, you're now pulling it in from uour Go server (http://localhost:8080/products)!vote()— You're also making a POST request to the Go server to reflect your vote for a given product. This demo is not persisting the data, but it's still hitting the server and saving the vote in memory as long as the server returns a200 OKresponse.- Authorization header — When you set up your Go server, you created a middleware that expects an access token. You're passing the signed-in user's access token along with the request, as you can see here:
const token = await getTokenSilently();

const response = await fetch("http://localhost:8080/products", {
  headers: {
    Authorization: `Bearer ${token}`,
  },
});
Test it out
To test everything out, make sure you have both your Go server and React client running.
Build and run Go server
Make sure you're in the directory of your Go project in your terminal and run:
go run .
Run your React application
Make sure you're in the directory of your React project in your terminal and run:
npm start
Conclusion
That's it! If you made it all the way through, pat yourself on the back because you just learned how to:
- Build an API with Go
- Connect a Go server to a React client
- Set up authentication in a React app
- Secure a Go API
Create middleware in Go
To conclude, Go is an excellent language for building scalable and highly performant APIs. Make sure to reach out in the comments if you have any questions, and thanks for reading!


