Automating Access Requests & Provisioning
A deep look at how we automated our employee access request system
“Give me access to vpn”
This is all you need to tell our Slack bot; a request is created and your manager receives an approval request.
Some Background
Granting users access to various resources is a challenge that many (if not most) organizations face. Unfortunately, many small/medium-sized companies find the cost of purchasing and operating monolithic provisioning systems prohibitive. User access often becomes a highly manual and messy process. Here at Auth0 we started out with a Google Form: employees would fill it out checking off various resources/apps they wanted access to. The form saved into a Google Sheet where a script would take each entry and create an Issue in a GitHub repository. Our IT team would then use the repo’s issues as a request tracking system and manually fulfill them. There are a few problems with this approach:
- No approval mechanism
- No tracking, and no easy way to show what an employee has access to
- Very hard to automate
- Pretty bad UX
… so we decided to build something
Goals
For our internal MVP, we wanted to at least address the above points, but also set ourselves up so this tool could grow:
- Provide an easy way to define resources (the things that people can request, for example: email distribution lists, building badges, access to AWS, GitHub, laptop, and VPNs, as well as work orders like “restore a backup” or “reset MFA”)
- Customizable, multi-step, dynamic approval workflows
- Tracking/reporting to help our SOC2 audits
- Mechanism to setup automated fulfillment for things that can be automated (for ex, via APIs, automatically add a user to our GitHub organization)
- Frictionless UX: we are Slack bot junkies, so we knew this was a critical integration
- Architecture that will allow expansion
- Extendable: if someone wants to convert a resource from manual to automated fulfillment, it shouldn’t require changes to the app or redeployment
- Use this opportunity to explore any new technologies we’ve been watching/itching to play with
End Result
After three months of on-the-side development, we launched our tool, code-named “Phenix” (no, it’s not misspelled).
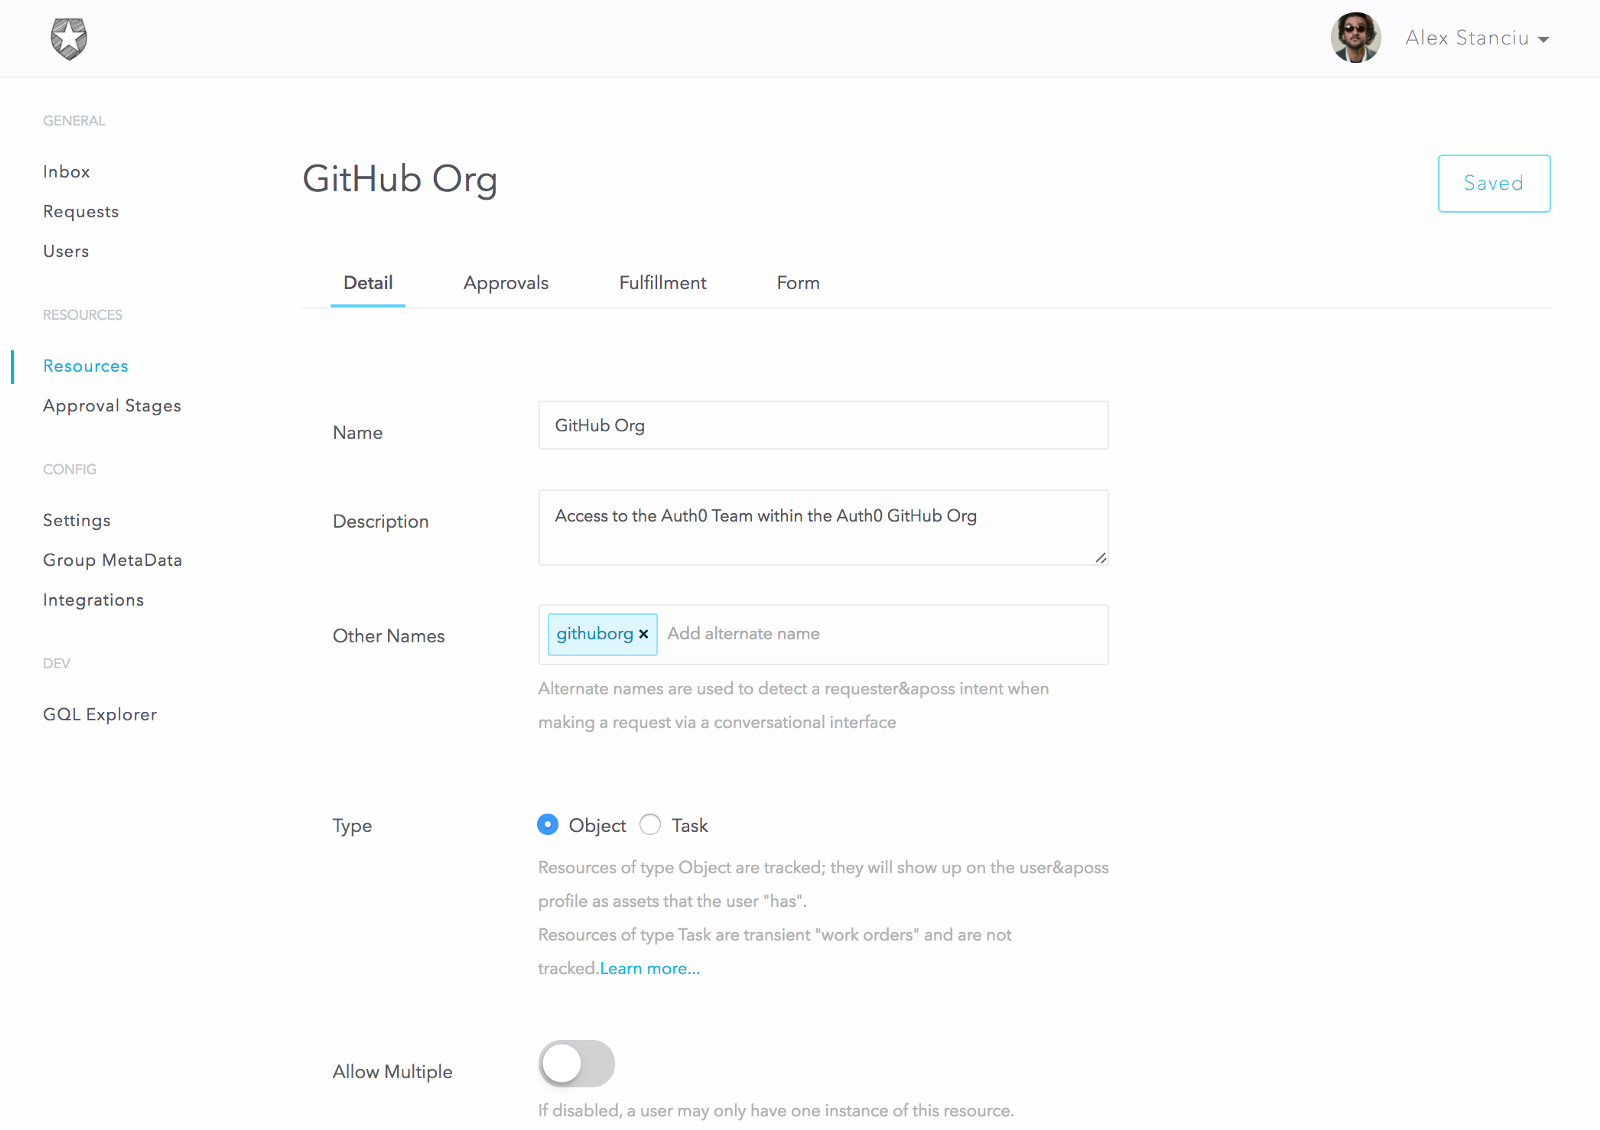
Let’s do a quick walkthrough of the basic flow. In this sample use case we’ll set up a resource to allow employees to request to be added to our Auth0 GitHub organization.
We first create the resource and specify a few options:
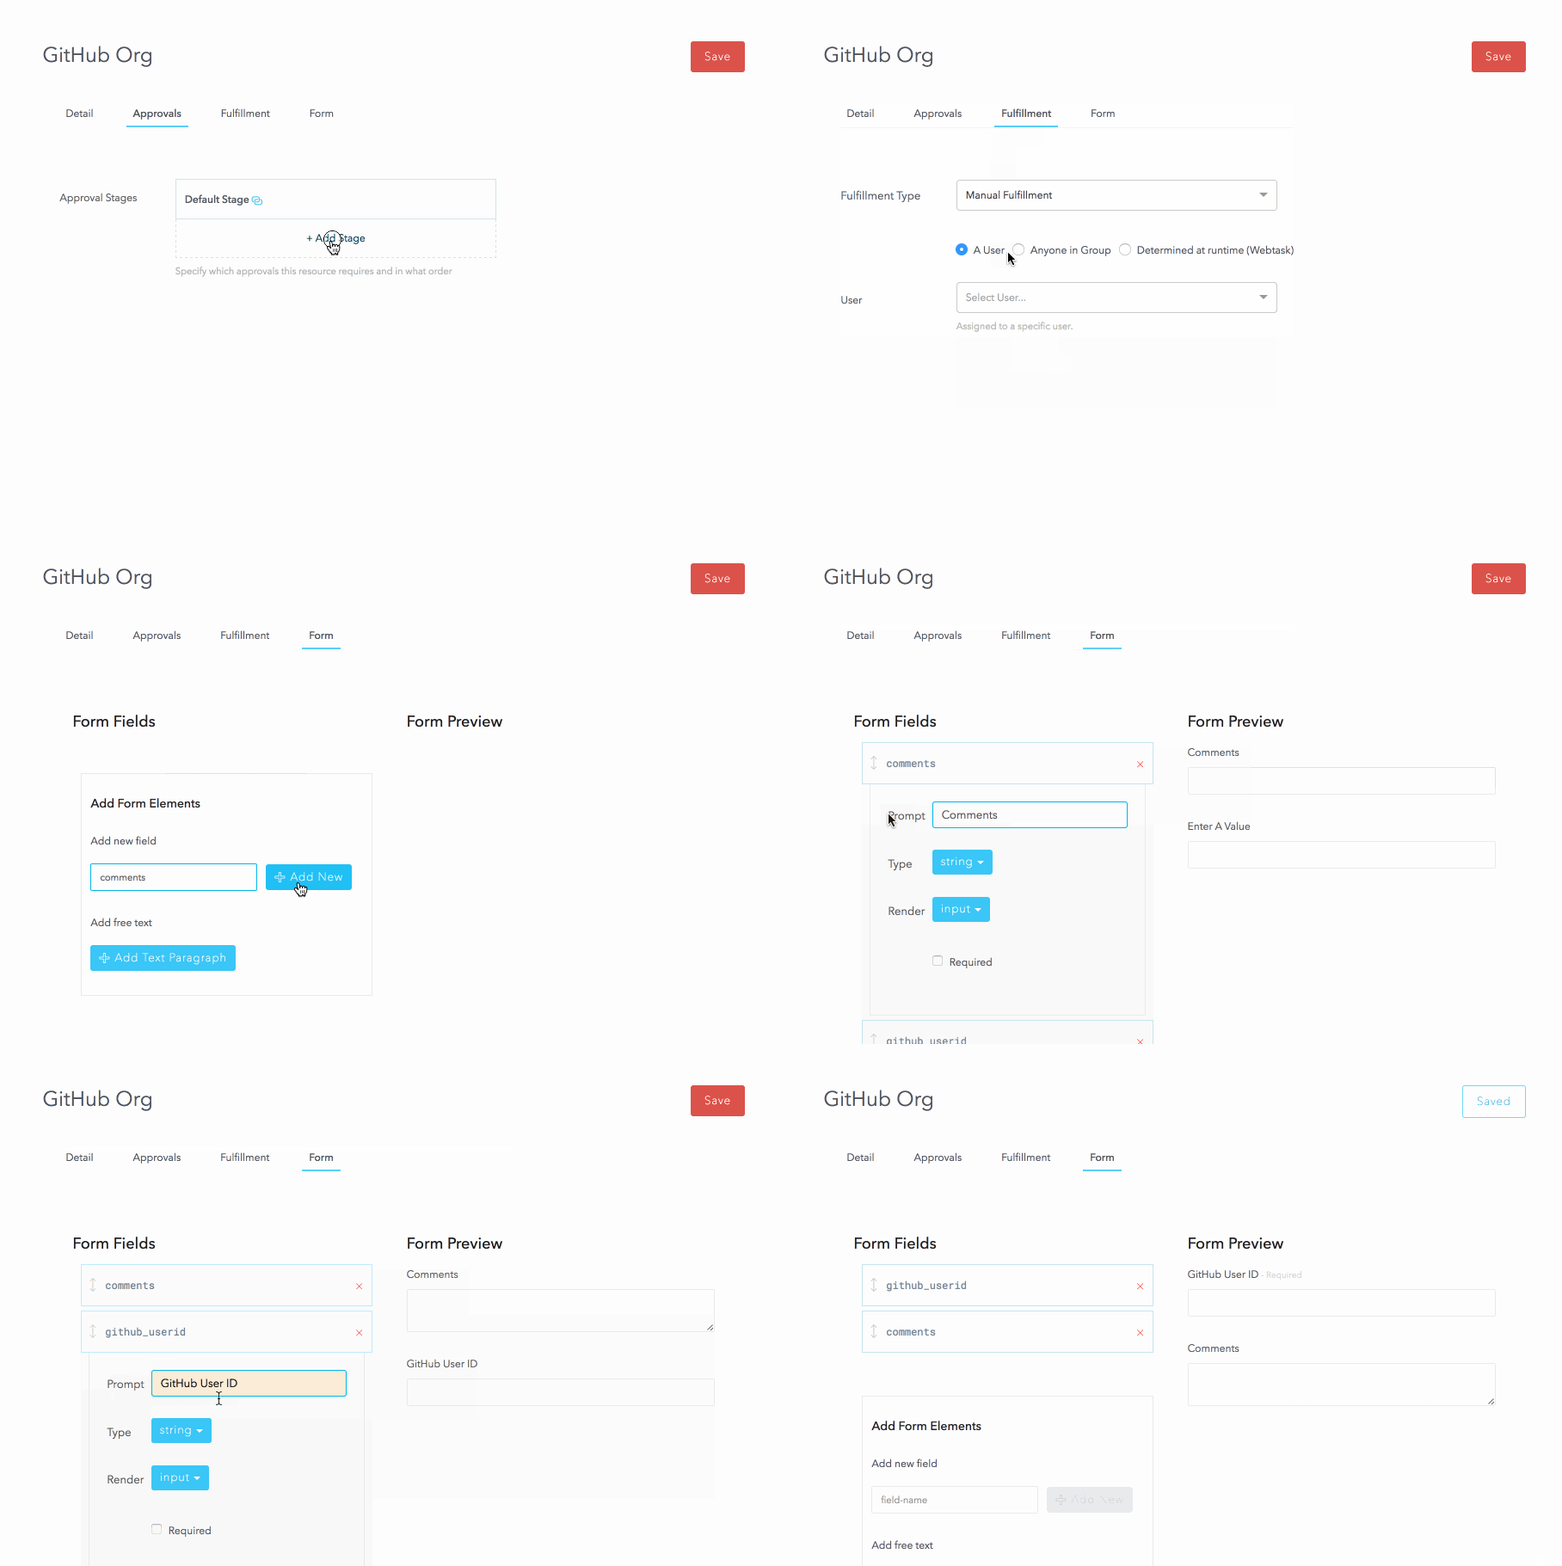
For the rest of the resource, we configure a two-step serial approval workflow that includes Manager Approval and Security Team approval.
For fulfillment, we’ll keep it manual for now and assign it to the Dev Ops group.
Resources also allow the creation of a custom form to capture data from the user at the time of request. We will use this to capture the user’s GitHub userid and a comment.
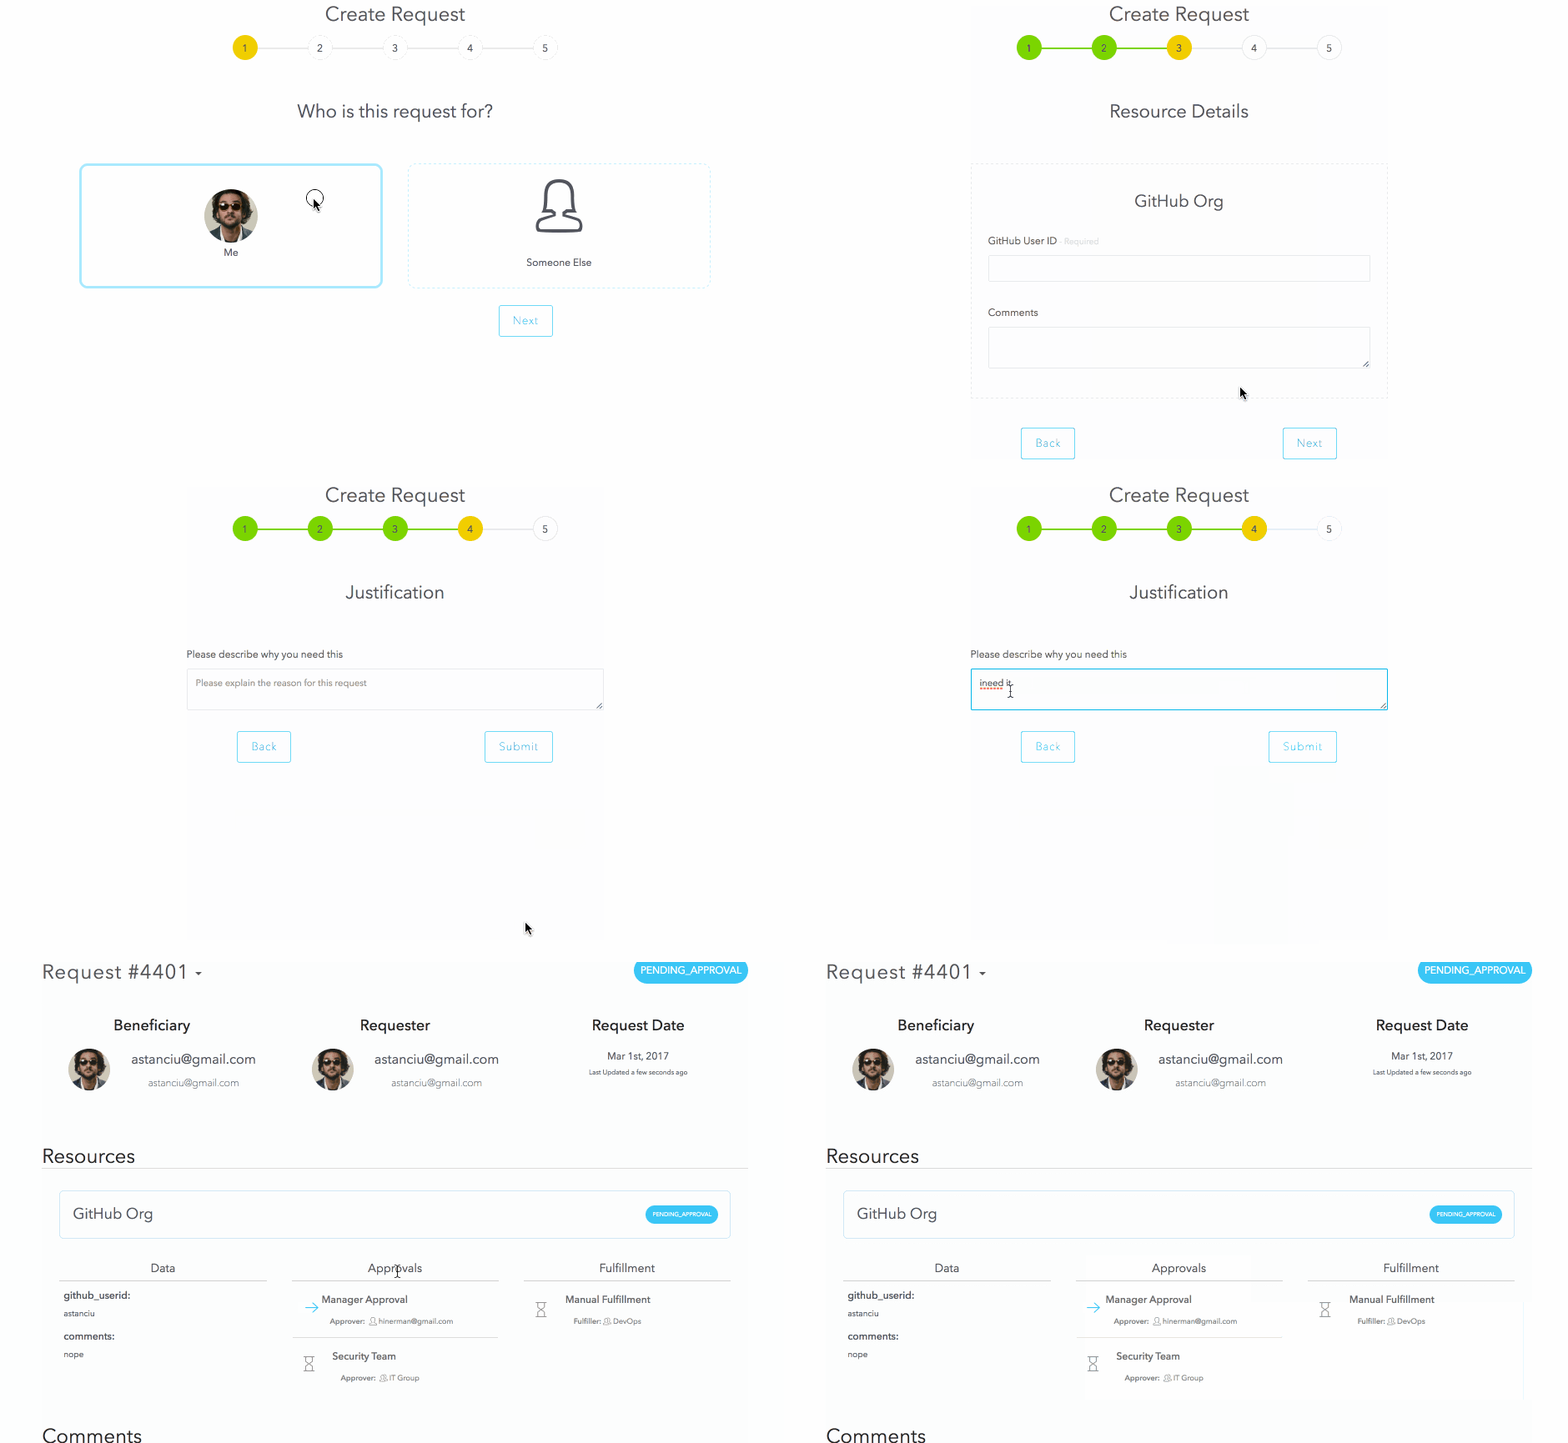
Now that the resource is configured, let’s request it:
Approvals
The above request will step through each stage of the approval process; if all stages are approved, the request will switch to fulfillment mode. If any stage is rejected, the approval process stops and the request is finished.
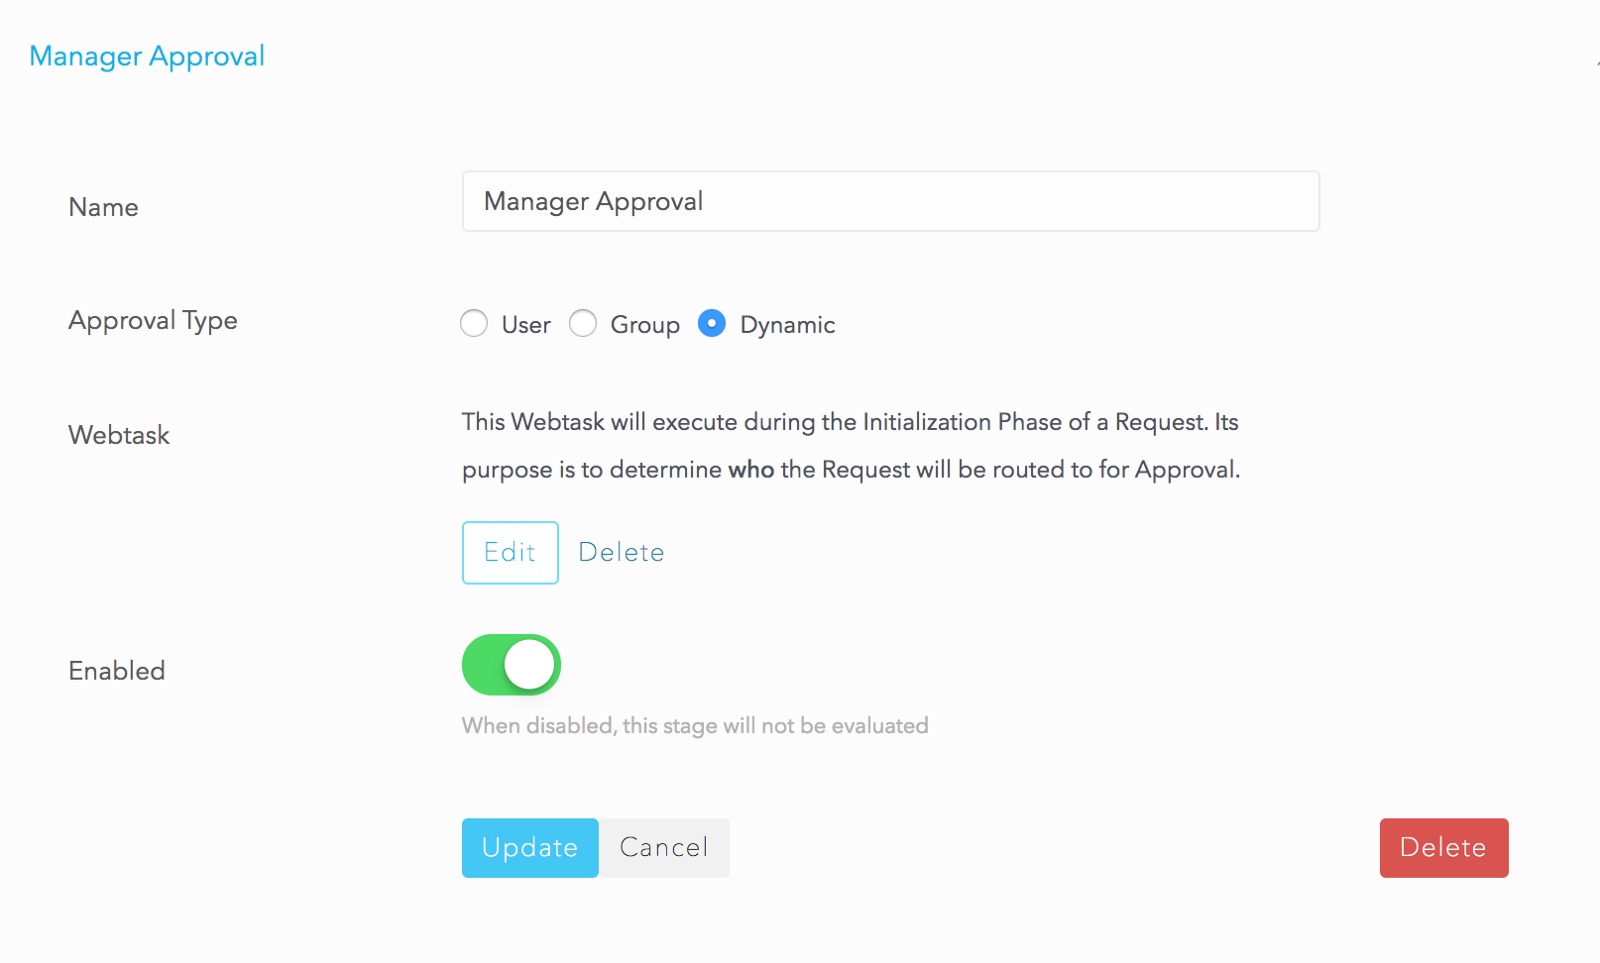
We configured an approval stage called Dynamic Approval for the Manager because each requester could have a different manager. We need to determine who the approver is at run-time, when the request is processing. We do this using the webtask platform. Setting the approval type as dynamic allows the creation of a webtask where the end user (the Administrator) can write custom code that figures out who the manager is.
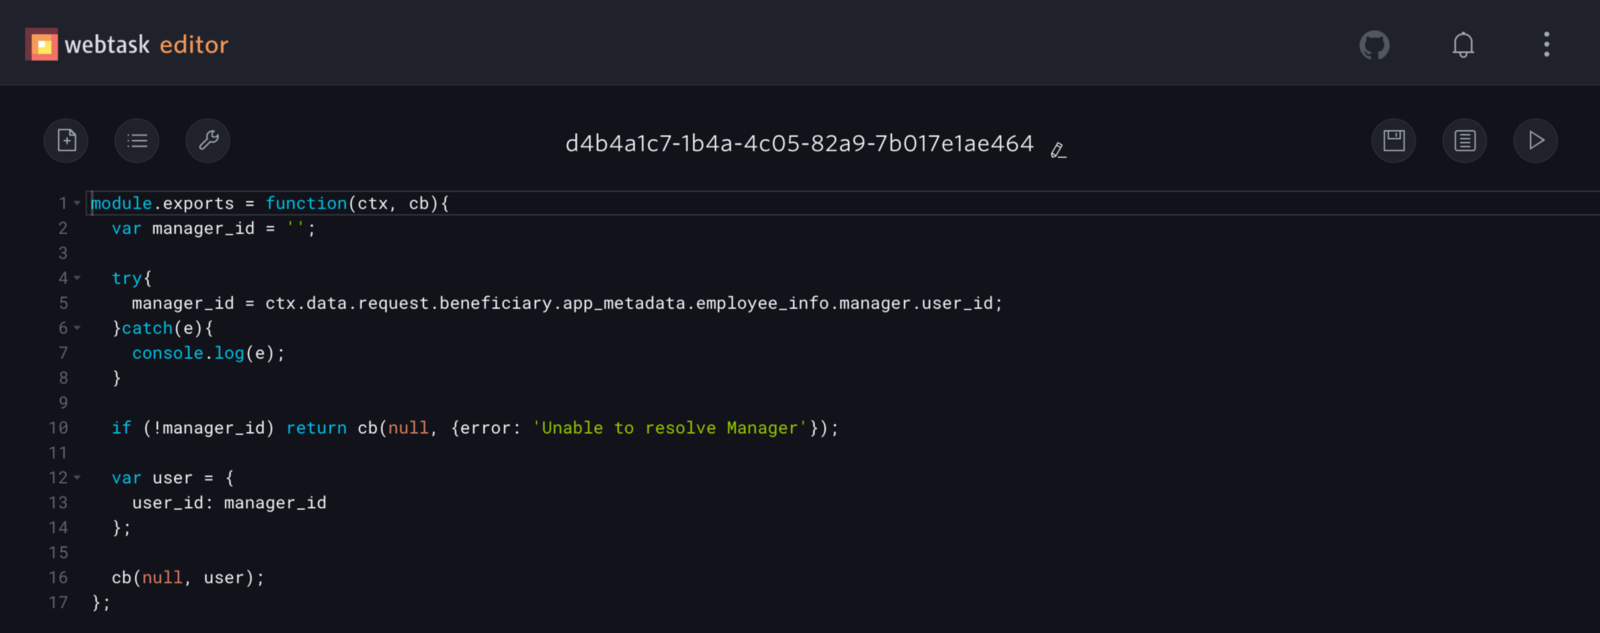
Clicking Edit opens the webtask editor where we have simple code to retrieve the manager userid from the request beneficiary’s profile:
The manager info is saved in the Auth0 user’s app_metadata attribute; this is currently populated via an existing outside script that syncs our HR system with Auth0 profiles. If we didn’t have this data already in Auth0, this code would instead make an API call to our HR system (BambooHR) to get the user’s manager.
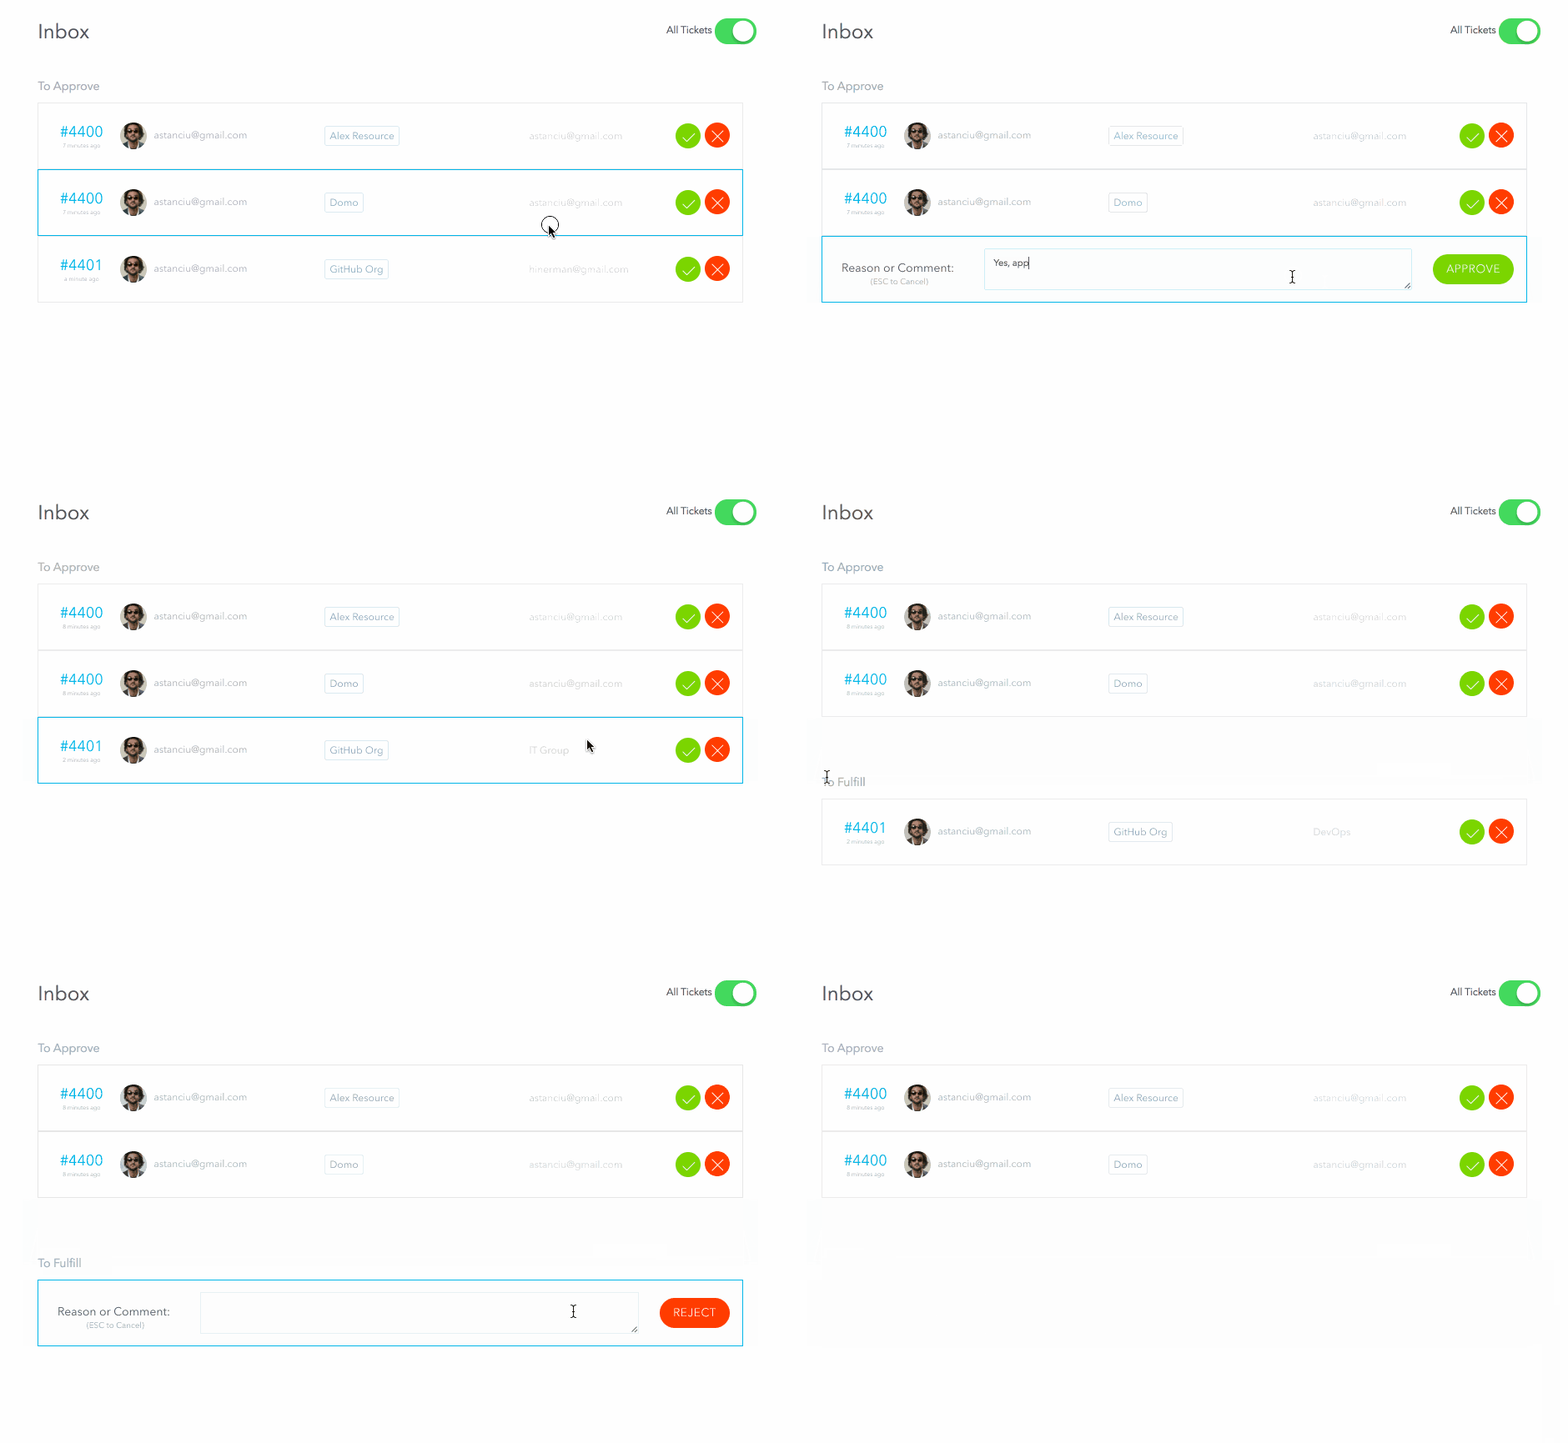
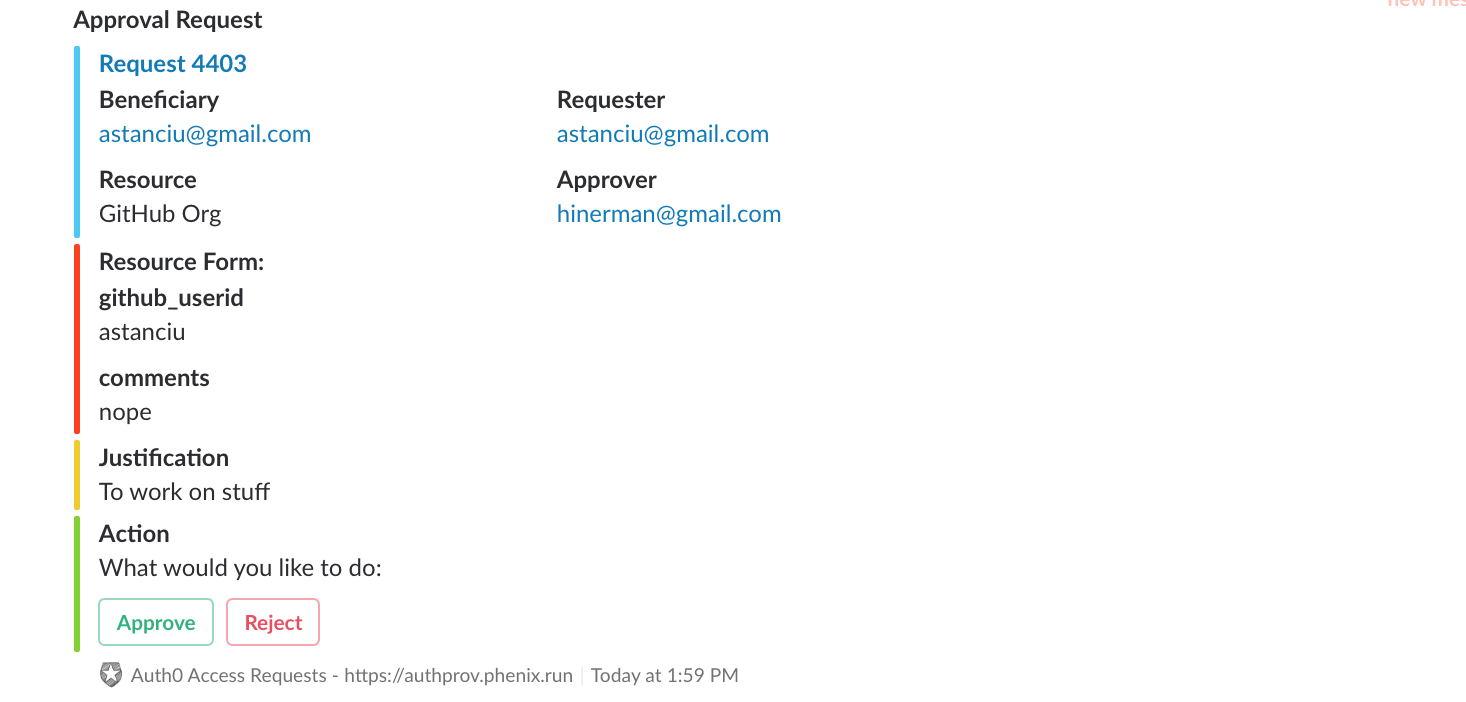
When the request is submitted, the approvers receive a ticket in their inbox representing a pending approval task. For the above request, since I am an admin, I will be able to see both approval tickets (for both the manager and security stages). I will approve both and then reject the fulfillment request. Normally these three steps would be performed by separate people
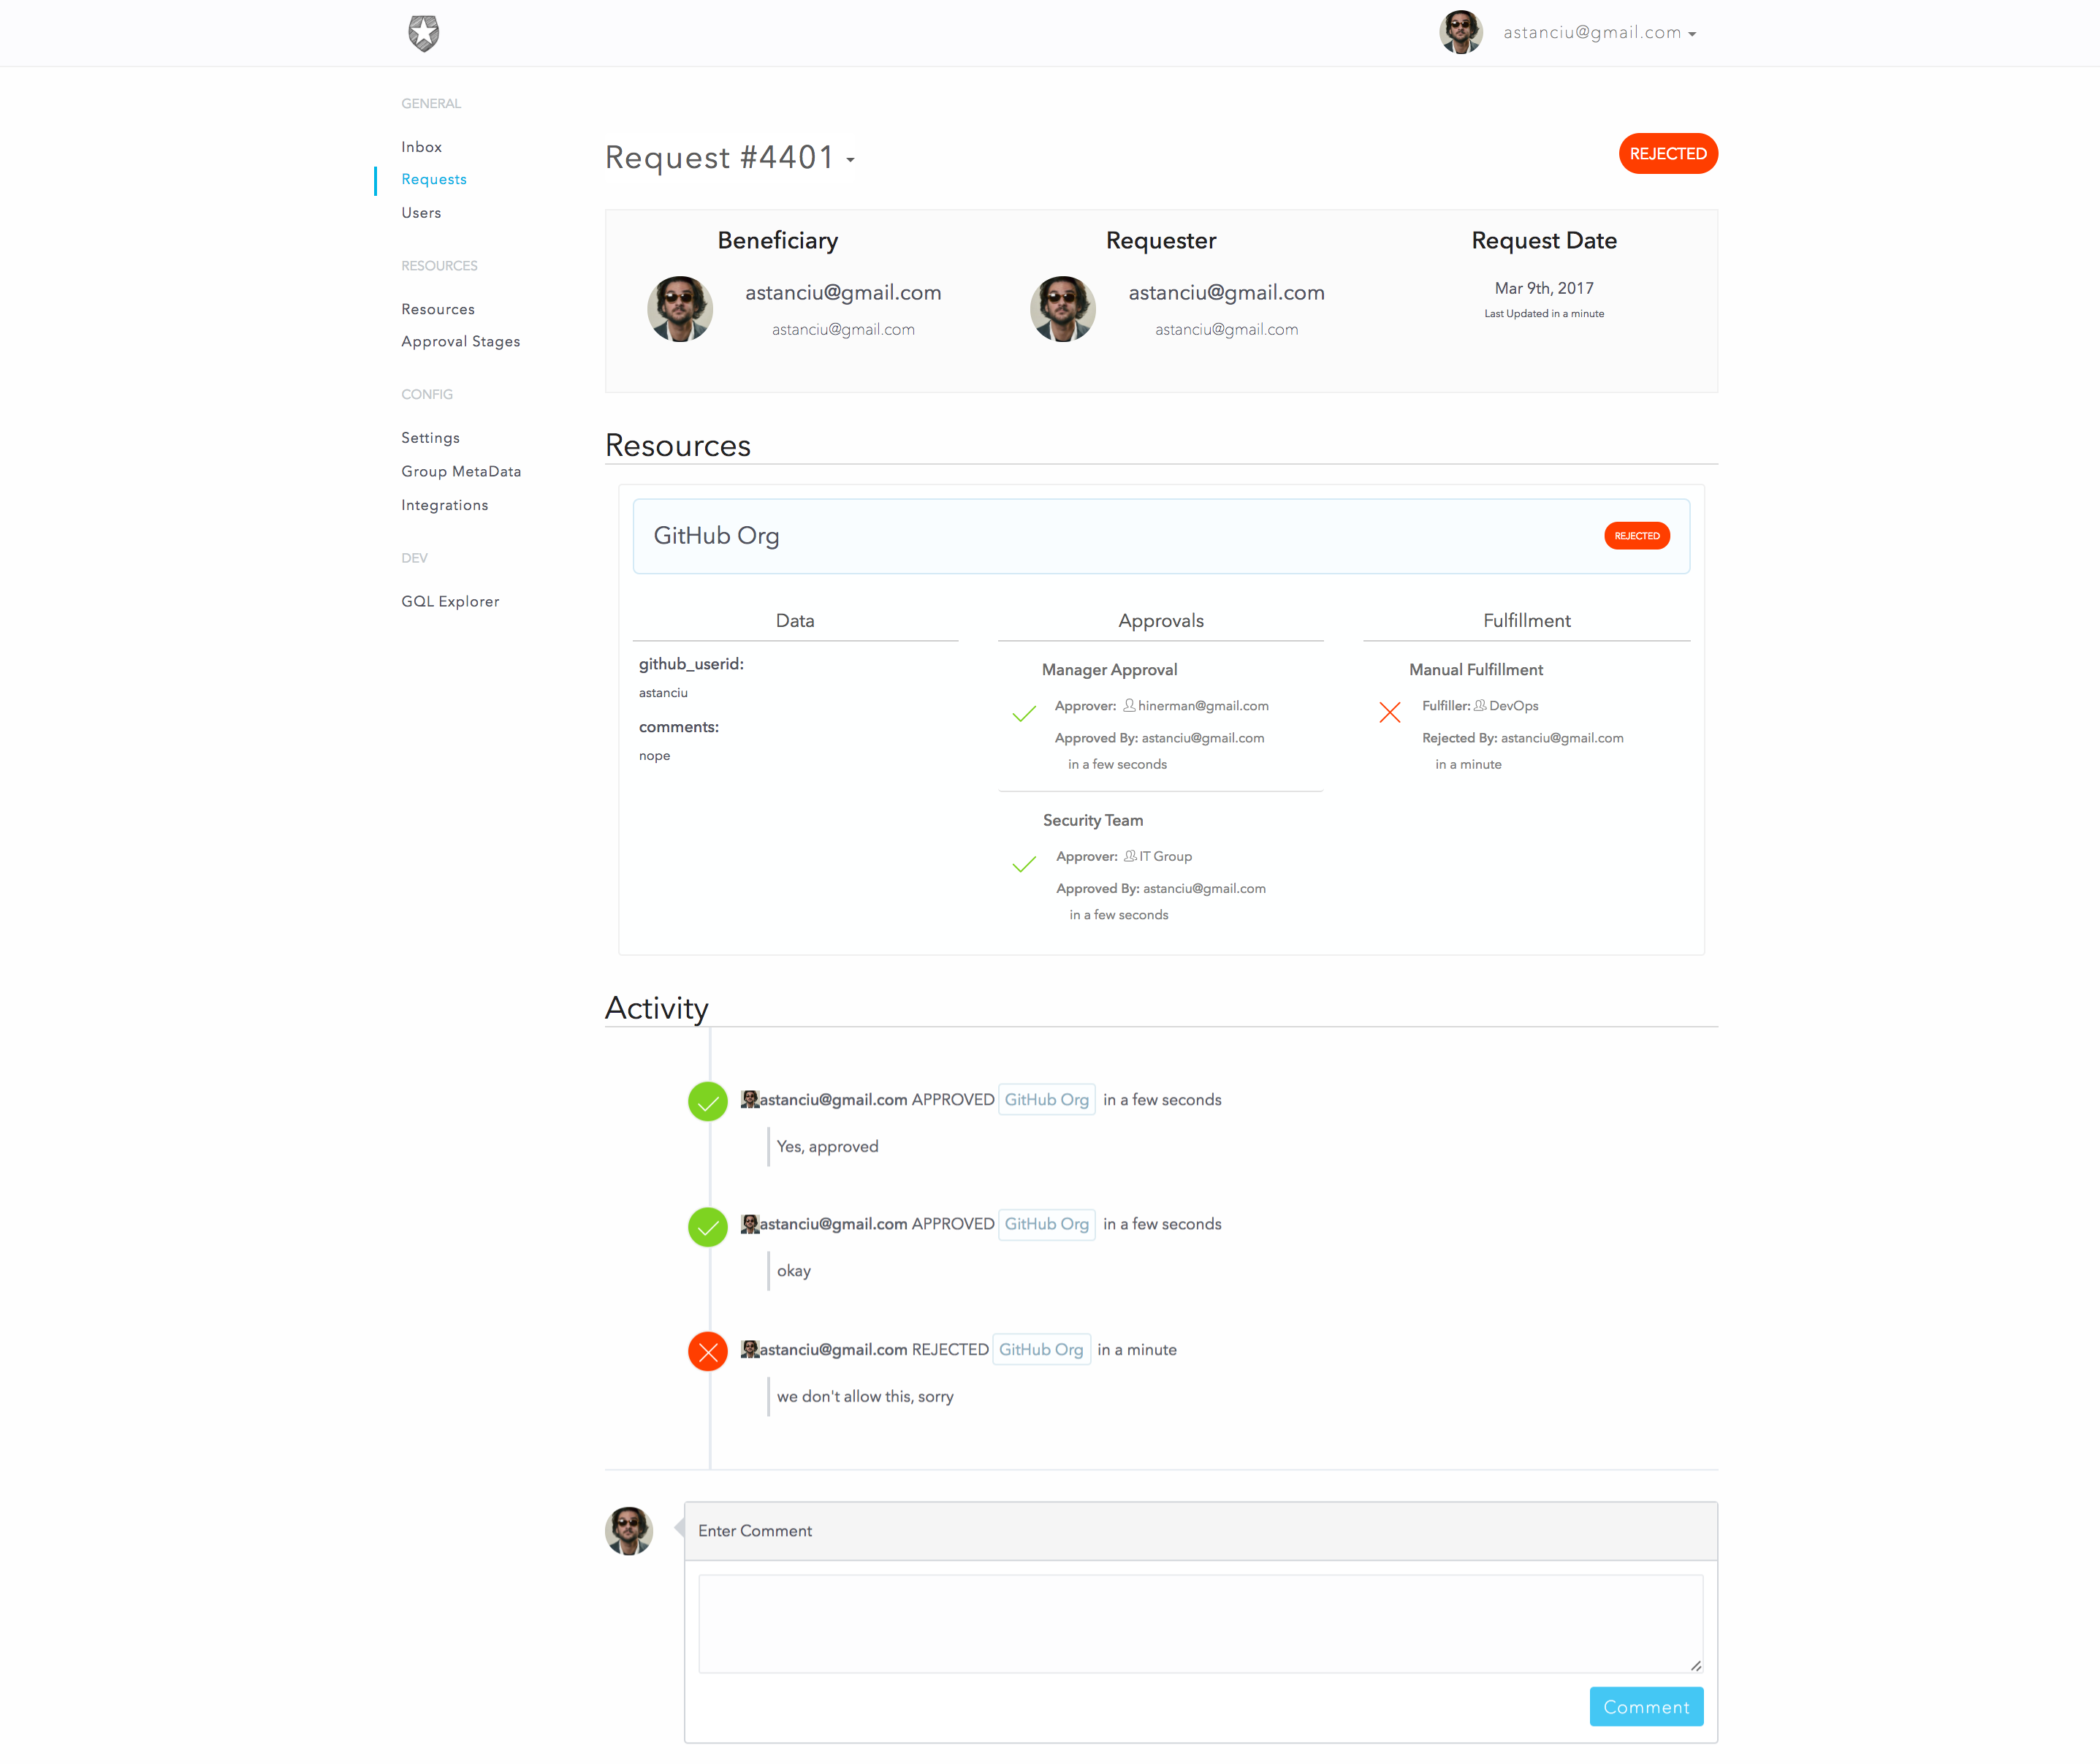
We can see the final status of this request as:
As you can see, for each stage it correctly shows who the intended approver/fulfiller was and who actually took the action. Great for our audit history!
Slack
When the approval tickets are created, the approvers also receive a message in Slack that they can approve or reject. If the approval is set to a group, we can create mappings of groups to Slack channels so only one message is posted in the group’s channel. The system ensures that only designated approvers are allowed to click the buttons (not everyone in the #devops channel is in the DevOps Group).
We also wanted the ability to create requests from Slack. This proved to be a bit more challenging in the end, but a ton of fun.
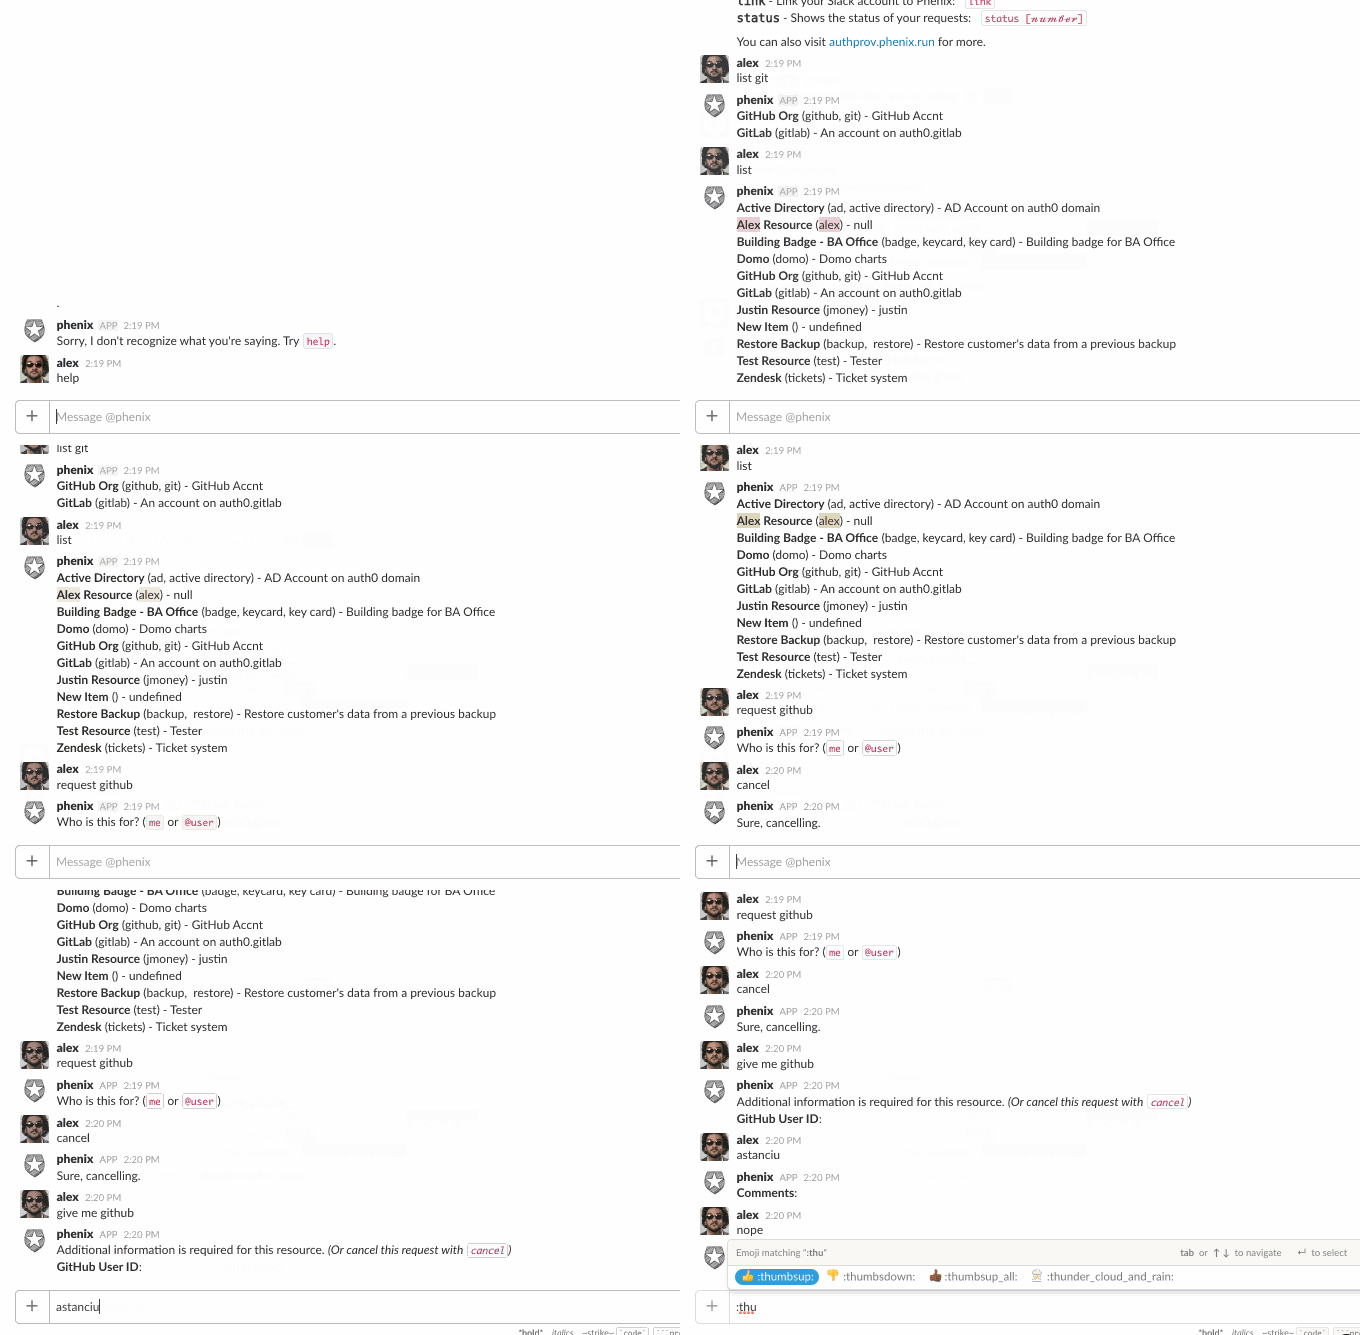
This is what it looks like:
It may not be immediately evident but there is a lot going on here.
First, the bot needs to keep track of different conversations, with different users, across different Slack teams. This is easy enough, but it also needs to keep track of where in the conversation it is.
It accepts some built-in commands, like help, list, etc., but if someone says something like, “I need access to vpn”, this is not a built-in command. To make sense of this, we use api.ai’s NLP services to process these kinds of phrases and detect if the user said something that matches making a request:
“give [user] [resource]”
“request [resource] for [user]”
“I want access to [resource]”
etc…
Once it detects that the user wants a resource and for whom (you can request things for other people, too), it then looks to see if that resource has a form defined. If so, we start a “conversation” with the user, progressively asking for the data in the form.
The hard part here was keeping track of it all. With Slack bots, there is no inherent concept of a session, so we had to build this. The bot could receive a message like “jdoe35” and it would need to figure out that user X, on team Y, is making a request for resource Z which has five form fields and this is the response to the third field, which we must have previously asked for (ex: “Enter your GitHub user id”).
Automating The Fulfillment
In the above example request for GitHub, the resource was configured for manual fulfillment. It means the designated fulfiller received a ticket representing the to-do item. They would manually do the work (add the user to our GitHub organization), and mark it as done.
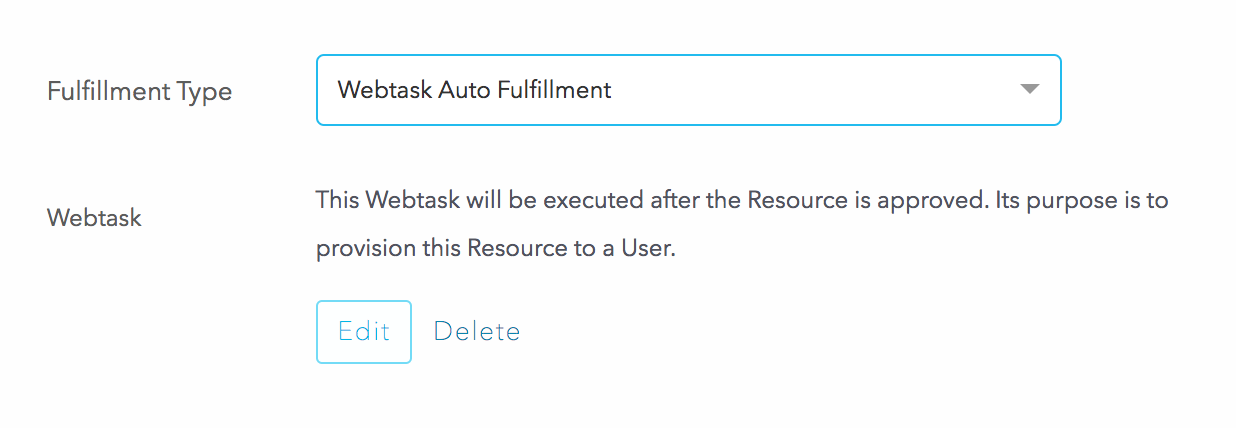
To automate this, you can configure automated provisioning via a webtask. This is a very simple and straight-forward way to quickly call an API and get something done. In the Fulfillment tab of the resource, we can select “Webtask Auto Fulfillment”:
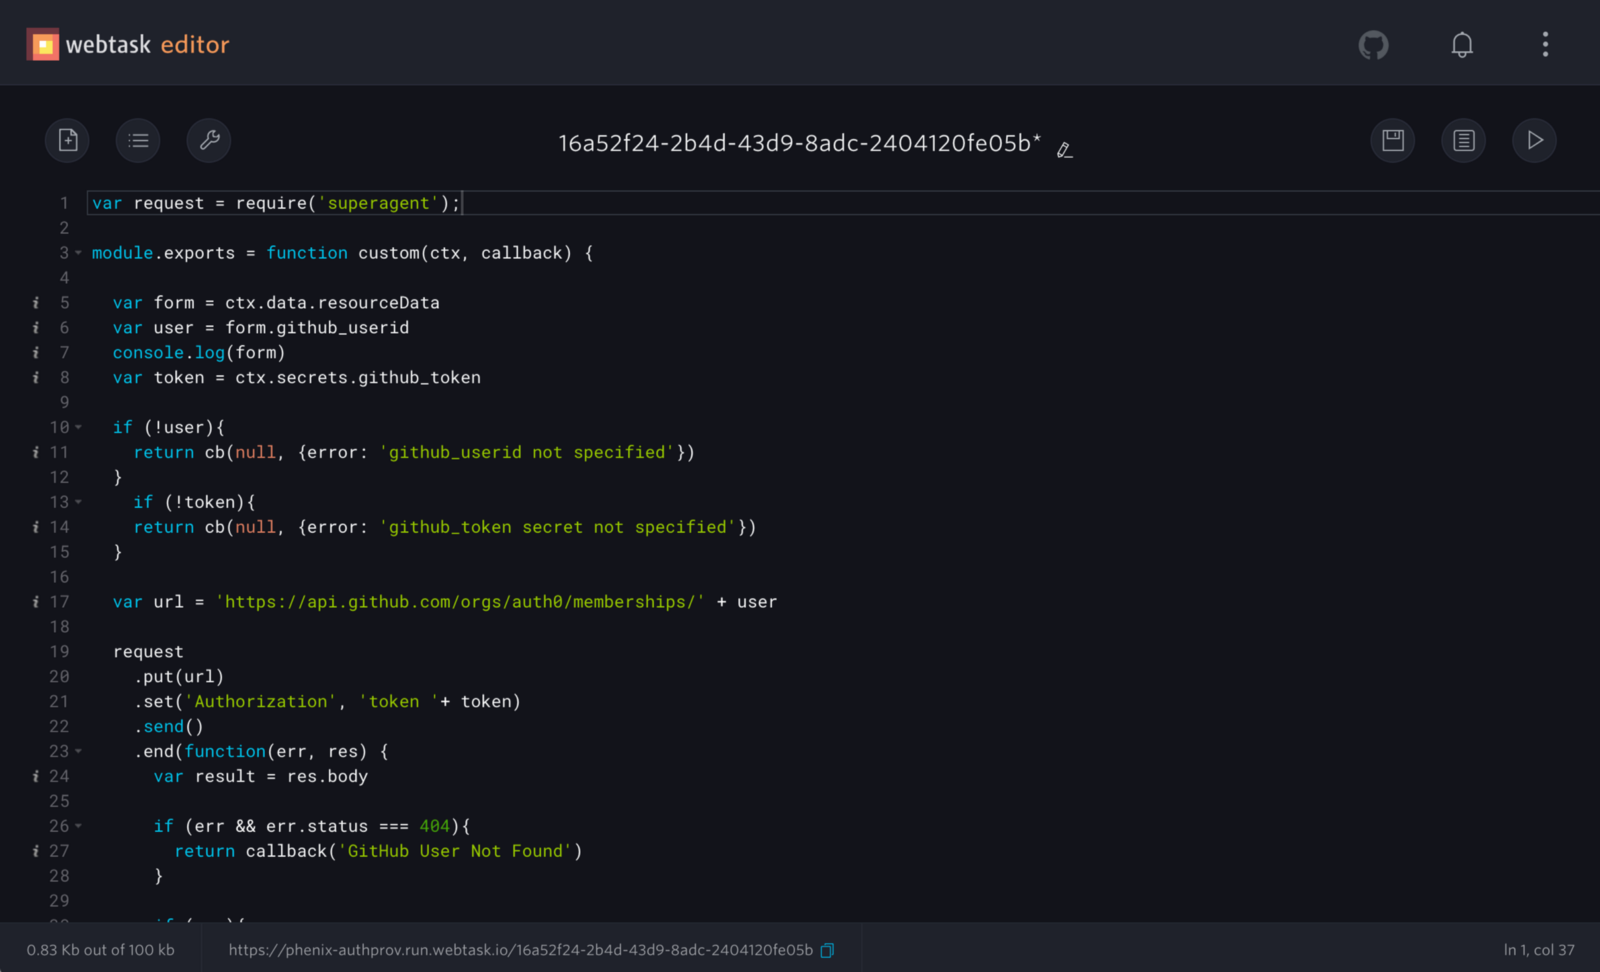
In the webtask code, we can grab the user’s GitHub userid from the form submitted with the request and make the API call:
Using the webtask platform for extensibility was a huge saver. We can let the administrators and end users customize the tool without burdening the development team. I wish every SaaS/Webapp had something like this, where, for example, you might be given a configuration choice between A or B, but maybe you want that to change depending on certain factors. The webtask platform allowed us to add this third option C to figure it out at runtime by running your own custom code.
Tracking
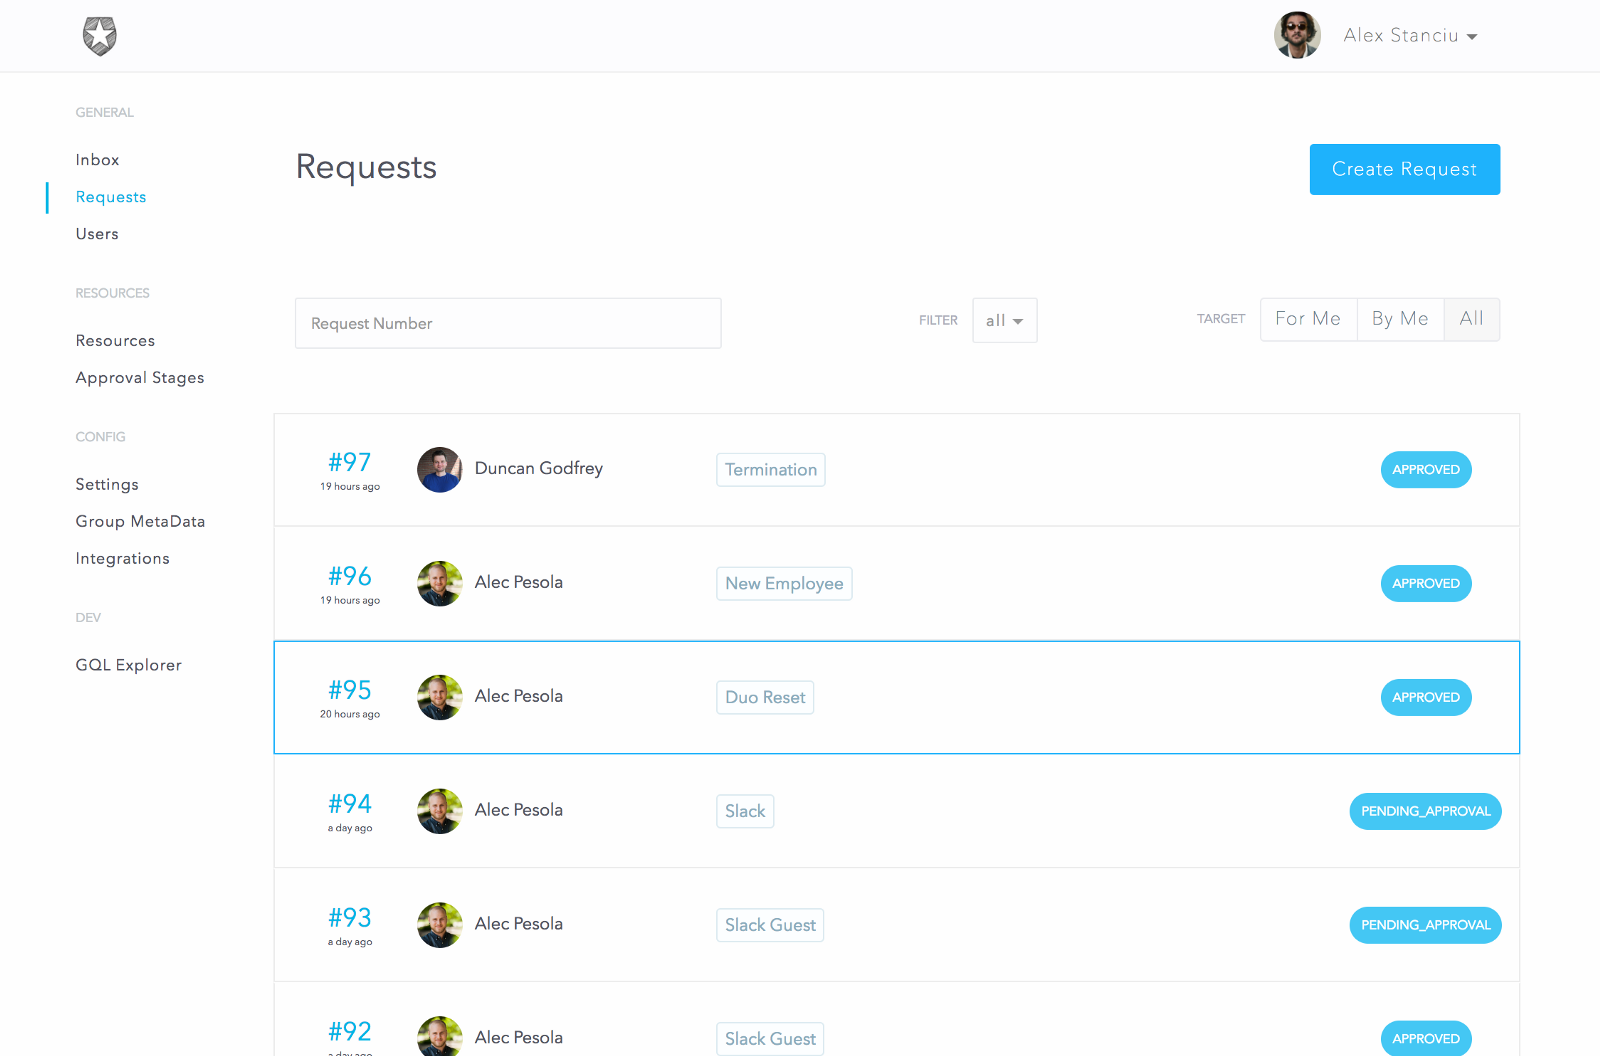
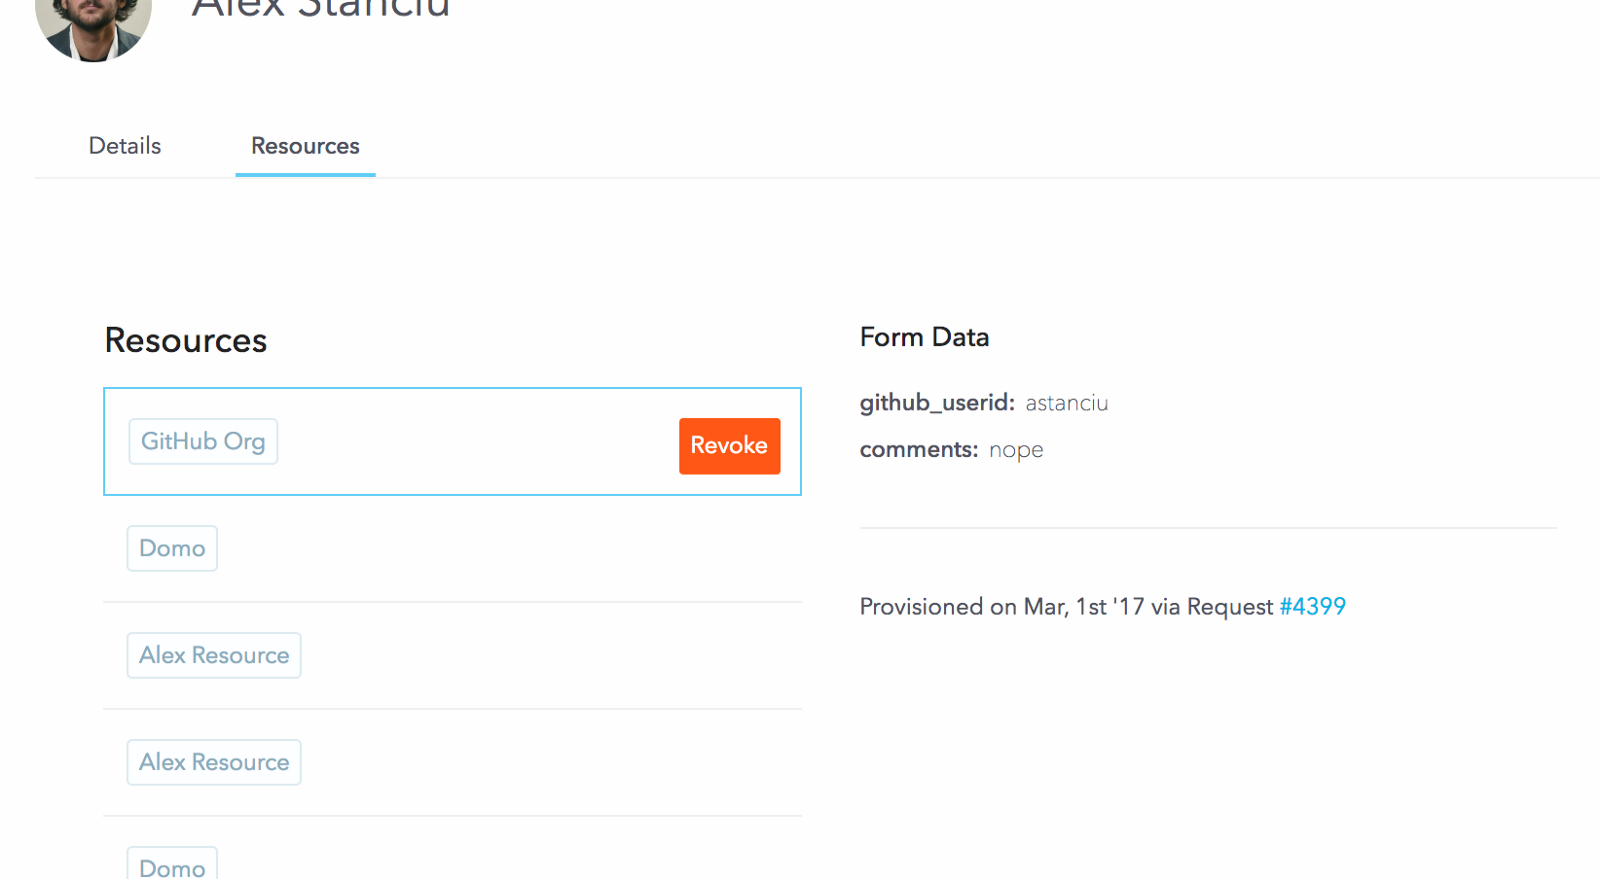
Now that a whole system is in place, it’s very easy to keep track of who has what and why. Below is a very crude interface that shows the basics, but the data is there and generating compliance reports is now trivial.
Building a lightweight certification mechanism on top of this would also be fairly straight-forward. (Certification is the process of periodically asking someone, usually a manager, if a user should still have access to X, thereby catching sensitive access that was only temporarily needed.)
Engineering
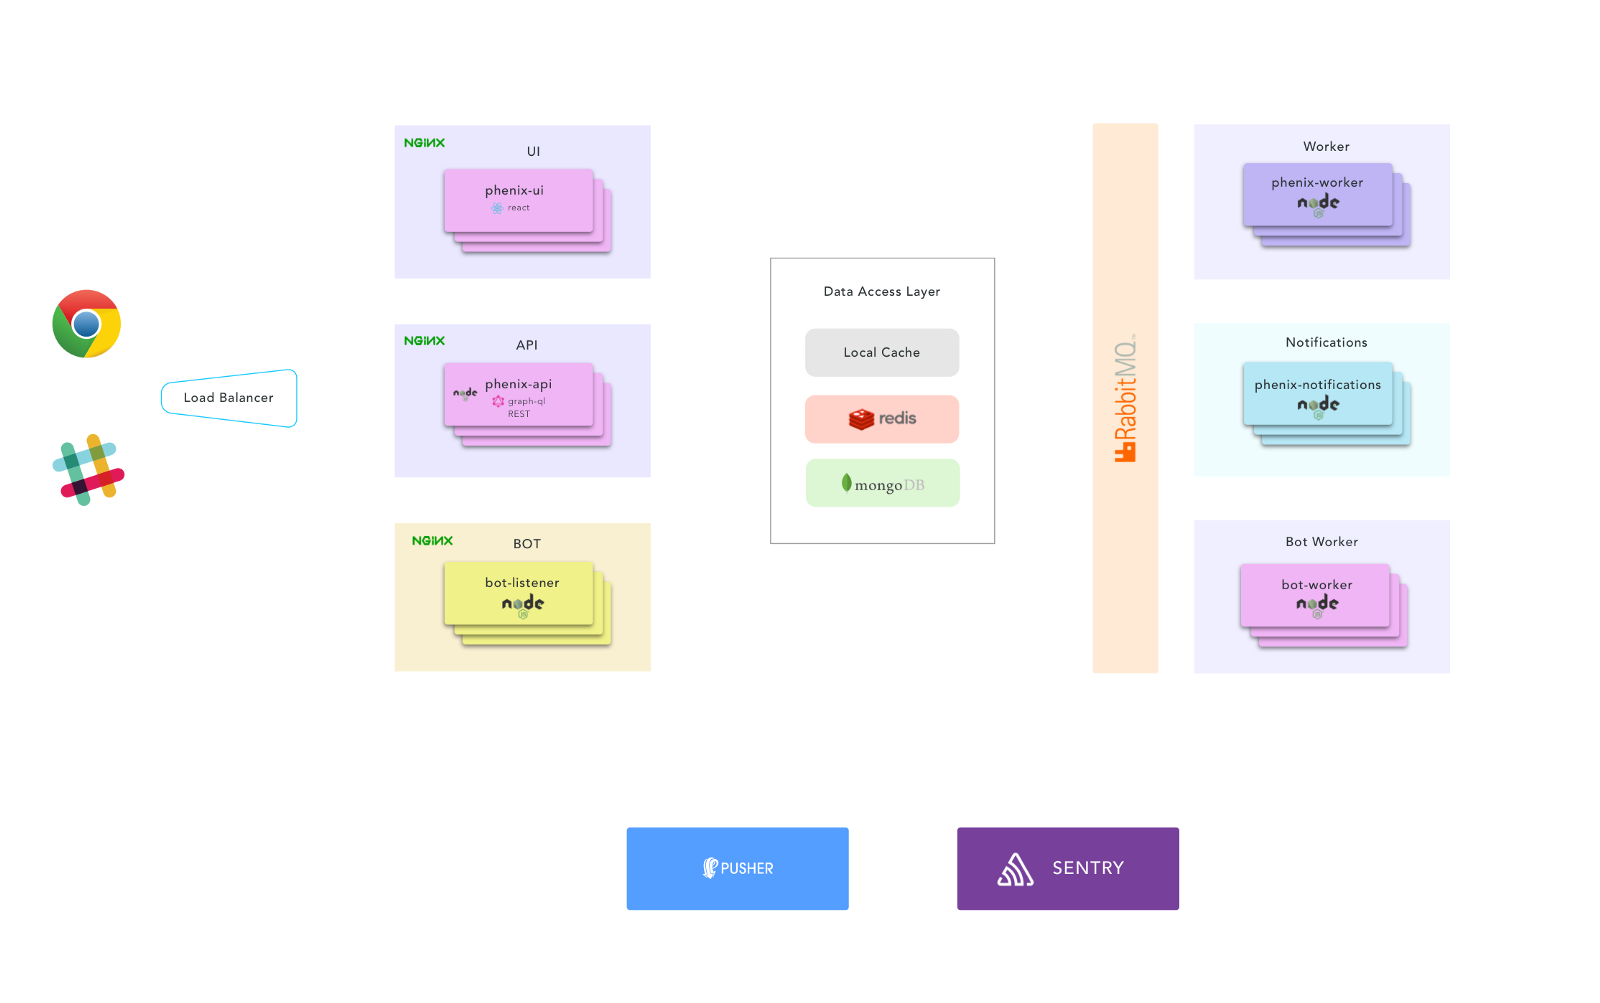
From the start we wanted to design and engineer this application as if it might some-day become a product. This meant building it from the ground up with scaling, multi-tenancy, security and performance in mind. We also wanted to try out some new technologies and patterns.
The front end is a React, Single Page App. Nothing too fancy going on here beyond current modern standards and recommendations (code splitting, lazy loading, etc…)
We decided to try out GraphQL as the API interface. The data model fits pretty well for the use case. There are lots of joins happening in the data model and with GraphQL the client can get everything in one shot.
To keep the API as light as possible, we split out the request processing and notification services into separate workers and handed them tasks via a queue.
The bot also follows this convention. We decided to not use Slack’s RTM API since it uses WebSockets, which come with different types of scaling problems. Instead, we use Slack’s Event API which functions like a webhook; we subscribe to chat messages and Slack does a POST to us with those messages. The trick here is that there could be many teams, with many channels, and if the bot is invited to very chatty channels, it will result in LOTS of POSTed messages from Slack.
If the bot is in a channel (versus Direct Message), it only responds if called by name and it responds in a thread. This minimizes “bot-spam” in public channels.
To handle this, we have an extremely light-weight HTTP server that receives the POSTed message, replies back to Slack with a 200, and puts the data in a queue. A separate bot worker processes the messages and replies to the user. We use Redis to store the conversation sessions, so while making a request and answering questions, there could be many bot workers actually replying.
Speaking of Redis, we also have a fairly standard caching layer for things that don’t change that often (resources, groups, users, tenant settings, API tokens, etc…) we proxy those through a layer of Local Cache -> Redis -> Mongo. A solid caching strategy is especially important when using GraphQL.
Aside: Securing Applications with Auth0
Are you building a B2C, B2B, or B2E tool? Auth0, can help you focus on what matters the most to you, the special features of your product. Auth0 can help you make your product secure with state-of-the-art features like passwordless, breached password surveillance, and multifactor authentication.
We offer a generous free tier so you can get started with modern authentication.
Going Forward
In its current state, Phenix is a fairly solid access request platform with some light provisioning. We are planning to keep building on top of this to create a robust provisioning engine with full connector support that handles all types of CRUD operations against target systems. We are also building a reconciliation engine to sync data into the system from other sources.
While Phenix is an internal tool for now, we are aware that it could be beneficial to others and we may decide to open it later. If you think something like this would be useful to your organization, or if you have any other thoughts or questions on this topic, please leave us a comment.


