As the cloud continues to spread and sensitive data is entrusted to service providers, customers wonder how it is protected and how they can exercise control over the security of their data. One way to allow a customer to take control of the confidentiality of their data is to use the Bring Your Own Key (BYOK) approach. In this article, you'll learn what BYOK is and how you can leverage it in Auth0.
What Is Bring Your Own Key?
Cloud service providers secure customer secrets and data using envelope encryption. This is a proven security mechanism that ensures a high level of protection of customer data using a hierarchy of encryption keys. Specifically, to encrypt data, the cloud provider platform uses Data Encryption Keys that are wrapped by a Root Key. So, to access the Data Encryption Key, a service needs access to the Root Key. Optionally, other intermediate keys can exist between the Data Encryption Keys and the Root Key.
This hierarchy not only enables data protection but also aims at protecting the encryption keys. Encryption and decryption of data are performed by a Key Management System (KMS) that leverages this key hierarchy. In addition, most cloud providers use a Hardware Security Module (HSM) to store the Environment Root Key, ensuring the strongest protection.
In the end, customers' sensitive data are encrypted using the Data Encryption Key, but due to this key hierarchy, only those who have access to the root key of this hierarchy can actually access the unencrypted data.
Why BYOK?
Usually, the cloud service provider issues and manages the Root Key. Ultimately, the cloud service provider has control over the key hierarchy, the data encryption, and the security of the customer data. However, this is not always the situation that a customer wants. There may be several reasons why a customer doesn't want the cloud service provider to control the Root Key and then the key hierarchy:
- They may need to comply with some key provenance requirements.
- They may need to comply with some data protection requirements.
- They may need to attain control of the lifecycle of the cryptography for users' sensible data.
Think of the financial or healthcare sectors, where data confidentiality is key. In these cases, cloud service providers allow customers to issue and use their own encryption key as the Root Key for the key hierarchy, hence the name Bring Your Own Key (BYOK) for this approach to take control of the encryption in a cloud environment.
BYOK in Auth0
As with any cloud service provider, Auth0 by Okta uses envelope encryption to secure customer data, too. To encrypt data, Auth0 uses Data Encryption Keys that are wrapped by a Tenant Master Key, which in turn is wrapped by the Environment Root Key. Take a look here to have more details on the Auth0 key hierarchy.
Auth0 stores the Environment Root Key in a Hardware Security Module (HSM), which is deployed in a highly available, multiple geographic configuration. In other words, the HSM will failover to another region in case of a severe region-wide incident. The HSMs are available for the two private cloud deployments supported by Auth0 — AWS and Azure — with different encryption algorithms.
With BYOK, Auth0 allows tenant administrators to securely import their own Root Key to the respective cloud provider's HSM. They can use the Auth0 Dashboard or Management API to replace the Auth0 Environment Root Key with their own Customer Provided Root Key, as you will see in the next section.
Bring Your Own Key is available on Enterprise plans with Highly Regulated Identity add-on.
How to Bring Your Key in Auth0
In this section, you will learn how to import your own encryption key in your Auth0 environment using the Auth0 dashboard. Make sure you have an Enterprise plan with the Highly Regulated Identity add-on to be able to use this feature. Basically, the process consists of three steps:
- Generate and download a wrapping encryption key from the Auth0 dashboard.
- Generate your own encryption key and wrap it with the downloaded wrapping encryption key.
- Upload the wrapped encryption key via the Auth0 dashboard.
For demo purposes, you will use OpenSSL to generate and wrap your encryption key, but in a real-world scenario, you should use an HSM, either on-premises or cloud-based, for key generation.
Make sure you have OpenSSL installed on your machine. If you have a macOS machine, be aware that it ships with LibreSSL, which is a fork of OpenSSL and has some differences.
Get the wrapping encryption key
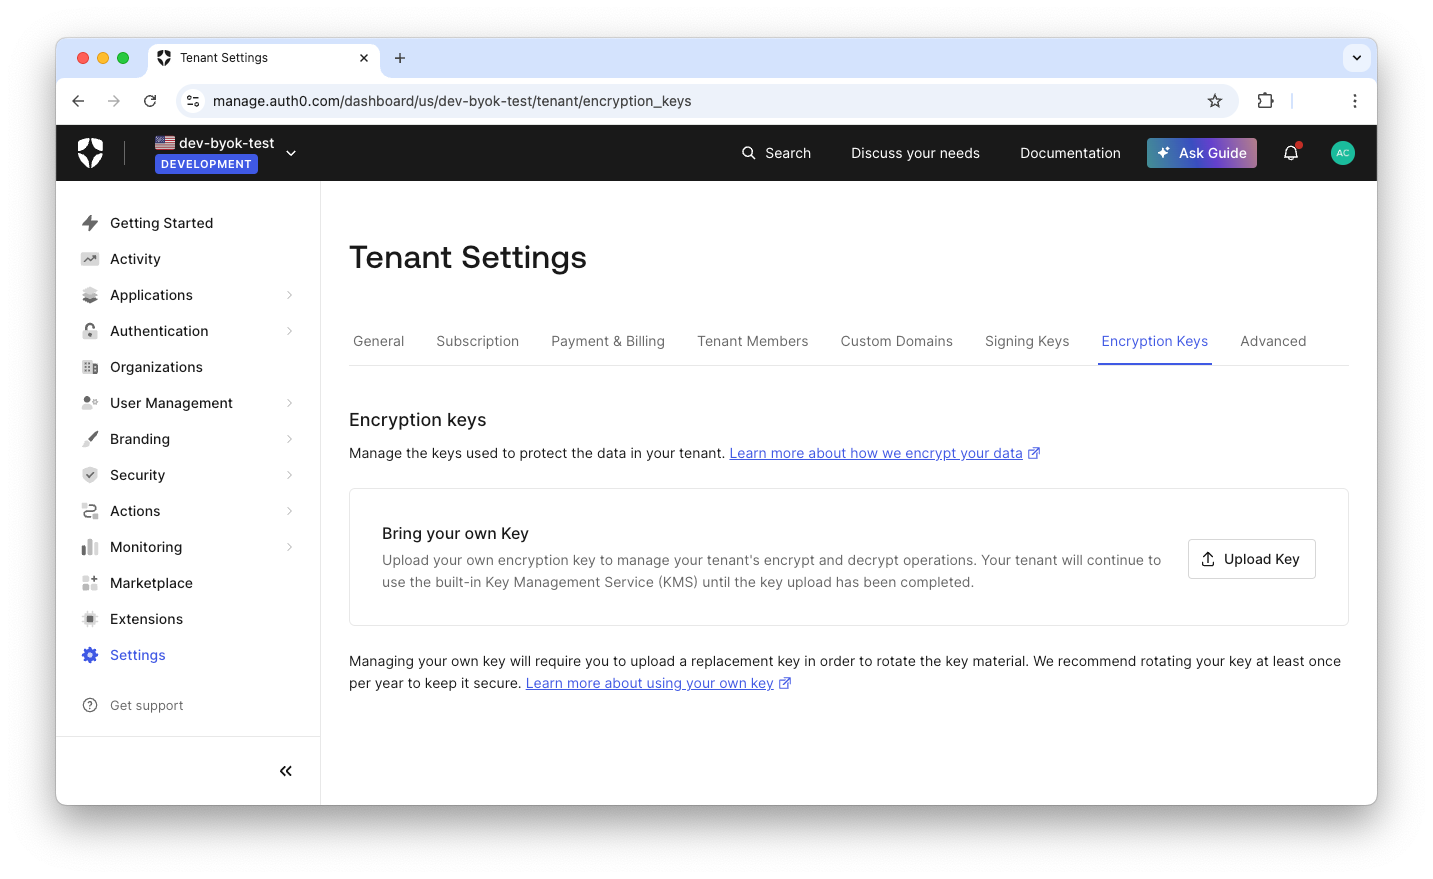
The first step is to get the wrapping encryption key from Auth0. Go to your Auth0 dashboard, click the Settings menu item, and select the Encryption Keys tab. You will see the following screen:

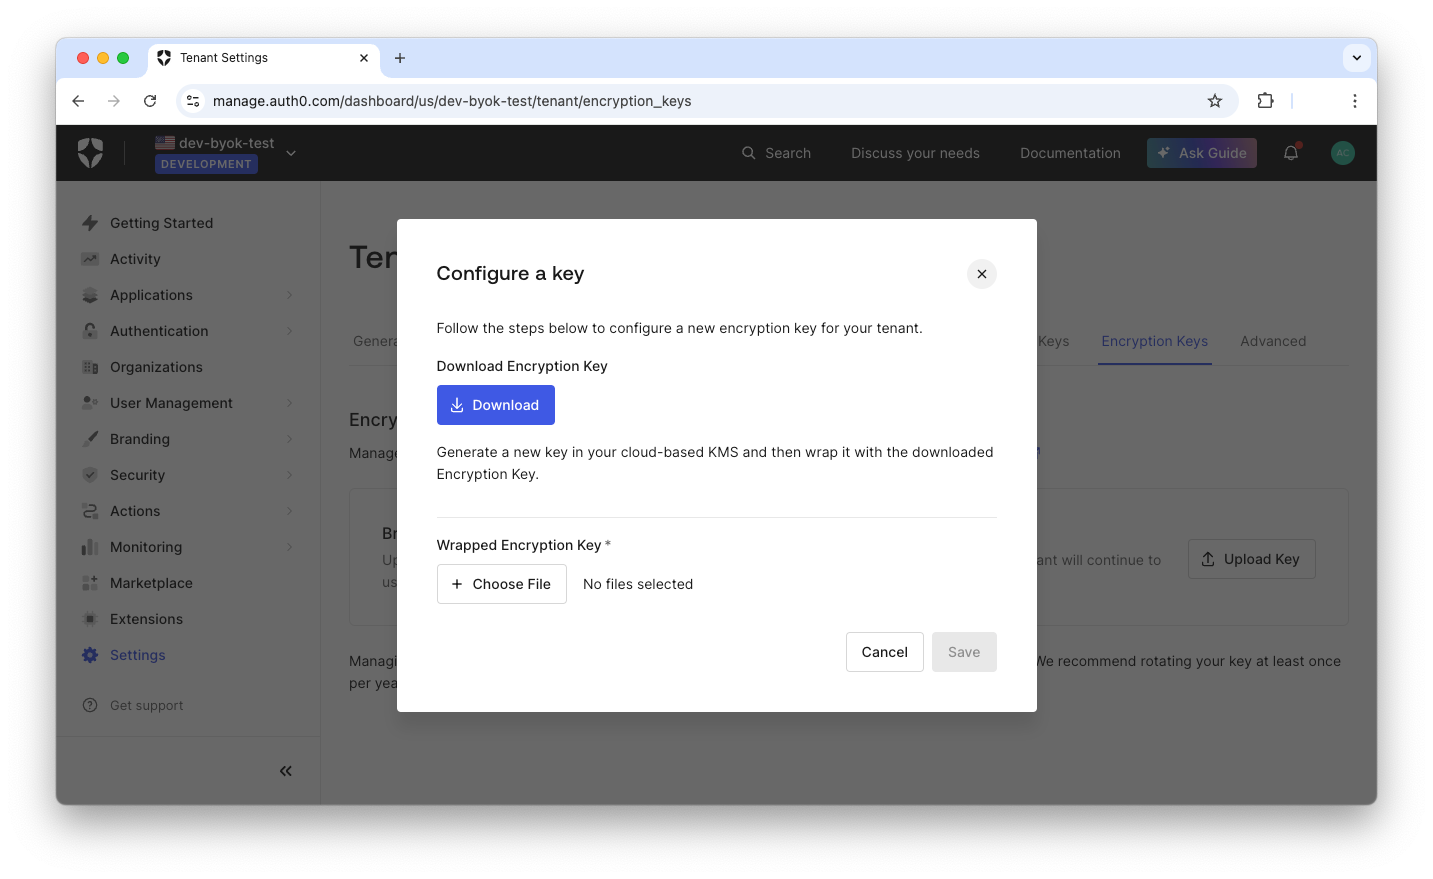
Now, click the Upload Key button and you will get the modal shown below:

Click the Download button to get the wrapping encryption key from Auth0. This ensures that your own key will be securely transferred to Auth0.
Until you have uploaded your own key, Auth0 will continue to use the built-in Environment Root Key.
Generate and wrap your own key
If you are using a Hardware Security Module to generate your key, follow its specific instructions. For test purposes, we are using Open SSL here, which requires some preprocessing of the content of the PEM file you downloaded from Auth0, the key generation, and then the actual key wrapping. Let's examine each step.
Preprocess the wrapping key
Open the file with a text editor and manually remove the PEM header and footer, i.e., the -----BEGIN PUBLIC KEY----- and -----END PUBLIC KEY----- strings. Then, remove all the line breaks in the file. The result will be a one-line file with the bits of the key.
Now, decode the content of this file from Base64 to binary. In Linux-based systems and macOS, you can use the base64 builtin tool as shown in the following example:
cat wrapping-key.pem | base64 -d > wrapping-key.bin
Assuming that your Base64-encoded file is named wrapping-key.pem, the previous command generates the binary decoded version into the file named wrapping-key.bin.
On Windows systems, you can use the certutil tool as follows:
certutil -decode wrapping-key.pem wrapping-key.bin
Generate your own key
Each cloud provider has its own requirements for the key you should generate, so you should use the appropriate settings for the CKM_RSA_AES_KEY_WRAP algorithm parameters.
Assume you are using AWS as your Auth0 cloud provider in our example. You can generate your 32 bytes (256 bits) symmetric key as follows:
openssl rand -out customer-key-material-key.bin 32
You also need a 32 bytes-long ephemeral AES encryption key that is required for AES Key Wrap with padding step:
openssl rand -out ephemeral-aes-kek-kwp.bin 32
Now you have two new files:
customer-key-material-key.bin, which contains your symmetric key that will be used instead of the Auth0 Environment Root Key. Let's call it the customer key.ephemeral-aes-kek-kwp.bin, which contains another symmetric key that will be used to wrap the customer key, as required by AWS. Let's call it the ephemeral key.
Wrap your own key
Let's start by wrapping the customer key with the ephemeral key. Use the following command:
openssl enc -id-aes256-wrap-pad \
        -K "$(xxd -p < ephemeral-aes-kek-kwp.bin | tr -d '\n')" \
        -iv A65959A6 \
        -in customer-key-material-key.bin \
        -out customer-key-material-wrapped.bin
You will get the customer-key-material-wrapped.bin file.
Now, wrap the ephemeral key with the wrapping key you downloaded from Auth0 and preprocessed earlier:
openssl pkeyutl \
    -encrypt \
    -in ephemeral-aes-kek-kwp.bin \
    -out ephemeral-aes-kek-kwp-wrapped.bin \
    -inkey wrapping-key.bin \
    -keyform DER \
    -pubin \
    -pkeyopt rsa_padding_mode:oaep \
    -pkeyopt rsa_oaep_md:sha256 \
    -pkeyopt rsa_mgf1_md:sha256
The result of this command will be the ephemeral-aes-kek-kwp-wrapped.bin file.
As the final step, concat the two wrapped files you generated and encode the result with Base64:
cat ephemeral-aes-kek-kwp-wrapped.bin customer-key-material-wrapped.bin | base64 > encrypted-key-material-b64
The file encrypted-key-material-b64 is the file you will upload to Auth0 to complete the BYOK process.
Upload your newly created Root Key
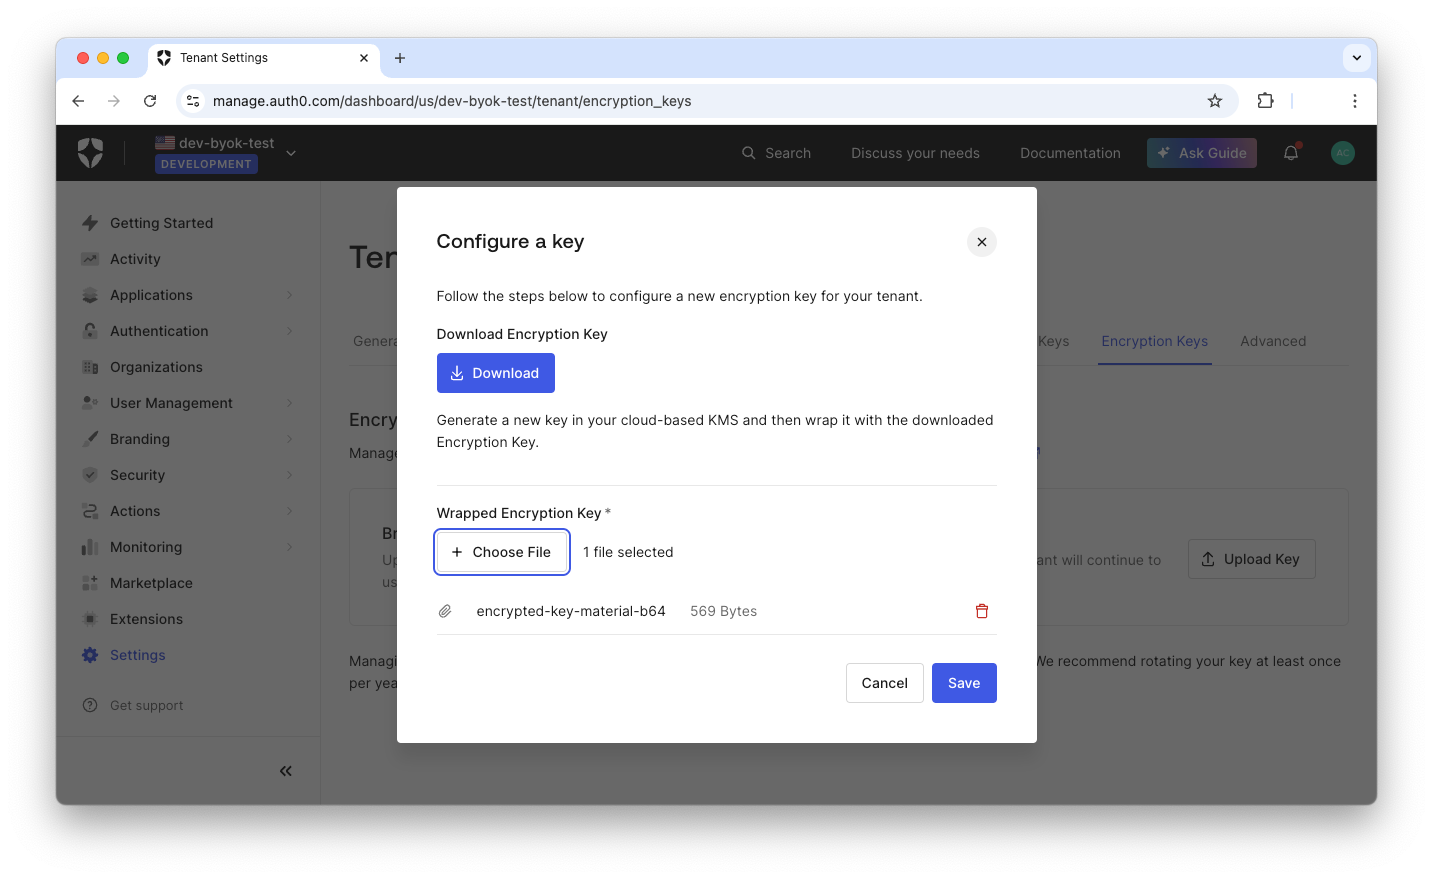
Go back to your Auth0 dashboard and follow the steps again to open the modal to upload the key. This time, click the Choose File button and select the encrypted-key-material-b64 file you created in the previous step:

Click the Save button to complete the BYOK process.
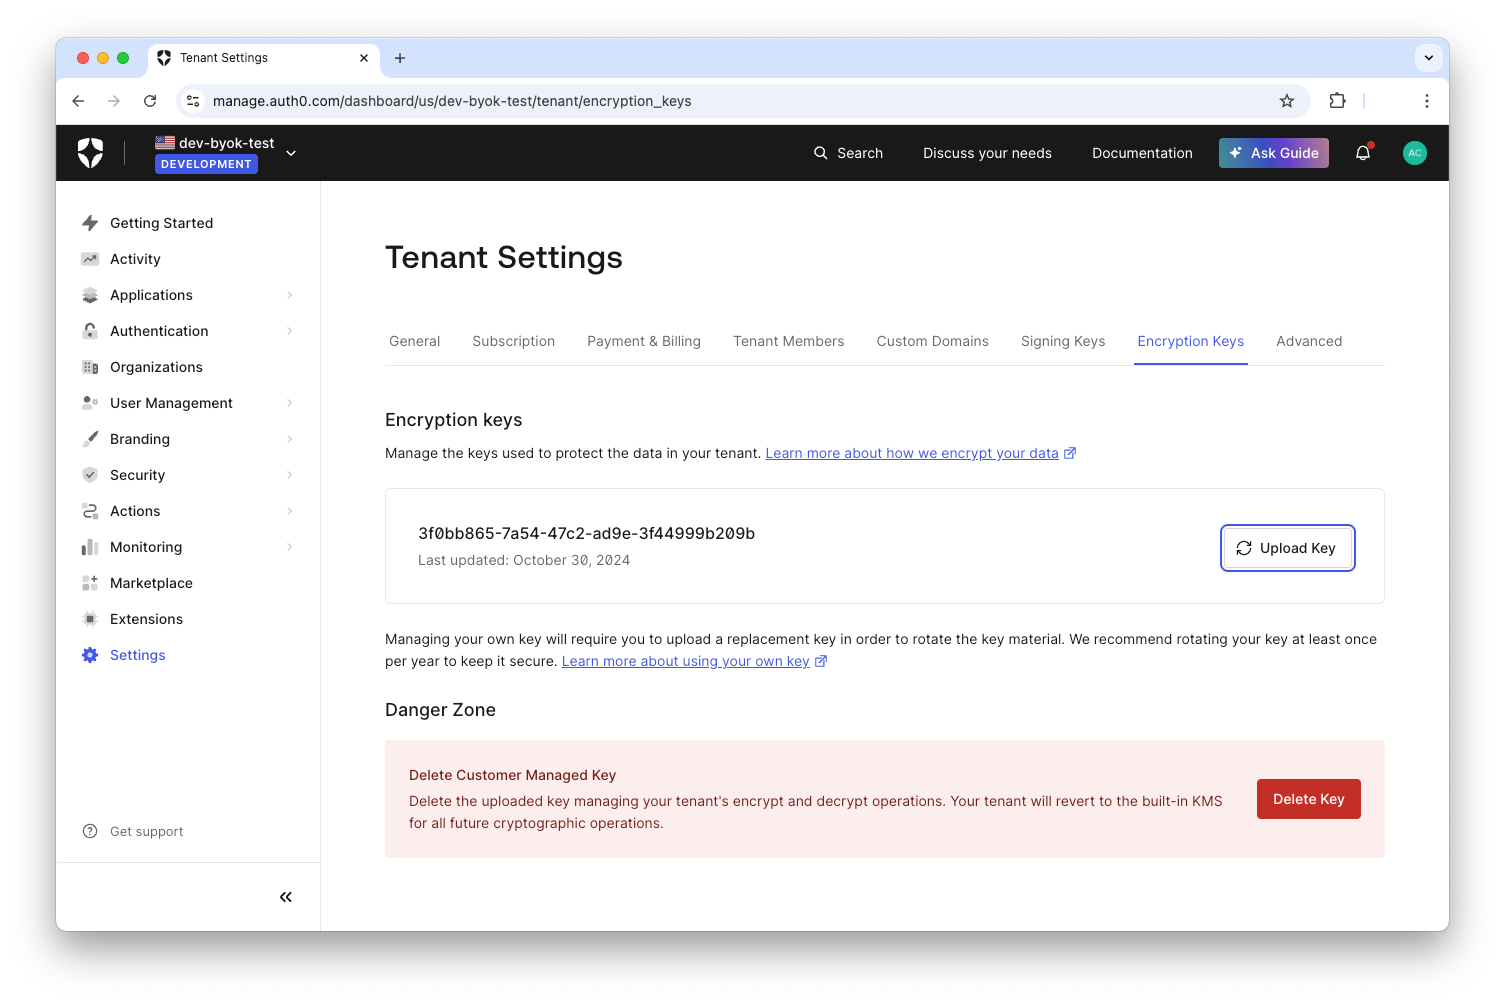
Congratulations! Now Auth0 will be using your own encryption key as your Environment Root Key:

Keep in mind that by importing your own encryption key, you implicitly deauthorize Auth0 from managing the lifecycle of the Environment Root Key. This means that now you are in charge of rotating the key periodically.
Automate the Key Generation and Wrapping
As you can see, there are a few manual steps to generate and wrap the encryption key to upload to Auth0. Fortunately, you can blend it all into one script as the following (only for Bash):
#!/bin/bash

# Check if a .pem file is passed as an argument
if [ -z "$1" ]; then
    echo "Usage: $0 <path to pem file>"
    exit 1
fi

PEM_FILE="$1"

#Ensure the file exists
if [ ! -f "$PEM_FILE" ]; then
    echo "File not found: $PEM_FILE"
    exit 1
fi

#1. Remove the first line (BEGIN CERTIFICATE)
#1. Remove the last line (END CERTIFICATE)
#1. Remove  all line breaks
#4. Remove any trailing characters like whitespace

CERT_DATA=$(sed '1d;$d' "$PEM_FILE" | tr -d '\n\r' | tr -d ' ')


if [ -z "$CERT_DATA" ]; then
    echo "Cleaned certificate is empty"
    exit 1
fi


echo "Processed certificate data: $CERT_DATA"

PUBLIC_WRAPPING_KEY=public-wrapping-key.bin

printf "%s" "$CERT_DATA" | base64 -D  > $PUBLIC_WRAPPING_KEY

if [ ! -f "$PUBLIC_WRAPPING_KEY" ]; then
    echo "Public Wrapping key file does not exist"
    exit 1
fi

openssl_operations() {
    echo "Running OpenSSL..."

    openssl rand -out customer-key-material-key.bin 32
    openssl rand -out ephemeral-aes-kek-kwp.bin 32
    openssl enc -id-aes256-wrap-pad \
        -K "$(xxd -p < ephemeral-aes-kek-kwp.bin | tr -d '\n')" \
        -iv A65959A6 \
        -in customer-key-material-key.bin \
        -out customer-key-material-wrapped.bin

    openssl pkeyutl \
    -encrypt \
    -in ephemeral-aes-kek-kwp.bin \
    -out ephemeral-aes-kek-kwp-wrapped.bin \
    -inkey public-wrapping-key.bin \
    -keyform DER \
    -pubin \
    -pkeyopt rsa_padding_mode:oaep \
    -pkeyopt rsa_oaep_md:sha256 \
    -pkeyopt rsa_mgf1_md:sha256

    cat ephemeral-aes-kek-kwp-wrapped.bin customer-key-material-wrapped.bin | base64 > encrypted-key-material-b64

    rm customer-key-material-key.bin ephemeral-aes-kek-kwp.bin customer-key-material-wrapped.bin ephemeral-aes-kek-kwp-wrapped.bin public-wrapping-key.bin

    # echo "$DECODED_CERT" | openssl ...
}

openssl_operations
This simplifies the generation and wrapping steps, making the process more straightforward, as you can see in the following video:
Try out Auth0 authentication for free.
Get started →Conclusion
This article showed you how Auth0 supports Bring Your Own Key, an approach that lets you control the provenance of the root key used to encrypt your secrets and data in the Auth0 environment.
You used OpenSSL as a testing tool to generate and wrap your own key and learned how to use the Auth0 dashboard to configure your environment with it.
A special thanks to Filip Palach and Lucas Gomes for their work on the OpenSSL process and the script.
If you want to learn more about BYOK in Auth0, leave a message below.
About the author

Andrea Chiarelli
Principal Developer Advocate
I have over 20 years of experience as a software engineer and technical author. Throughout my career, I've used several programming languages and technologies for the projects I was involved in, ranging from C# to JavaScript, ASP.NET to Node.js, Angular to React, SOAP to REST APIs, etc.
In the last few years, I've been focusing on simplifying the developer experience with Identity and related topics, especially in the .NET ecosystem.
