
As described in a previous blog post, supporting your business customers’ security standards becomes essential as your SaaS application scales from serving individual users to enterprise organizations. Auth0 Enterprise Connections enables seamless integration with external, federated identity providers (IdPs) to meet enterprise Identity and security requirements. While this feature is powerful, it typically requires Auth0 Tenant Admins or Editors to set up each connection individually or demand custom development within your SaaS application to delegate the tasks to customer admins.
Self-Service Single Sign-On (SSO) allows B2B SaaS Customers to enable self-service functionality more easily and quickly than before.
Self-service SSO uses the following components to delegate setup to your customers:
Self-service profile: Defines key elements of customer SSO implementations, such as the identity providers they can use for SSO and which user attributes they must capture, such as email.
Self-service access ticket: This ticket, provided as a magic URL, grants customer admins access to the SSO setup assistant and sets specific details for their resulting SSO integration. Customer admins can either create a new connection or edit an existing connection.
SSO setup assistant: Guides customer admins through the SSO setup process.
In this blog post, I'll show you how to set up the feature step by step.
Set Up Self-Service SSO Feature on the Management Dashboard
First, set up this feature on the Auth0 Management dashboard to understand how it works.
Create a Self-service profile
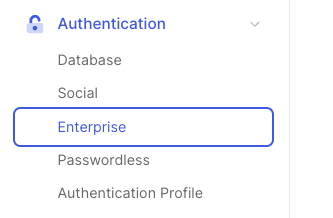
On the Auth0 Management dashboard, choose Authentication - Enterprise in the navigation menu.
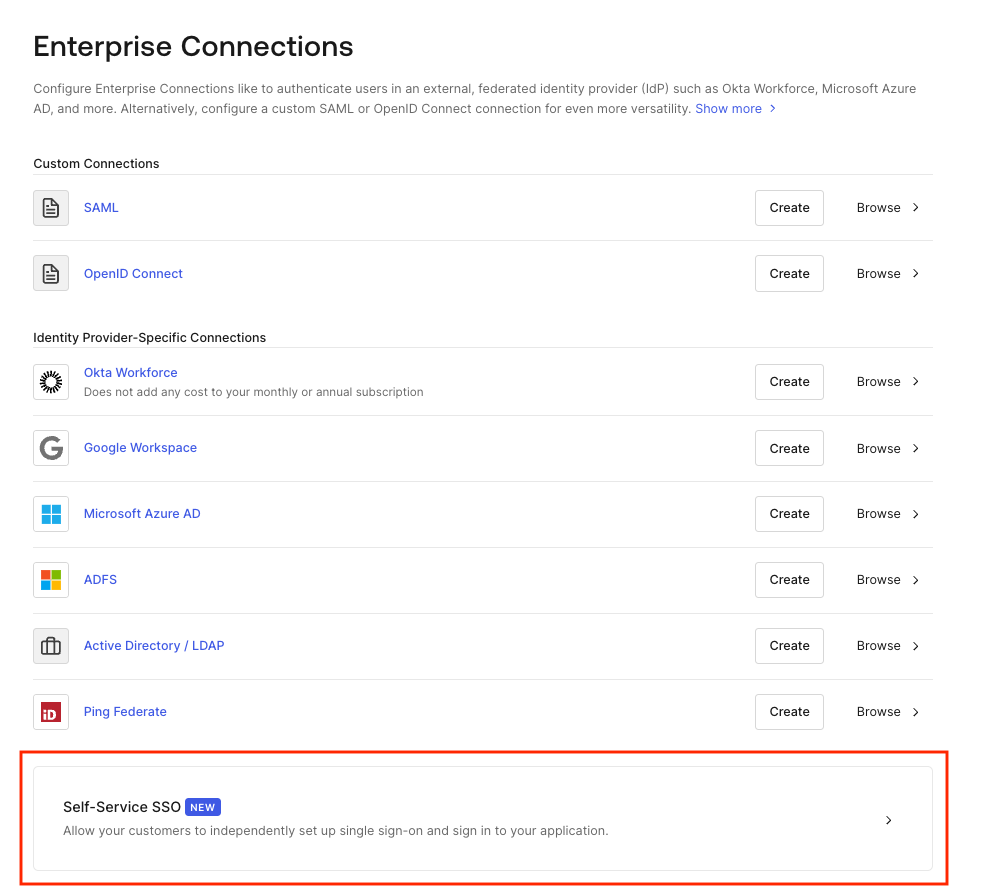
You will see a list of connections that we support for enterprise. Scrolling to the bottom, you will find the Self-Service SSO box. Let's click it.
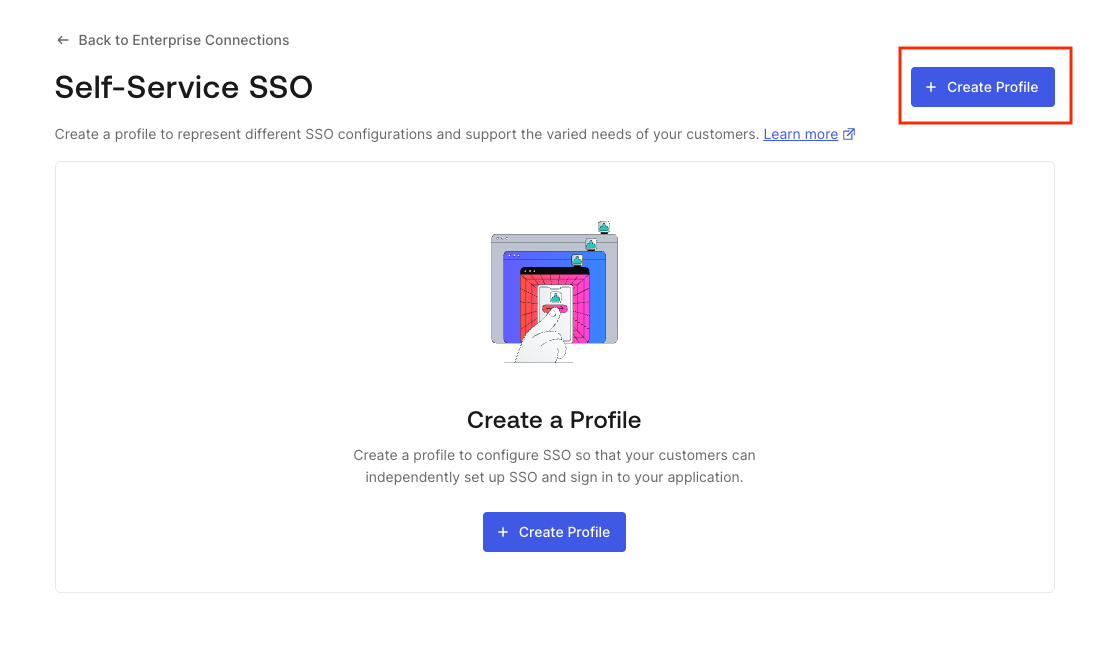
Press + Create Profile to create a new profile.
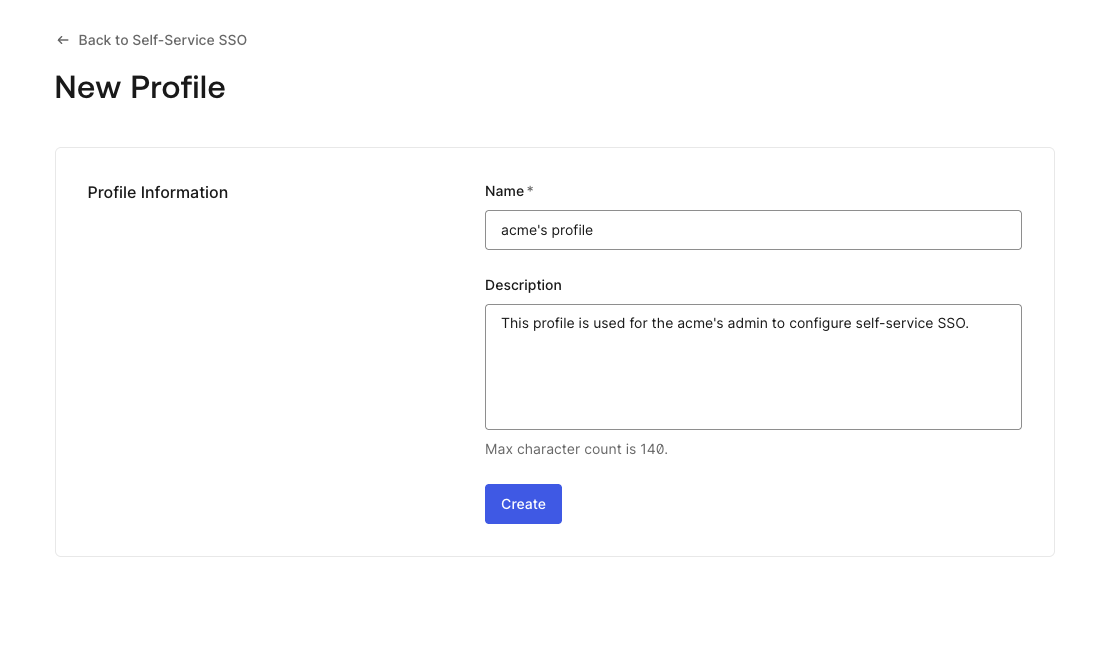
Enter the Name of the profile and Description (optional).
In the Settings tab, you can select the identity providers that the profile supports.

You can also optionally configure the branding to provide a customized experience. I leave default settings in this post.
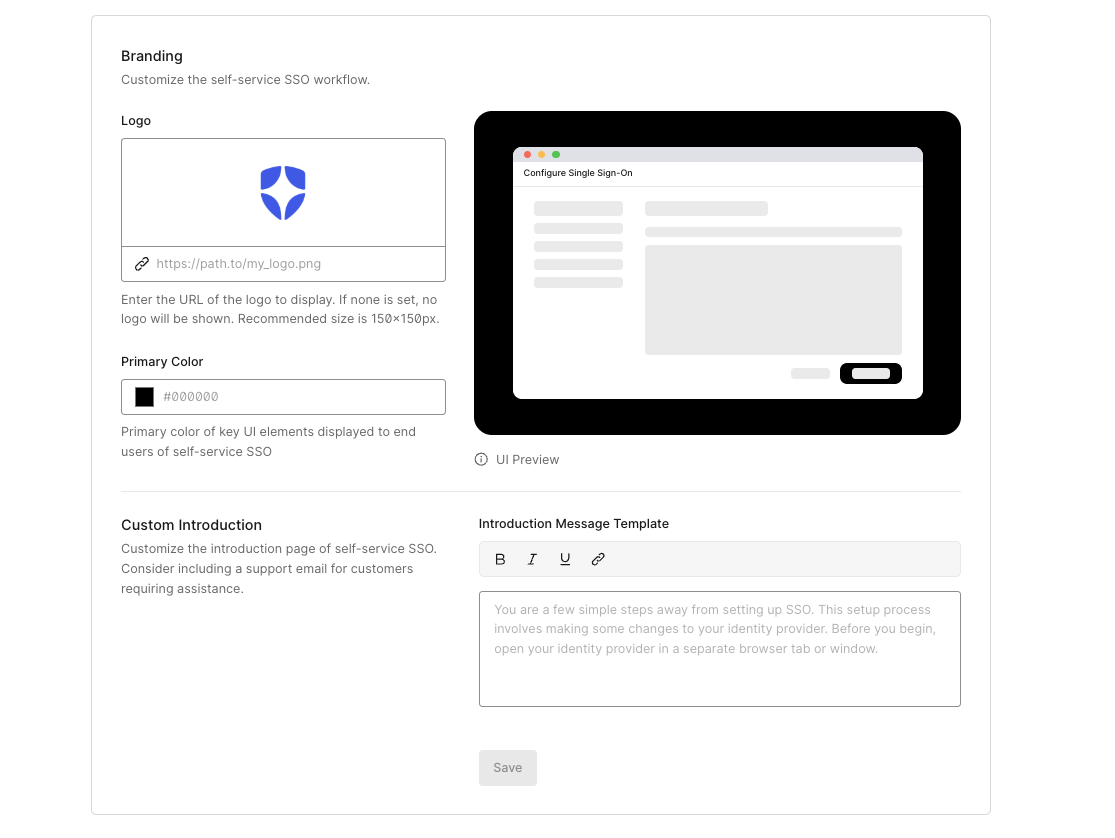
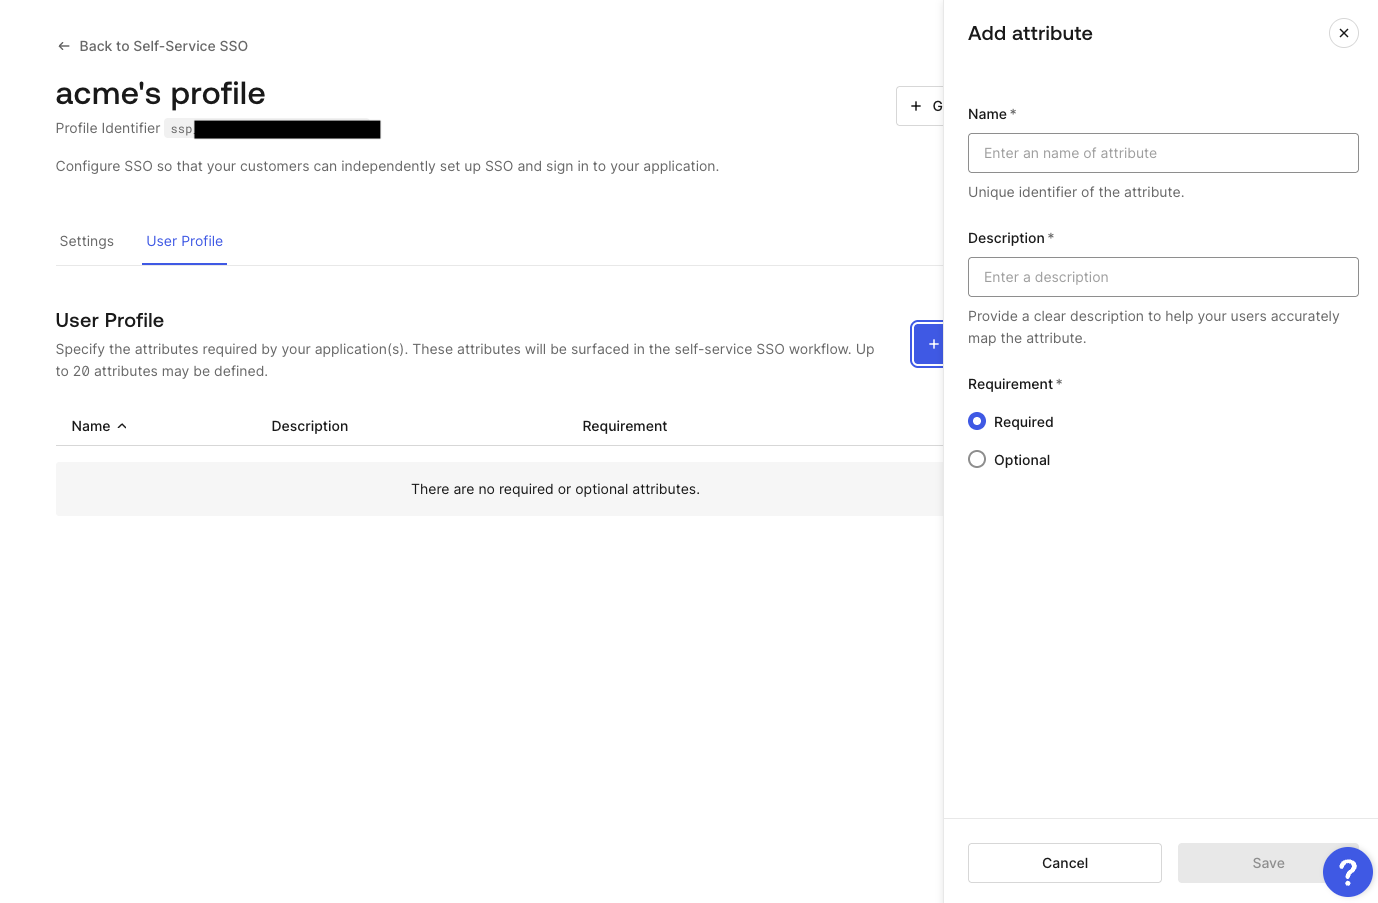
If your application requires specific attributes, you can add them in the User Profile tab. Customer admins must add these attributes to their identity providers' attributes. Attributes can be email, department, title, and others.
Now, we are ready to generate a ticket for customer admins.
Generate a Ticket for End-User Admin to Configure SSO
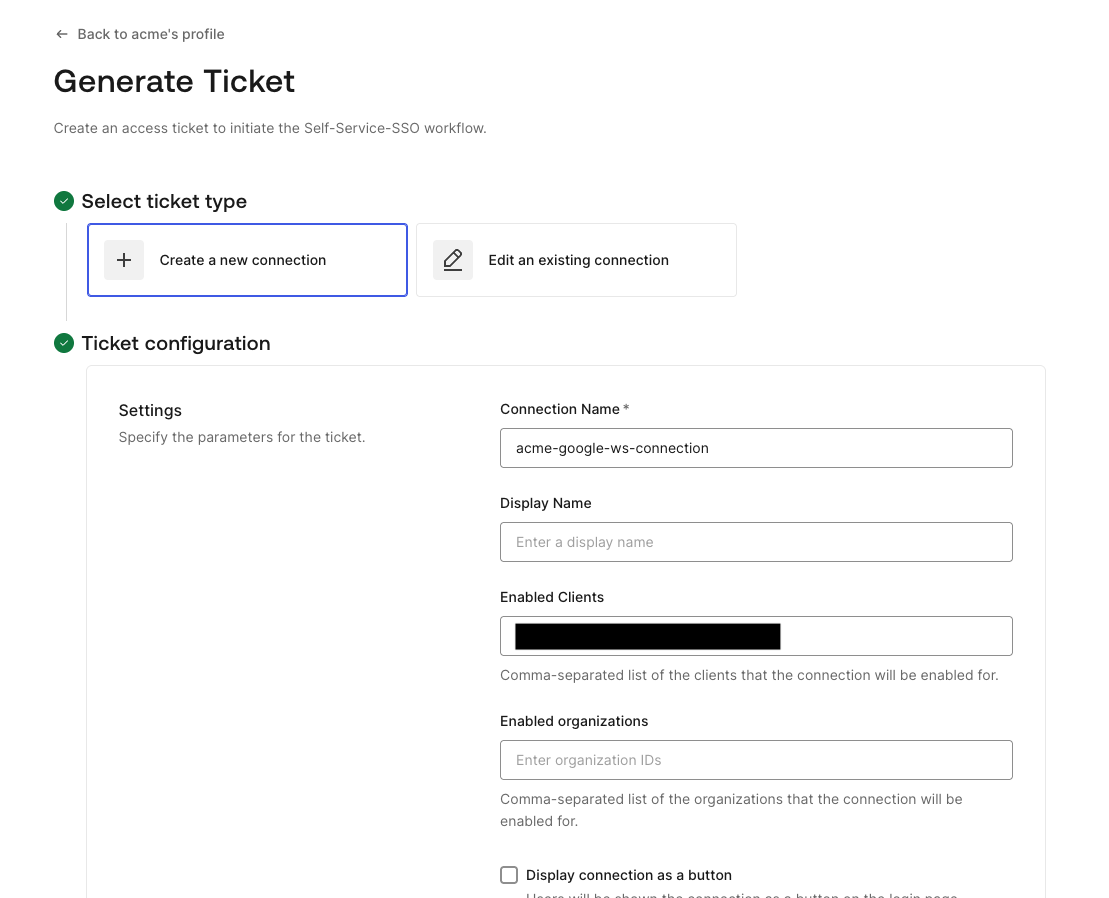
You can generate a ticket for a customer admin to configure SSO by clicking + Generate Ticket on the profile screen.
On the next page, you can set up the ticket to create a new connection or edit an existing one. You must specify the Connection Name field to create a new ticket. To edit the connections flow, you must specify the Connection ID field instead. You can enter clients (Auth0 Applications) in the Enabled Clients field and Organizations in Enabled organizations field depending on your SaaS needs. You can also specify other options, too.
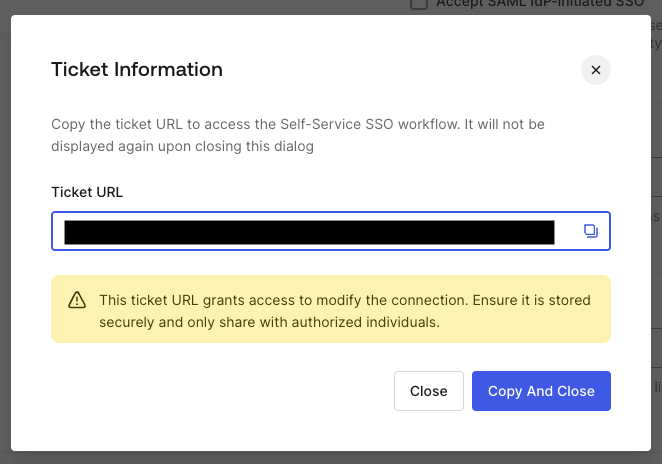
Once you have set options, click Create Ticket at the bottom of the page to generate a ticket. A pop-up window will appear with a URL to set up or edit an SSO connection. You will provide this URL to a customer admin. For security reasons, you should store this URL securely and only share it with authorized individuals.
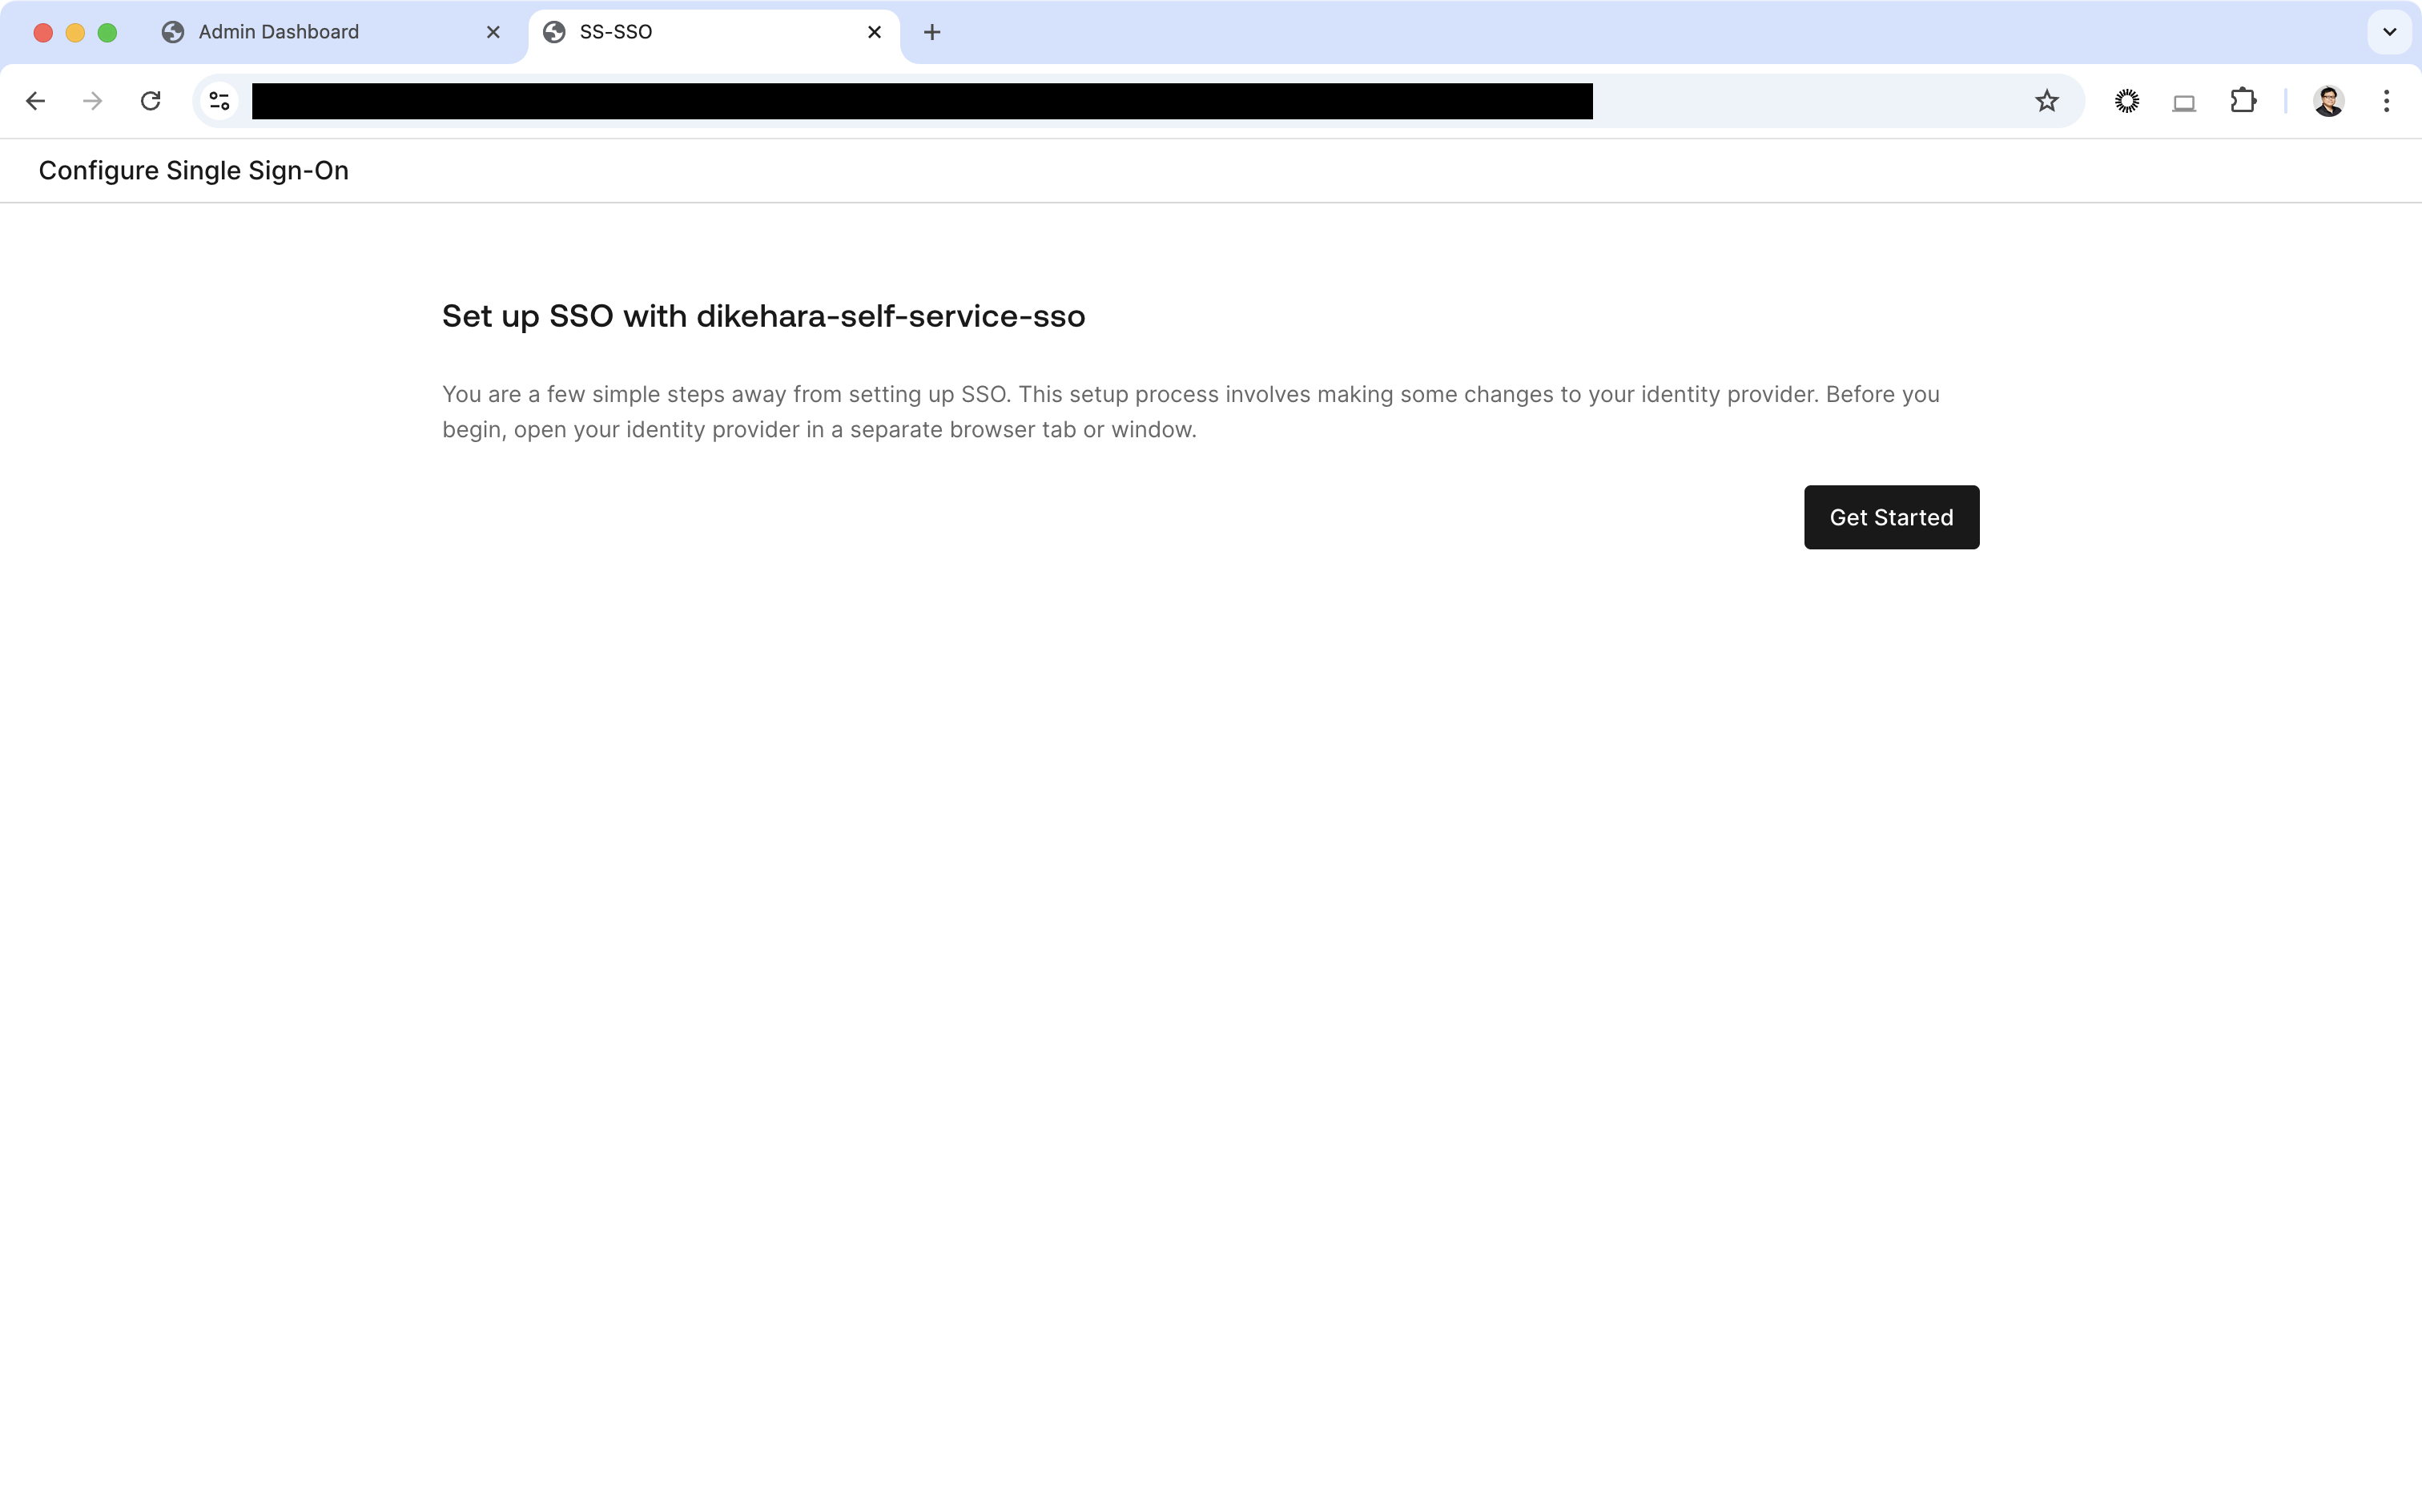
Set Up a Self-Service SSO with the Ticket as a Customer Admin
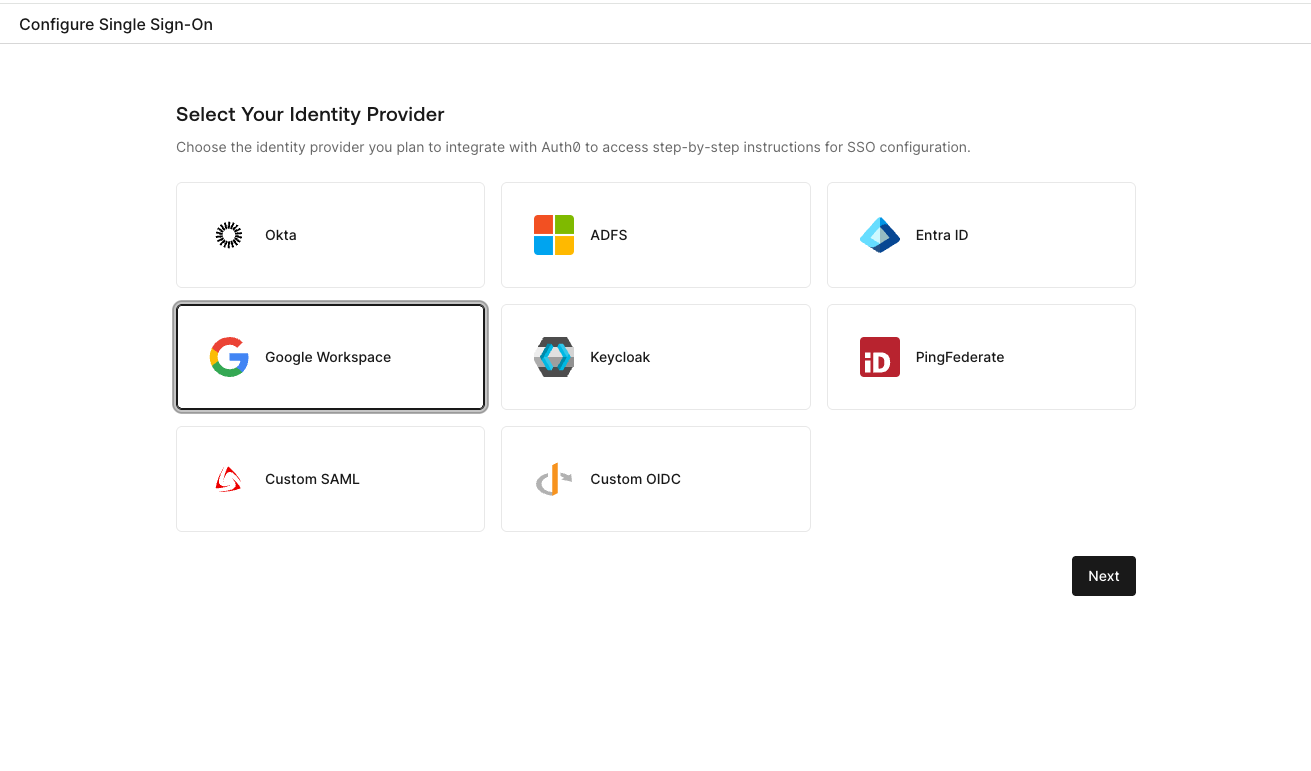
In this step, let’s set up SSO with Google Workspace as a test. Open the generated URL for a ticket in our browser.
On the Identity Provider selection screen, choose Google Workspace and press Next.
On the next page, you will find instructions for setting up an OIDC application on the Google Developer Console. Follow the instructions to create an OIDC application.
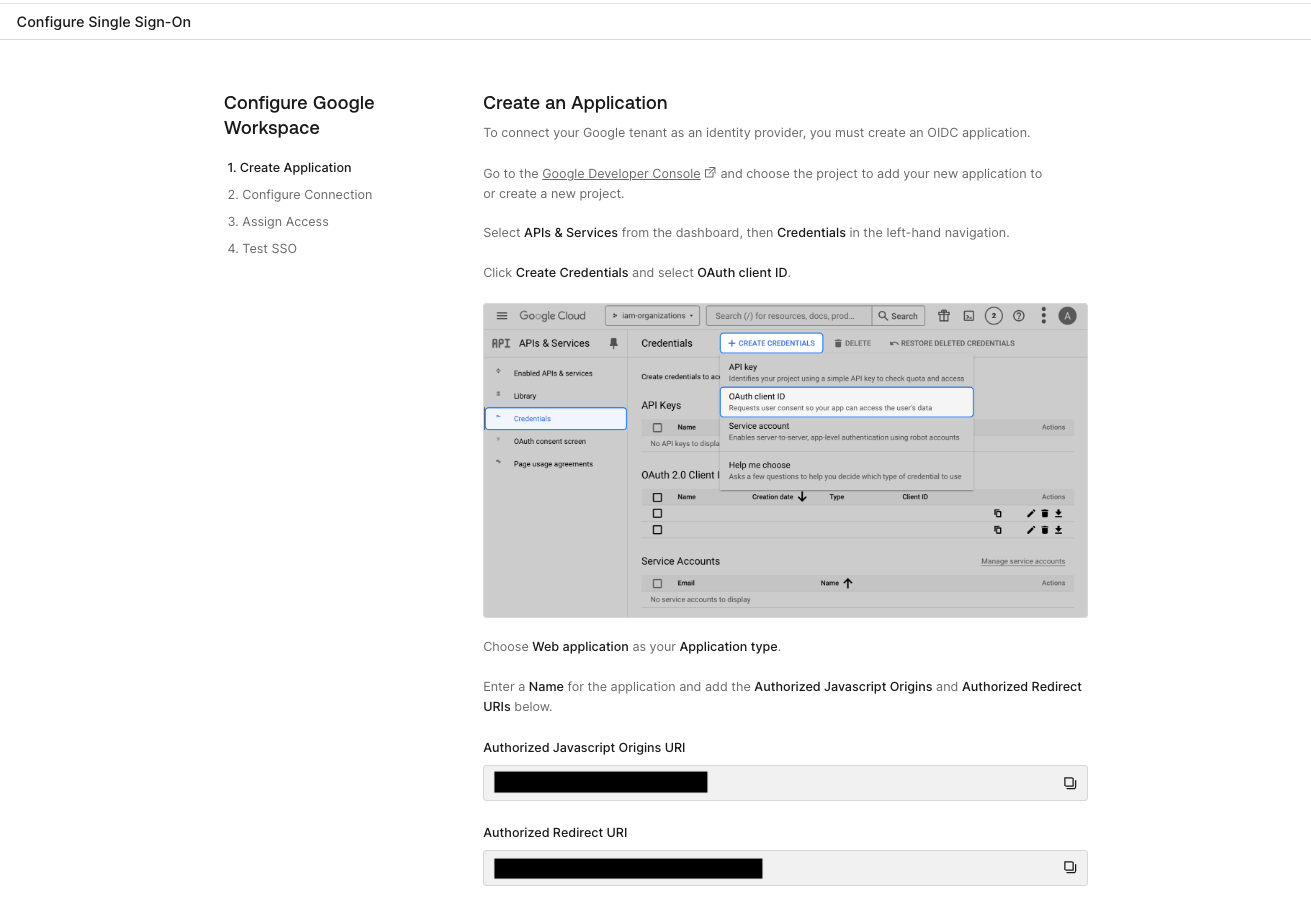
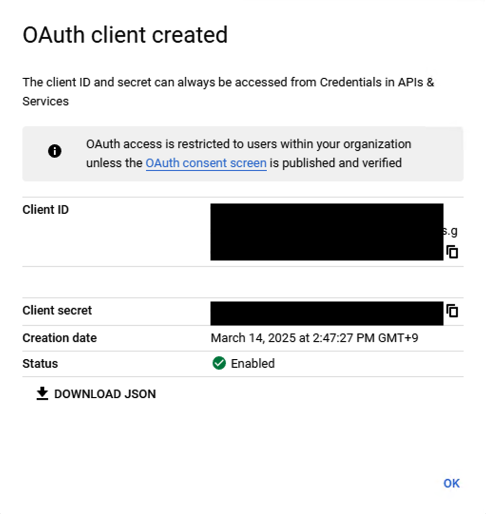
After following the instructions, an OAuth client will be created on the Google Developer Console. Copy the Client ID and Client secret on the popup.
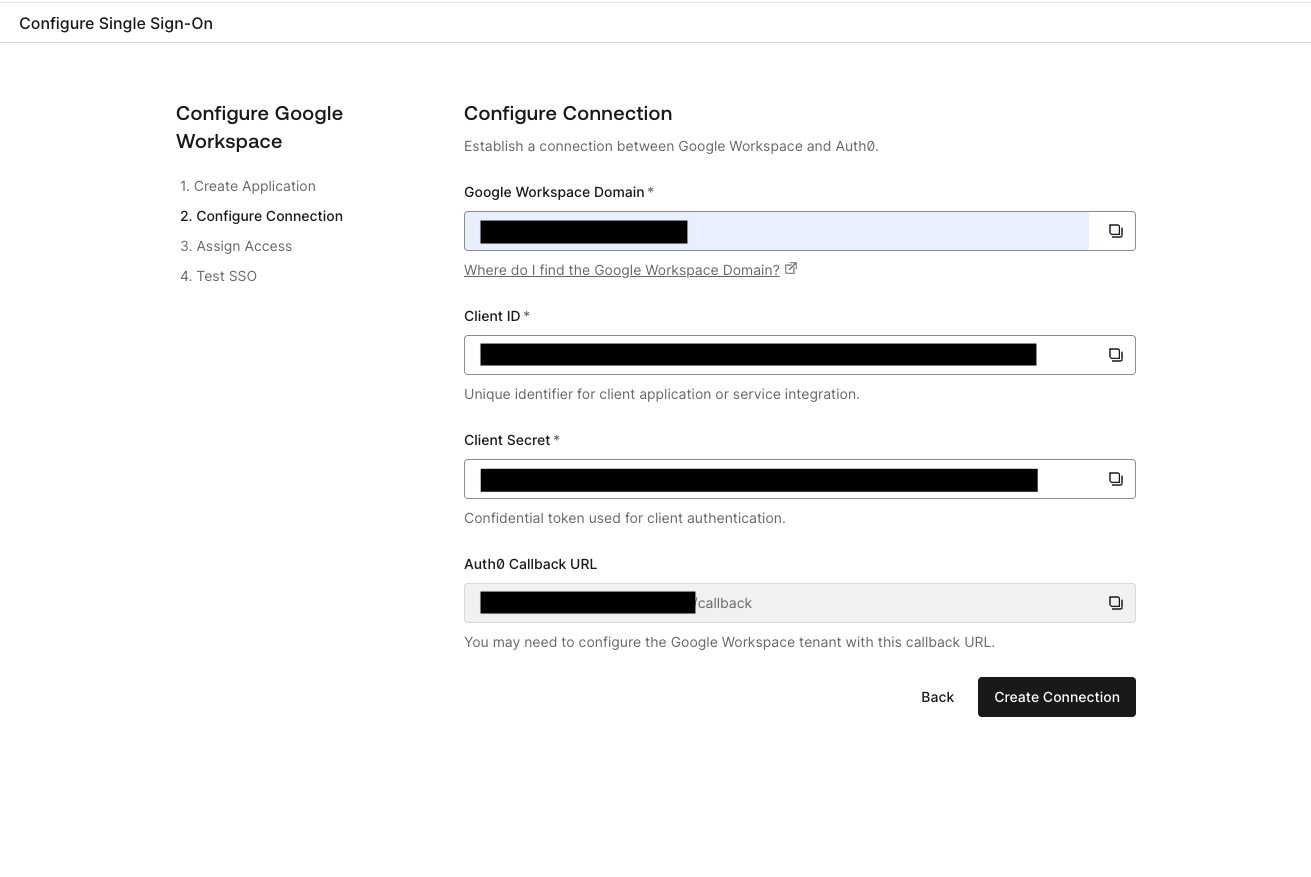
In Step 2, Enter Google Workspace Domain, Client ID, and Client secret to configure the connection.
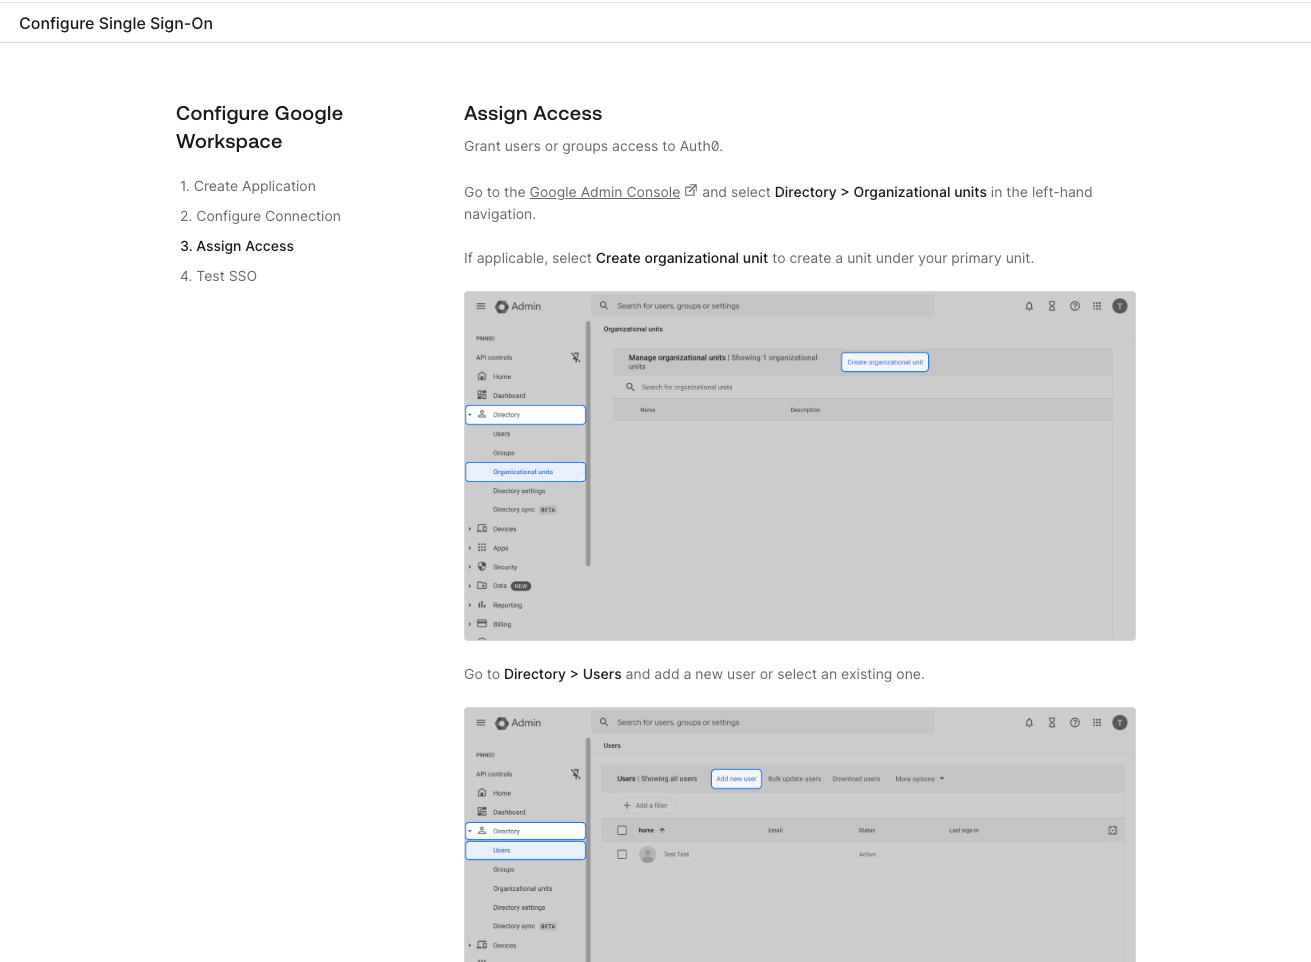
In Step 3, you can find instructions on the page to grant users or groups access to Auth0 in the Google Admin Console.
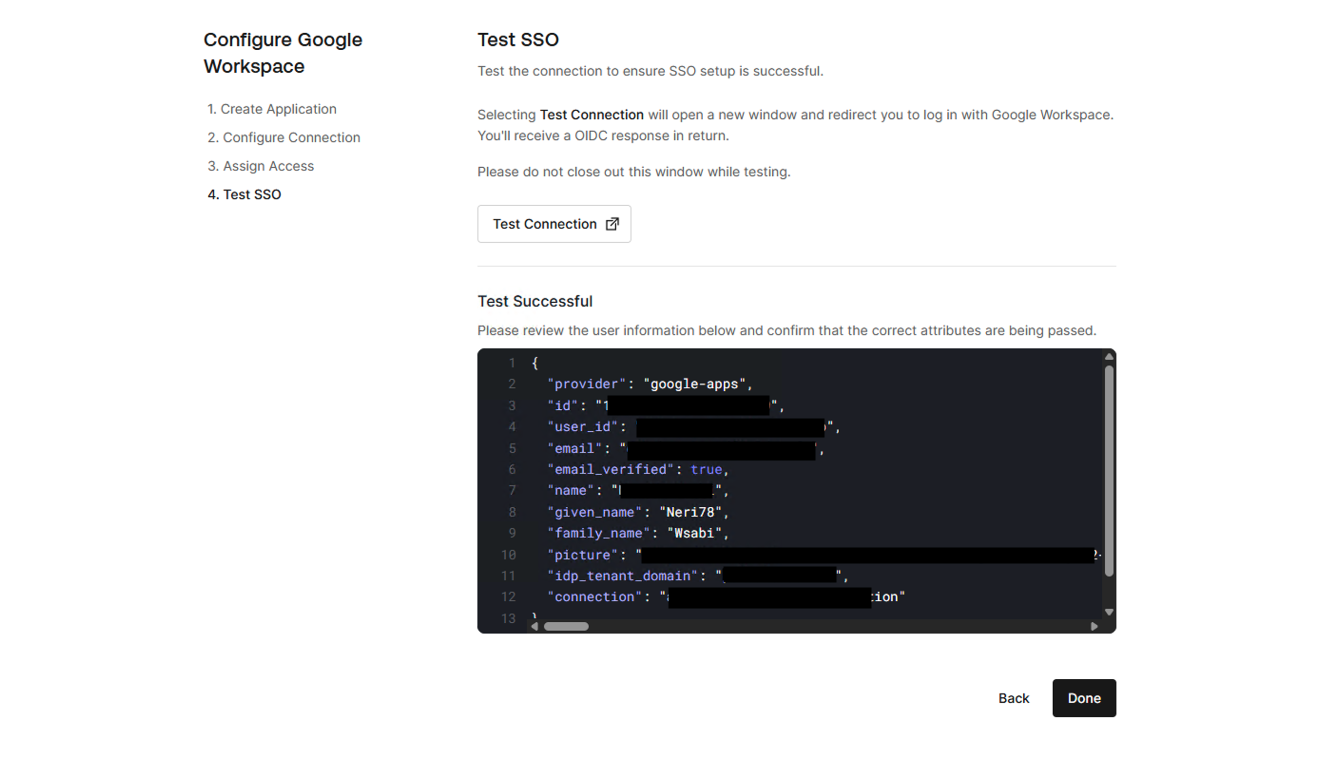
After you configure everything, you can test SSO in Step 4.
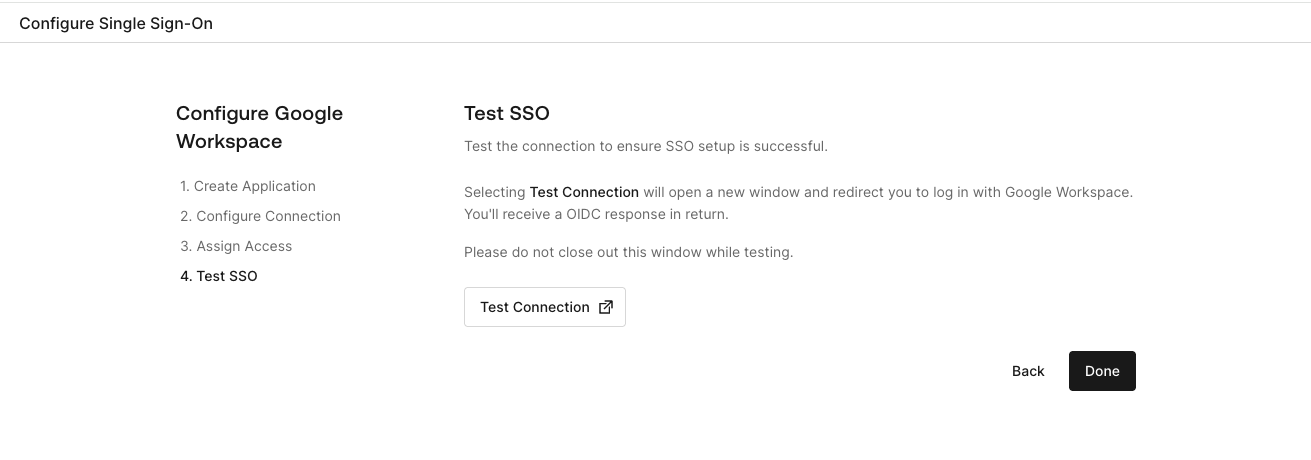
If the test goes well, you will see the following screen. Make sure you click the Done button to complete.
Test the Connection with Auth0
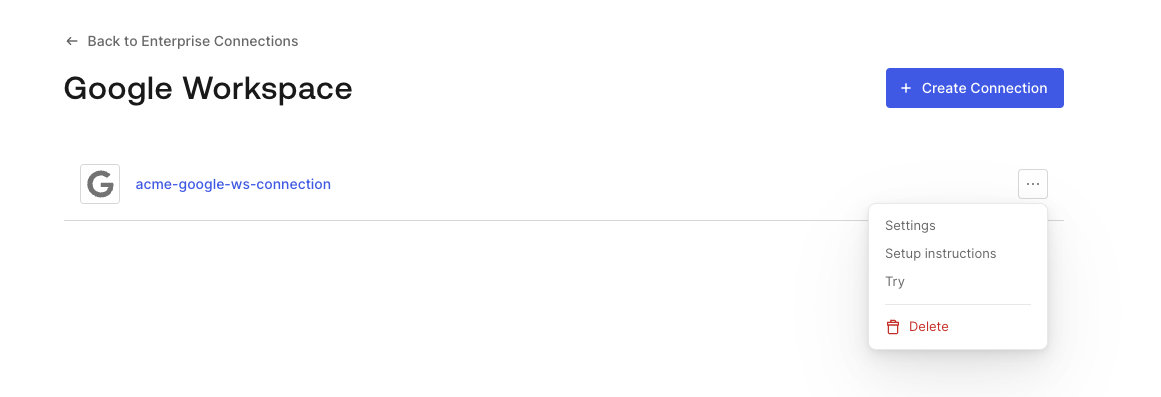
Once the customer admin creates a connection, you can see the connection settings on the Auth0 Management dashboard. Open Authentication - Enterprise, and click Google Workspace.
You'll notice the connection is listed. You can test the connection by clicking the Try option.
If you have configured everything appropriately, a login screen for the Google Workspace account will show up.
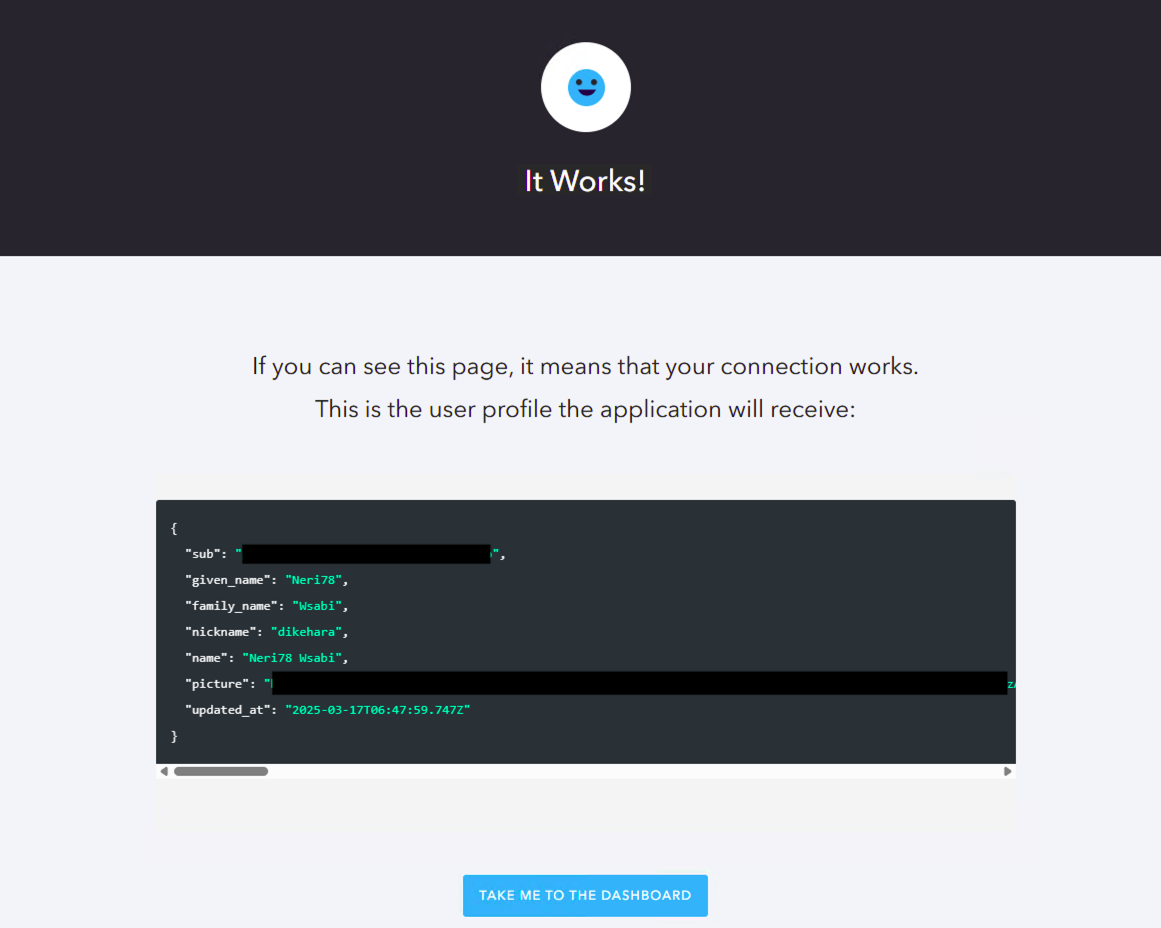
You have successfully configured an SSO connection using the Self-Service SSO Flow.
In the next section, we will generate a ticket on an application.
Generate a Ticket in a Node.js Application
In this part, we will implement a feature to generate tickets on the application with the profile we just created on the dashboard. This feature allows customer admins to generate tickets themselves.
As a starting point for following the steps illustrated in this section, you can download a sample Node.js/Express application:
git clone --branch initial --single-branch https://github.com/neri78/self-service-sso-express.git
Follow the instructions in the attached README file to register and configure the application.
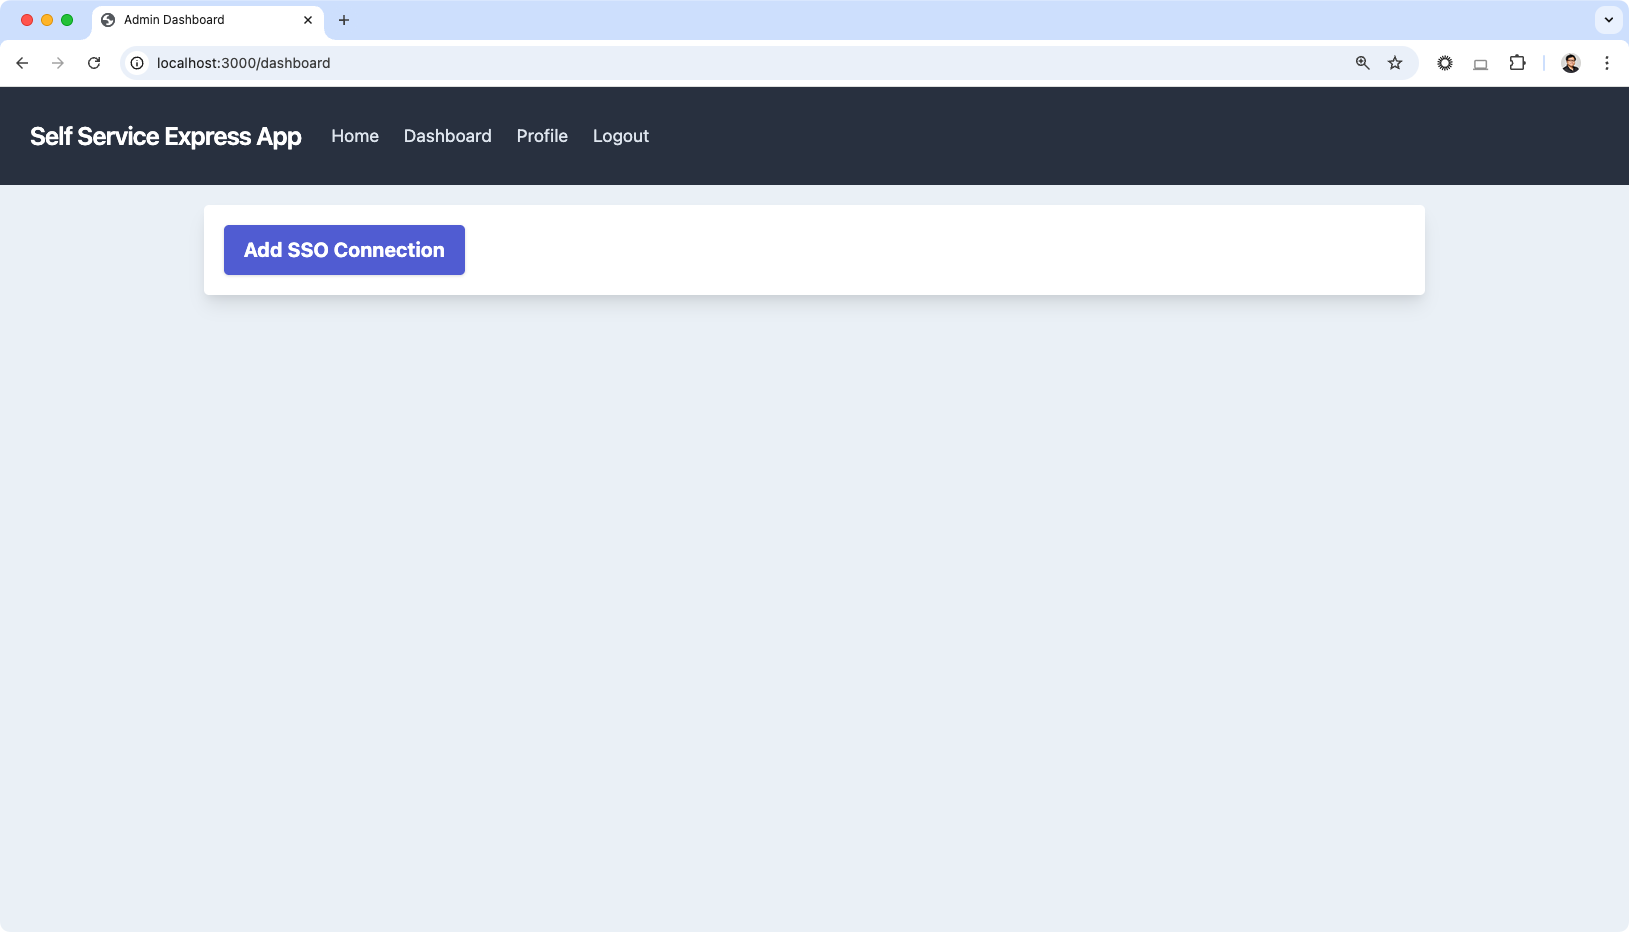
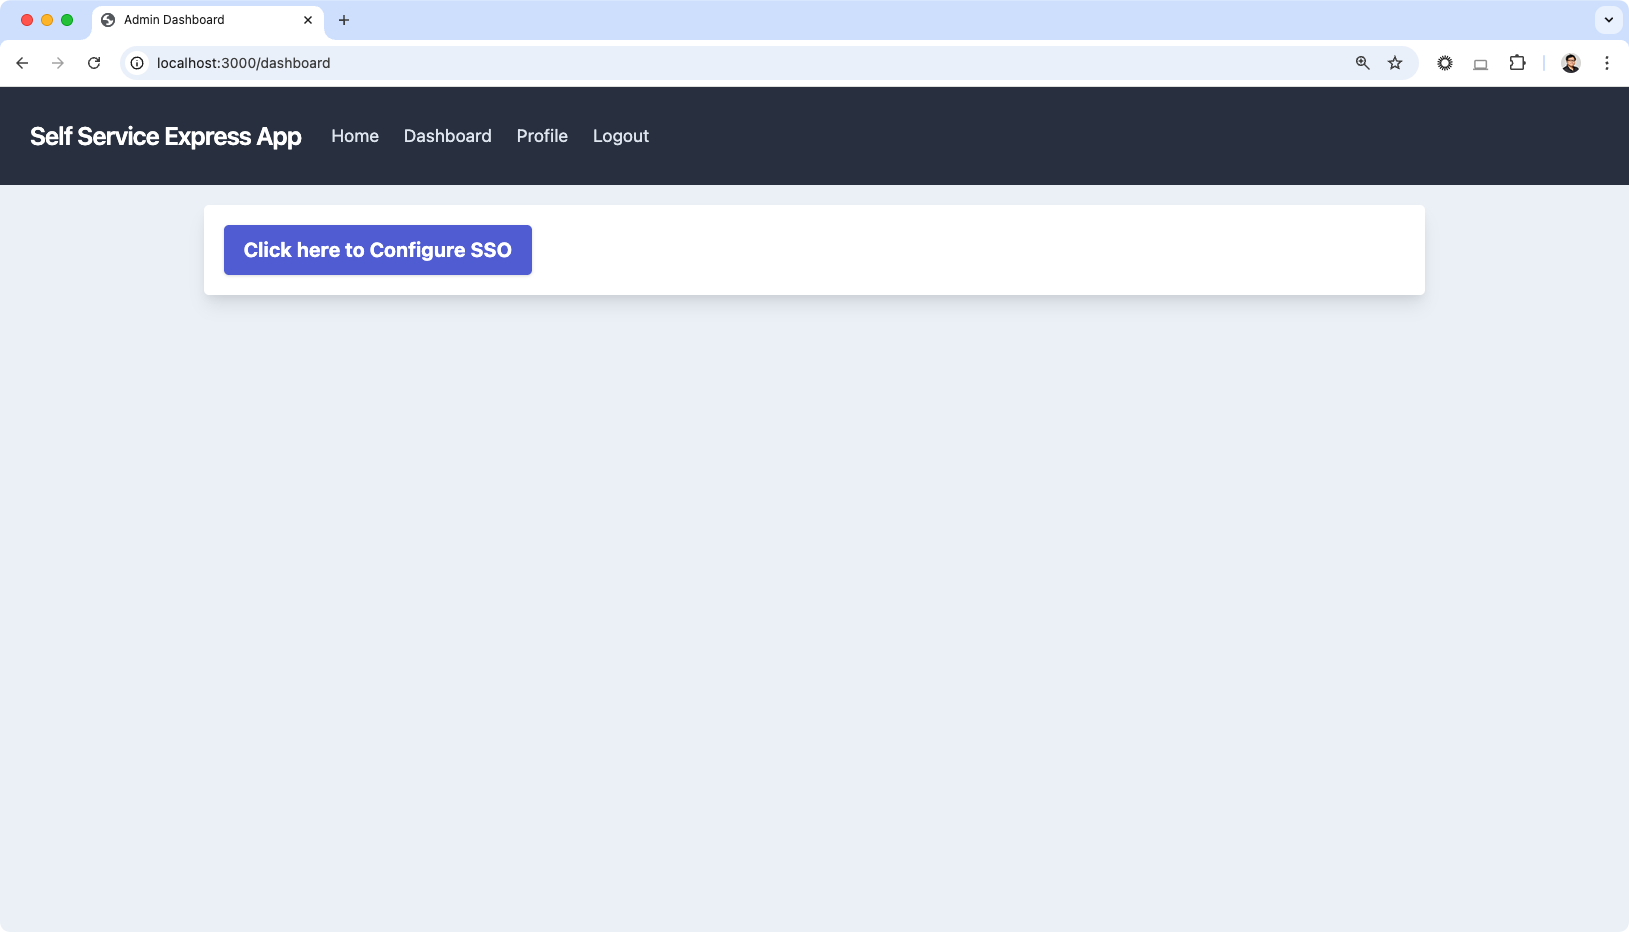
In the sample app, once you have signed up as a user and logged in, click Dashboard on the header navigation to open the dashboard page. You will see the following page on the navigation to the Dashboard page. The Add SSO Connection button is not functioning at this moment.
In the following sections, you will:
- Provide access to the Management API for your application
- Generate a ticket for customer Admin to set up an SSO connection.
Provide access to the Management API for your application
To perform self-service SSO operations from your application, we will register a new application in your Auth0 tenant with access to the Auth0 Management API.
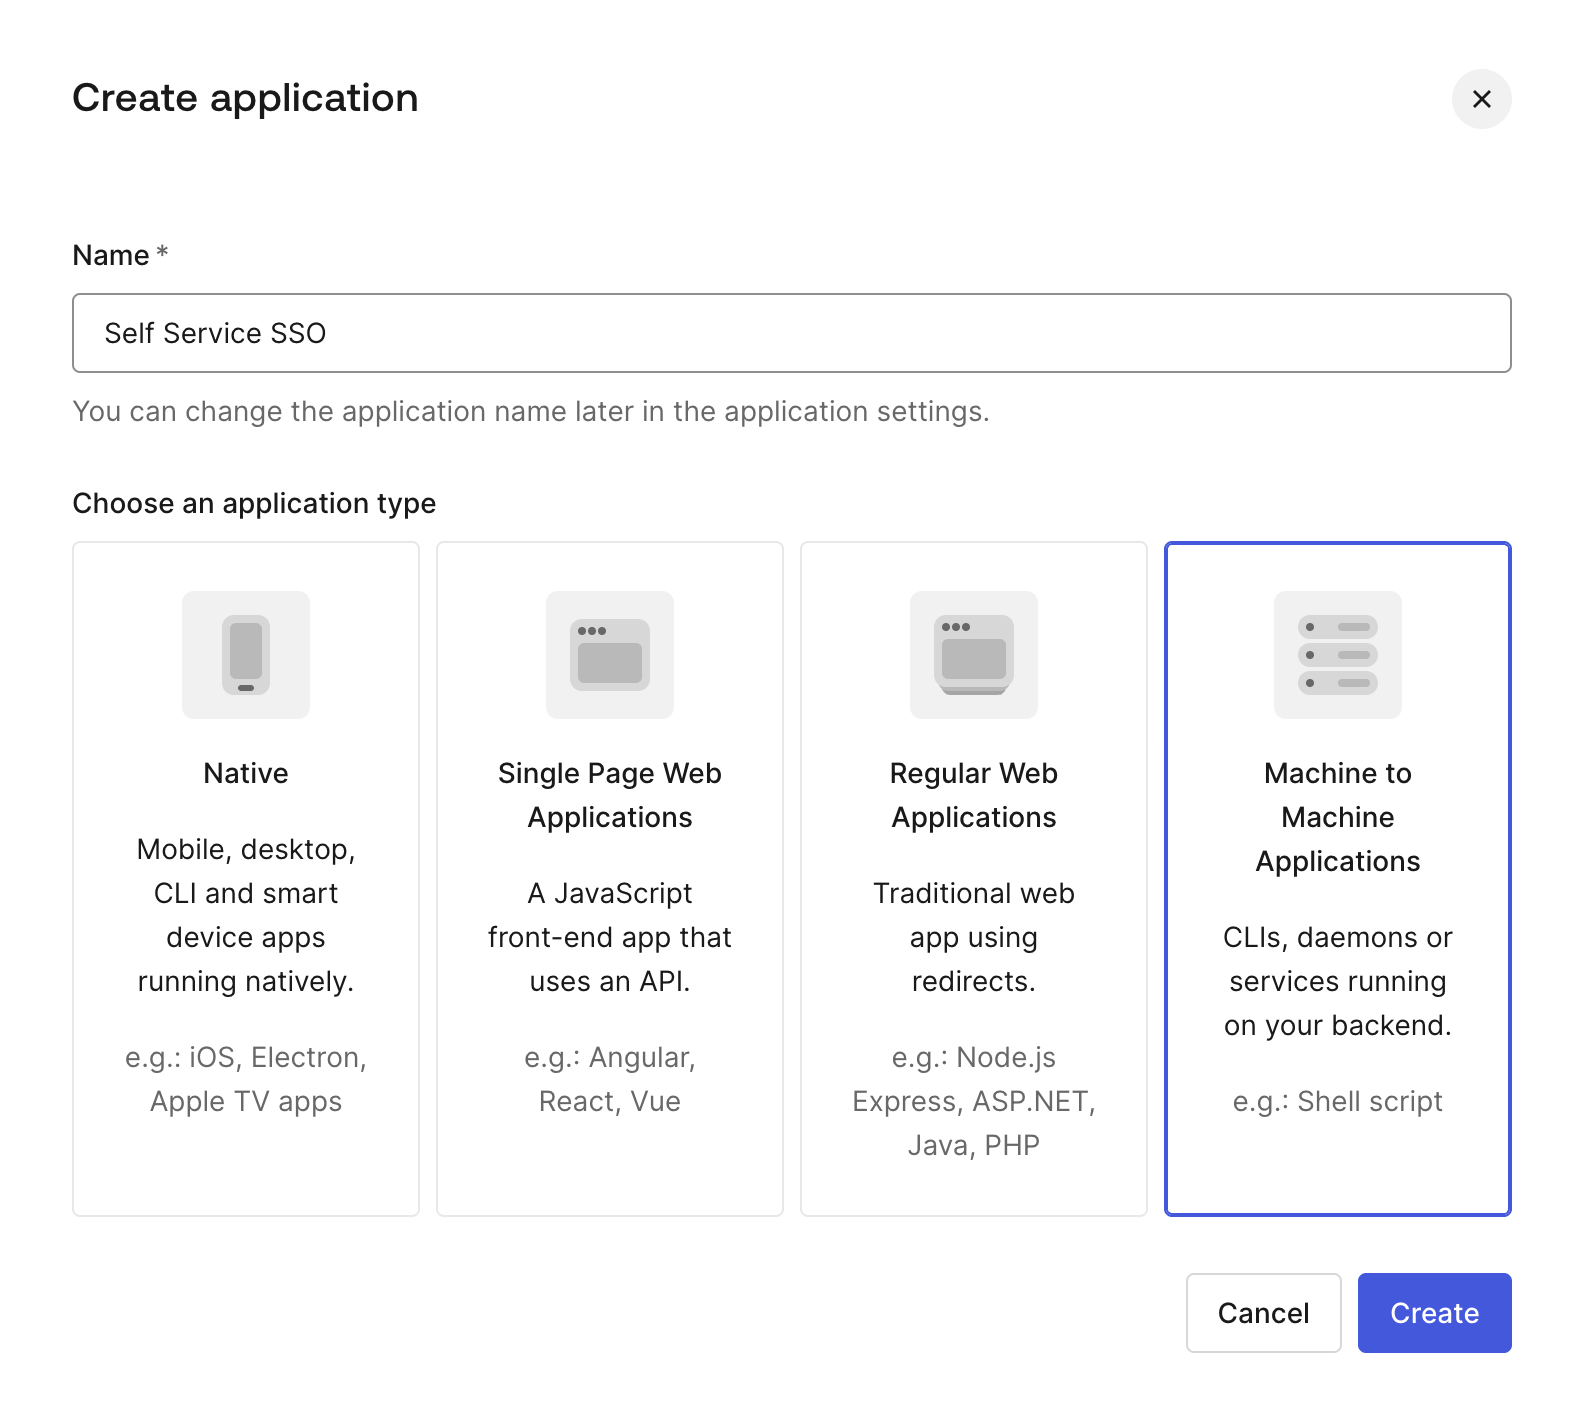
As a first step, access your Auth0 dashboard and register a new Machine-to-Machine application as shown in the following image:
Once you register your application, take note of its domain, client ID, and client secret.
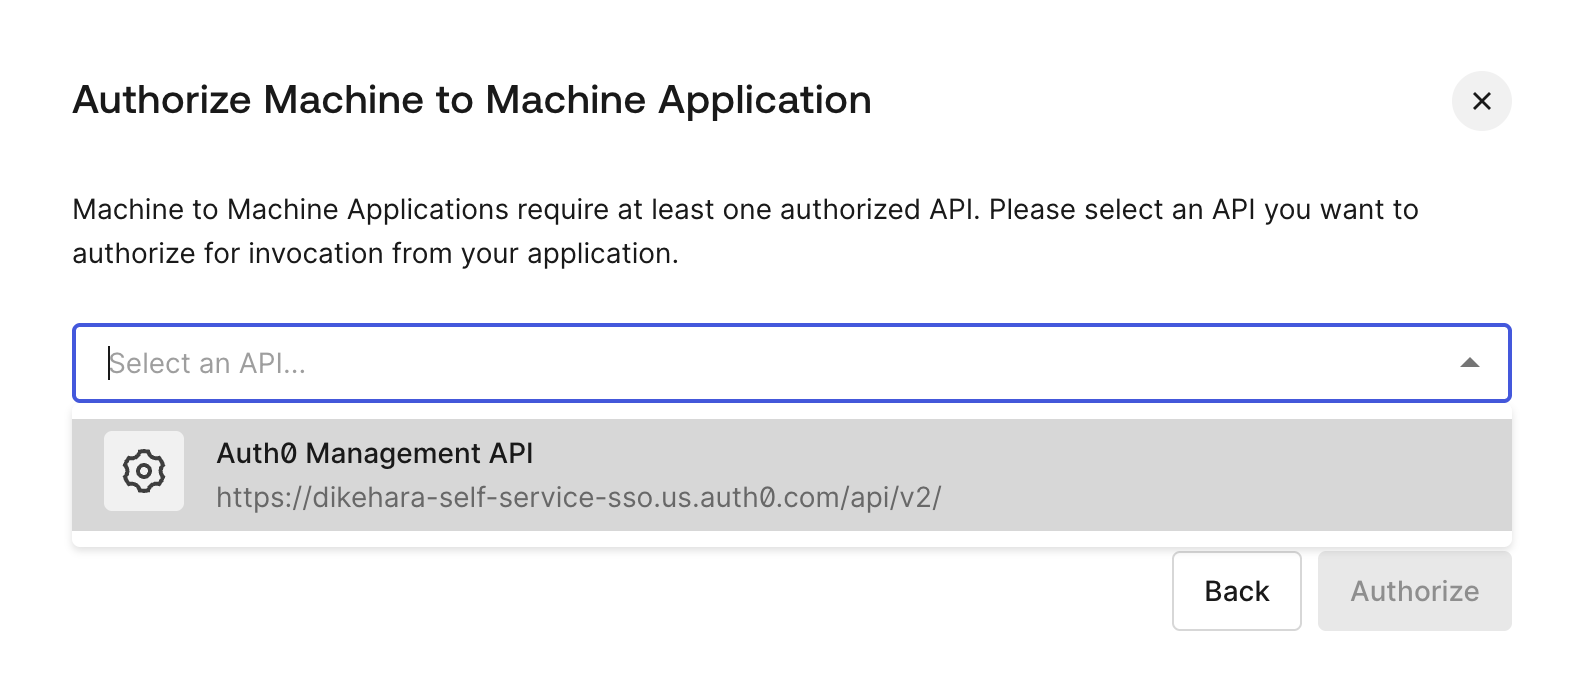
Next, select the Auth0 Management API for your application to authorize.
You must select your application's permissions to operate with the API. In this post, we want to retrieve existing self-service SSO profiles and clients and generate a ticket. For those purposes, grant the following permissions:
- read:selfserviceprofiles
- read:clients
- create:ssoaccesstickets
As a general rule, only grant permissions that are strictly necessary for the operations you intend to perform on your tenant.
After enabling permissions, click the Update button to apply your changes.
Open the .env file in the sample application and find the following environment variables.
AUTH0_MANAGEMENT_CLIENT_DOMAIN="YOUR_MANAGEMENT_CLIENT_DOMAIN"
AUTH0_MANAGEMENT_CLIENT_ID="YOUR_MANAGEMENT_CLIENT_ID"
AUTH0_MANAGEMENT_CLIENT_SECRET="YOUR_MANAGEMENT_CLIENT_SECRET"
Replace the placeholders YOUR_MANAGEMENT_CLIENT_DOMAIN, YOUR_MANAGEMENT_CLIENT_ID, YOUR_MANAGEMENT_CLIENT_SECRET with the corresponding values of the application you just registered.
Add Auth0 Node.js Client to Your Application
Your application needs to call the Auth0 Management API to create a ticket. The API allows you to configure your Auth0 tenant via code. We will use the Node.js client library to simplify interacting with the Auth0 Management API. The Node.js client library provides a Management API Client to handle all the management operations.
Let's install the library by the following command:
npm install auth0
Next, we will create a helper module to create an instance of the ManagementClient so that the application uses the same instance instead of creating multiple instances every time it interacts with the Auth0 Management API.
Create a helpers folder and auth0ManagementClient.js file. Then, add the following code.
// helpers/auth0ManagementClient.js

// 👇 new code
const { ManagementClient } = require('auth0');

let management = null;

function getManagementClient() {
  if (!management) {

    // Initialize an instance of the Management API Client
    management = new ManagementClient({
      domain: process.env.AUTH0_MANAGEMENT_CLIENT_DOMAIN,
      clientId: process.env.AUTH0_MANAGEMENT_CLIENT_ID,
      clientSecret: process.env.AUTH0_MANAGEMENT_CLIENT_SECRET,
    });
  }
  return management;
}

module.exports = getManagementClient;
// 👆 new code
Every time the getManagementClient function is called, it checks an existing instance of ManagementClient with the management variable and creates a new instance if necessary. When this module is required by another Node.js file for the first time, the entire code is executed, and the exported getManagementClient function is cached and returned upon subsequent require() calls.
To use the module, open the index.js file in the routes folder and import the getManagementClient function.
// routes/index.js

//...existing code...
var router = require('express').Router();
const { requiresAuth } = require('express-openid-connect');

// 👇 new code
const getManagementClient = require('../helpers/auth0ManagementClient');
// 👆 new code

//...existing code...
We will use the module later in the blog post.
Generate a Ticket for Customer Admin to Set Up an SSO Connection
When the customer admin clicks the 'Create' button, the application will create a POST request. Let's add the following code snippet to handle this:
// routes/index.js

//...existing code...
router.get('/dashboard', requiresAuth() ,async function (req, res, next) {
//...existing code..
});

// 👇 new code
router.post('/dashboard', requiresAuth() , async function (req, res, next) {

  // get an instance of the ManagementClient
  const management = getManagementClient();

  // Get a list of Self Service Profiles
  const ssProfilesResponse = await management.selfServiceProfiles.getAll();

  // Use the first profile
  const ssoProfile = ssProfilesResponse.data[0];

  // build options to generate a ticket for connection creation
  const requestParameters = {
    id: ssoProfile.id
  };

  // Generate connection name and set current Auth0 application as an enabled client
  let bodyParameters = {
      connection_config: {
        name: `self-service-sso-${Date.now()}`
      },
      enabled_clients: [process.env.CLIENT_ID]
  };

  // generate a self sertvice sso ticket
  let ssoTicket = await management.selfServiceProfiles.createSsoTicket(
    requestParameters,
    bodyParameters
  );

  res.render('dashboard', {
    title: 'Admin Dashboard',
    ticketURL: ssoTicket.data.ticket
  });
});
// 👆 new code

//...existing code..
module.exports = router;
Let's see the details of the code.
Get an Instance Of The Management Client
In the first step, let’s get an instance of the management client, which provides access to the Management API on your Auth0 tenant. We can use the helper class we implemented to get an instance.
//...existing code..

// get an instance of the ManagementClient
const management = getManagementClient();

//...existing code..
Get a Self-Service Profile
To generate a ticket, a Self-Service Profile must be specified. The following code snippet gets all profiles available in the tenant. To simplify the sample app, this blog post will use the first profile in the list.
// Get a list of Self-Service Profiles with current
const ssProfilesResponse = await management.selfServiceProfiles.getAll();

// Use the 1st profile in this sample
const ssoProfile = ssProfilesResponse.data[0];

//...existing code..
The management.selfServiceProfiles.getAll() method loads all self-service profiles available in the tenant.
Building Parameters to Generate a Ticket
The management.selfServiceProfiles.createSsoTicket() method is to generate a self-service SSO ticket. This method requires requestParameters and bodyParameters.
Let's take a look at the requestParameters first:
//...existing code..

// build options to generate a ticket for connection creation
const requestParameters = {
    id: ssoProfile.id
};
//...existing code..
In requestParameters, you will set the id of a self-service profile as id.
Next, you can specify options for the ticket in bodyParameters:
//...existing code..

// Generate connection name automatically and set current Auth0 application as an enabled client
const bodyParameters = {
    connection_config: {
      name: `self-service-sso-${Date.now()}`
    },
    enabled_clients: [process.env.CLIENT_ID]
};
//...existing code..
When generating a ticket for a new connection flow, you must specify a name in connection_config. Alternatively, you can specify connection_id in the body parameter to update an existing connection. In this blog post, we will generate a name with the following snippet: self-service-sso-${Date.now()} to create a new connection.
Also, if you want to enable the connection for clients or organizations upon creation, you can set the enabled_clients or enabled_organizations properties. In this blog post, we specify the current Auth0 application as a client by setting enabled_clients: [process.env.CLIENT_ID]
Generate a ticket via Management API
After building the requestParameters and bodyParameters, you will call management.selfServiceProfiles.createSsoTicket() method to generate a ticket.
//...existing code..

// generate a self sertvice sso ticket
const ssoTicket = await management.selfServiceProfiles.createSsoTicket(
  requestParameters,
  bodyParameters
)

res.render('dashboard', {
  title: 'Admin Dashboard',
  ticketURL: ssoTicket.data.ticket
});

//...existing code..
Let's see it in action!
When you click the Add SSO Connection button, you will see the following page with another button that opens the URL of the generated ticket.
When you click the button, the browser opens a new tab with the SSO setup assistant page.
As we tried in the previous section, you can continue to set up an SSO connection by following the instructions.
Now, you have implemented a feature to generate a Self-Service SSO ticket for your application.
Conclusion
In this post, you learned how to:
- Create a self-service SSO profile and generate a ticket with the Auth0 Management dashboard.
- Retrieve existing self-service SSO profiles and generate a self-service ticket to begin a Self-Service SSO flow from your application.
This blog post is just the beginning. With this powerful feature, you can create a Self-Service profile from your application, update an existing profile, customize the introduction page of the Self-Service SSO, integrate with the Auth0 Organization feature, and much more. Future posts will expand on this exciting new capability.
Try with SaaStart: Next.js B2B SaaS Reference Application
Auth0 provides features for building a B2B SaaS application. In this post, I used Node.js/Express to showcase one of its features. If you are considering building a B2B SaaS in Next.js, try SaaStart. The app provides reference implementations of necessary features for B2B SaaS, such as multi-tenancy, login options for enterprise users, security policies, and more.
About the author

Daizen Ikahara
Principal Developer Advocate
.NETエンジニアとしてキャリアをスタートさせた後、UIコンポーネントベンダーやクラウドコミュニケーションプラットフォームベンダーにおいて様々なロールを歴任。2023年3月よりOktaに参画し、日本市場における開発者リレーションを担当。趣味はゲームと長距離散歩。
Daizen Ikehara joined the Developer Relations team in March 2023 as a Principal Developer Advocate. In the early stages of his professional career, Daizen started using C#. Then, he touched on various JavaScript technologies/frameworks—Angular, React, and Vue. Recently, he’s been using Node.js/JavaScript more often. He is passionate about talking with developers. Outside of work, Daizen likes to take long walks, play video games, and watch Formula 1 racing.