
For developers building B2B SaaS applications, a seamless user onboarding experience is crucial for customer satisfaction and adoption. A clunky or complicated onboarding process can lead to frustration and churn, while a smooth and intuitive one can set the stage for a long and successful customer relationship.
This article explores various user onboarding strategies for B2B SaaS applications, with a focus on the solutions offered by Auth0. We will delve into different onboarding flows and provide a practical guide on how to implement member invitations in a Blazor application.
User Onboarding Strategies
When it comes to onboarding users to your B2B SaaS application, there is no one-size-fits-all solution. The best approach will depend on your specific application, your customers' needs, and their technical capabilities. Auth0's Organizations feature provides the flexibility to support various onboarding models.
Self-Service vs. Admin Provisioning
A fundamental choice in user onboarding is between self-service and administrator-led provisioning.
- Self-Service: In a self-service model, users can sign up for the application on their own. This is a common approach for applications that want to offer a frictionless trial experience. To maintain control, you can implement an approval workflow where administrators from the customer's organization need to approve new sign-ups.
- Admin Provisioning: In an admin-provisioning model, an administrator from the customer's organization invites users to the application. This gives the customer more control over who has access to the application and is a common requirement in enterprise settings.
Onboarding Flows with Auth0 Organizations
Auth0 Organizations allows you to model your B2B customers as distinct entities within your Auth0 tenant. This enables you to manage users, connections, and policies on a per-organization basis. Here are two common user onboarding flows you can implement with Auth0 Organizations:
- Invitation Flow: An administrator from the customer's organization can invite users to join their Organization within your application. The user receives an email with an invitation link. When they click the link, they are guided through the signup or login process and are automatically added to the correct Organization.
- Just-in-Time (JIT) Provisioning: For enterprise customers using their own identity providers (like Azure AD or Okta), JIT provisioning is often the preferred method. With JIT, a user account is automatically created in your application the first time the user logs in through their corporate Single Sign-On (SSO). This eliminates the need for manual user creation and streamlines the onboarding process.
Inviting Users to an Organization
Let's take a closer look at the invitation flow, a common and effective onboarding strategy. With Auth0, you can invite members to an Organization using either the Auth0 dashboard or the Management API.
In the rest of the article, you will learn how to invite a new user to join an Organization programmatically. Basically, the invitation process works as shown in the following diagram:
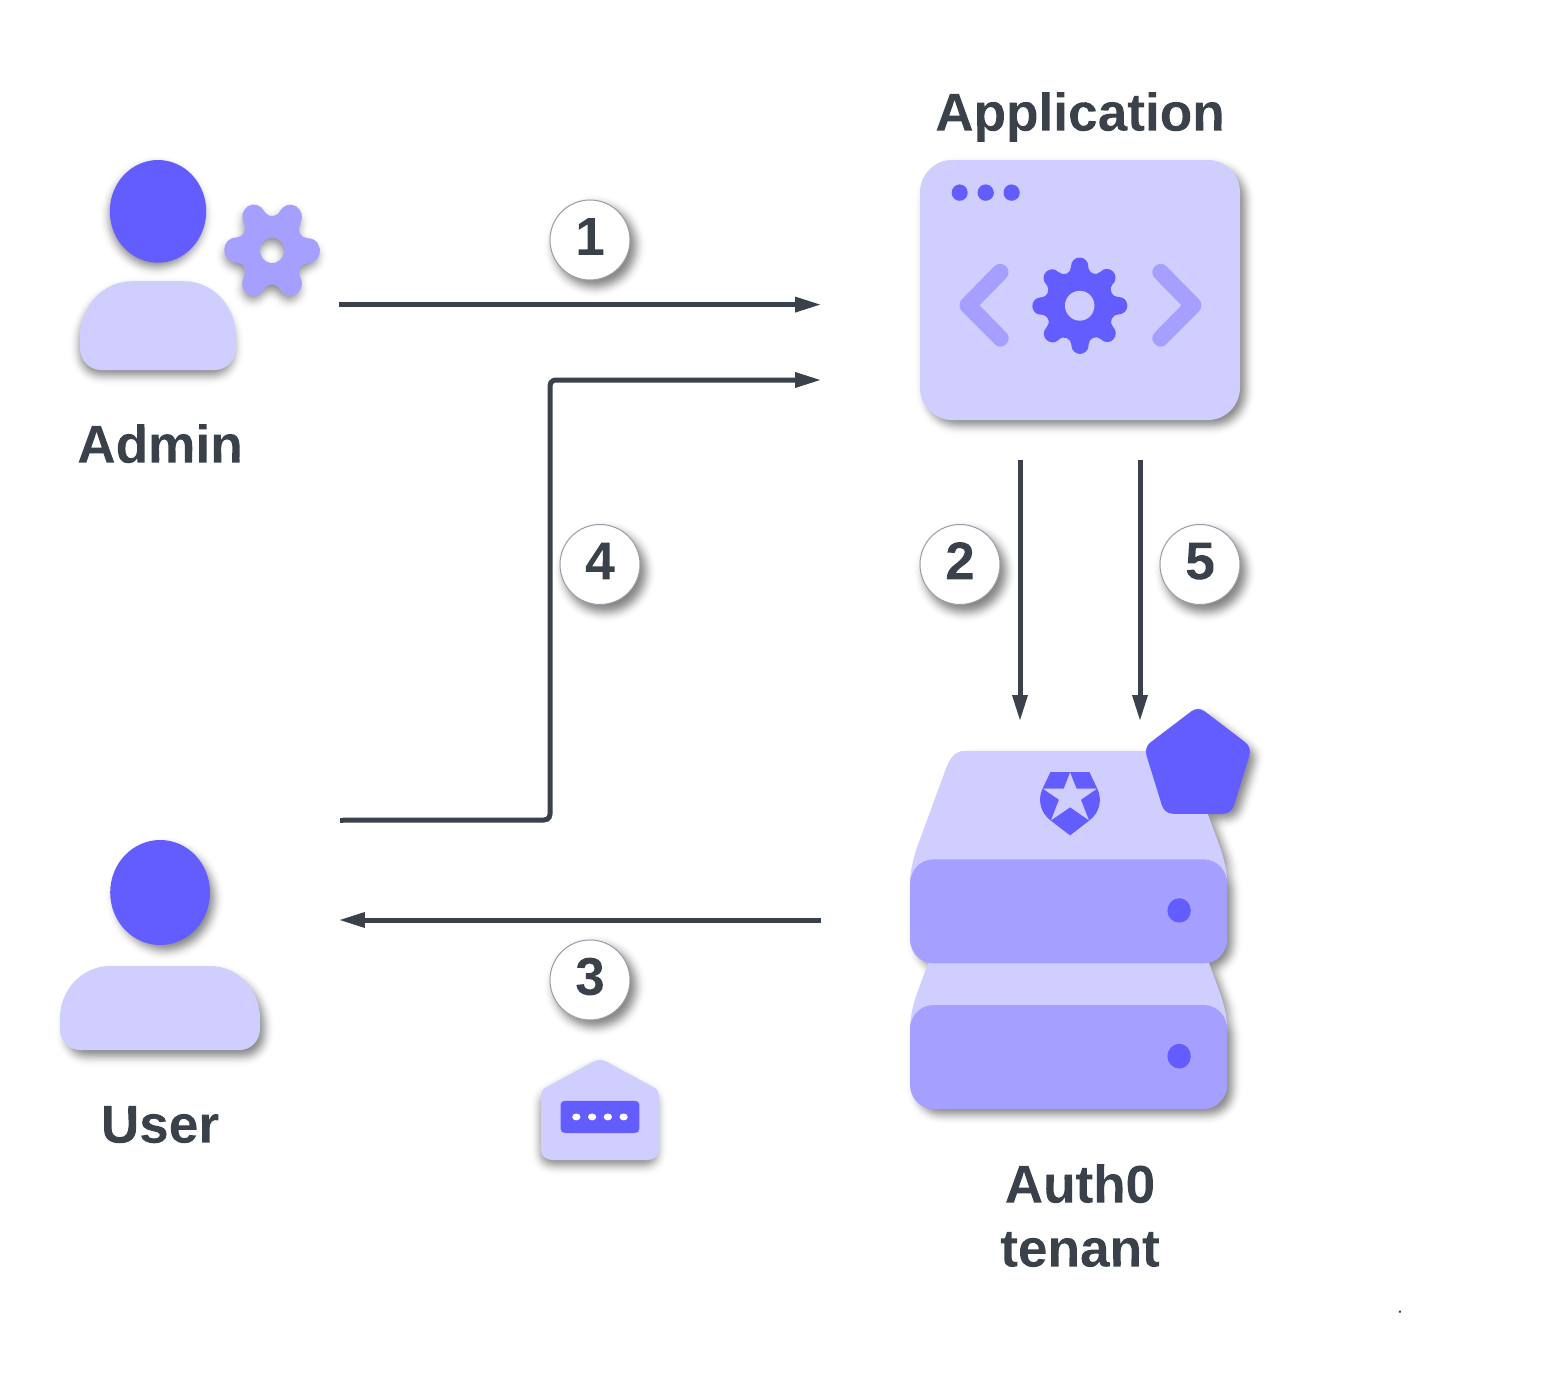
Following the numbered lines in the diagram:
- An administrator initiates an invitation from your application.
- Your application uses the Auth0 Management API to create an organization invitation.
- Auth0 sends an email to the user with a unique invitation link.
- The user clicks the link, which directs them to your application's login page.
- After the user signs up or logs in, they are automatically added to the organization.
To implement this flow, you need to configure an "Application Login URI" in your Auth0 application settings. This is the URL in your application that will handle the invitation acceptance.
For more details, refer to the Auth0 documentation on inviting organization members.
Leverage Auth0's authentication and authorization services in your .NET applications.
DOWNLOAD THE FREE EBOOK
Implementing User Invitations
Now, let's see how to add support for inviting organization members to the sample B2B Blazor application, as featured in previous Auth0 blog posts:
- Add Auth0 Organizations to Your B2B Blazor Web App
- Enable Self-Subscribing Model in Your Blazor B2B SaaS Application
- Enforce Customer Email Verification in Your B2B Blazor Web App
- Implementing Role-Based Access Control in Your Blazor B2B SaaS Application
The Blazor application allows a new customer to subscribe and create a new Organization, but currently, they can add new users only via the Auth0 dashboard. With the changes we are about to implement, you will enable the Organization administrator to invite users directly from the application.
Prerequisites
If you don’t want to implement the sample application from scratch following the previous articles, you can download it by running the following command:
git clone --branch member-invite --single-branch https://github.com/andychiare/MyBlazorSaaS
Follow the instructions in the attached README file to register and configure the application with Auth0. If you don't have an Auth0 account, you can sign up for free.
To enable the application to send invitations for joining an Organization, you need to add a new permission for your application.
Assuming you have configured your application according to the mentioned README file, navigate to your Auth0 dashboard and locate the ManagementClient application under the Applications > Applications section.
On the application's configuration page, select the APIs tab and expand the area below the Auth0 Management API item. Then, select the create:organization_invitations permission and click the Update button to save your changes.
Implementing the invitation feature
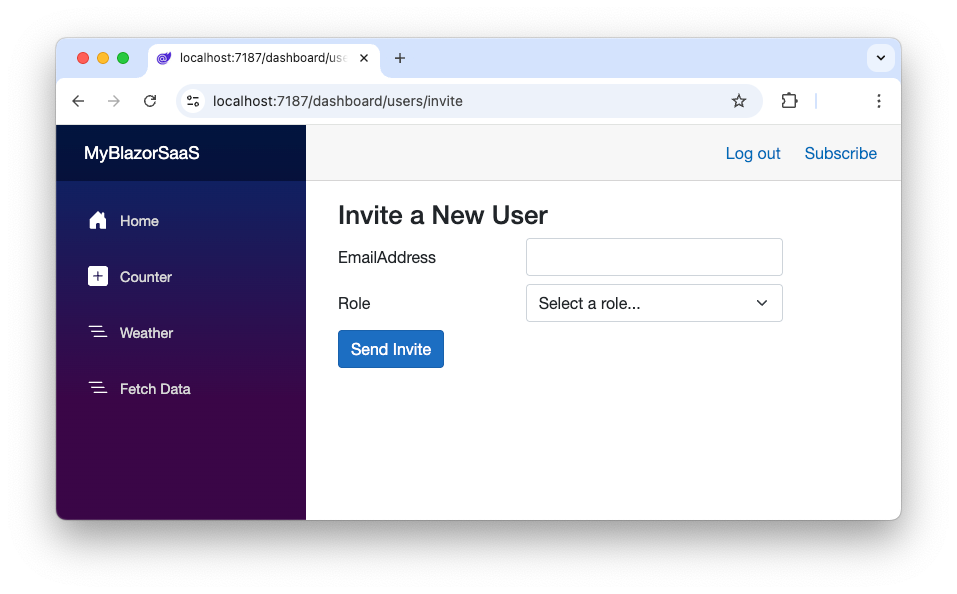
Now we are ready to implement the invitation feature. As the first step, create a new page named Invite.razor under the MyBlazorSaaS/Components/Pages/Dashboard folder and start adding the following code:
@page "/dashboard/users/invite"
@attribute [Authorize(Roles = "admin")]
@rendermode InteractiveServer

@using Auth0.ManagementApi
@using System.ComponentModel.DataAnnotations
@using Auth0.ManagementApi.Models
@using Microsoft.Extensions.Configuration

@inject IAuth0Management auth0Management
@inject IConfiguration Configuration

<h3>Invite a New User</h3>

<div>
 <div class="form-group row my-2">
   <label for="email" class="col-sm-4 col-form-label">EmailAddress</label>
   <div class="col-sm-6">
     <InputText
       type="email"
       @bind-Value="EmailAddress"
       id="email"
       class="form-control"/>
   </div>
 </div>

 <div class="form-group row my-2">
   <label for="role" class="col-sm-4 col-form-label">Role</label>
   <div class="col-sm-6">
     <InputSelect id="role" class="form-select" @bind-Value="RoleId">
           <option value="">Select a role...</option>
           @foreach (var role in availableRoles)
           {
               <option value="@role.Id">@role.Name</option>
           }
     </InputSelect>
   </div>
 </div>

 <button class="btn btn-primary" @onclick="HandleInvite">Send Invite</button>
</div>

@if (!string.IsNullOrWhiteSpace(successMessage)) {
 <div class="alert alert-success" role="alert">
   @successMessage
 </div>
}

@if (!string.IsNullOrWhiteSpace(errorMessage)) {
 <div class="alert alert-danger" role="alert">
   @errorMessage
 </div>
}
This is the UI part of the user invitation page. Its relative path is /dashboard/users/invite, and it is accessible only to administrators. It defines a textbox for the new user’s email address and a select box with the roles that can be assigned to users. The last two if statements control the visibility of the success and error messages.
For the sake of simplicity, no data validation is performed on the data submitted through the form, but this must be done in production code, of course.
The rendering of this page looks like the following picture:
Now, let’s implement the behavior behind this UI by adding the following code to the Invite.razor page right after the existing code:
// ...existing code...

@code {
 [CascadingParameter]
 private Task<AuthenticationState>? authenticationState { get; set; }
 private ManagementApiClient? managementClient;
 private string EmailAddress = "";
 private string RoleId = "";
 private string OrganizationId = "";
 private string OrganizationName = "";
 private string successMessage = "";
 private string errorMessage = "";
 private IEnumerable<Role>? availableRoles = [];


 protected override async Task OnInitializedAsync()
 {
   if (authenticationState is not null)
   {
     var state = await authenticationState;

     if (state.User?.Identity?.IsAuthenticated??false)
     {
       OrganizationId = state.User?.FindFirst(c => c.Type == "org_id")?.Value??String.Empty;
       if (!string.IsNullOrEmpty(OrganizationId))
       {
         managementClient = await auth0Management.getClient();
         var organization = await managementClient.Organizations.GetAsync(OrganizationId);
         OrganizationName = organization.DisplayName;

         availableRoles = await managementClient.Roles.GetAllAsync(new GetRolesRequest());
       }
     }
   }
 }

   private async Task HandleInvite()
   {
       try
       {
           var inviterName = $"{OrganizationName} Admin";

           var invitation = new OrganizationCreateInvitationRequest
           {
               Inviter = new OrganizationInvitationInviter { Name = inviterName },
               Invitee = new OrganizationInvitationInvitee { Email = EmailAddress },
               ClientId = Configuration["Auth0:ClientId"],
               Roles = new List<string> { RoleId }
           };

           await managementClient.Organizations.CreateInvitationAsync(OrganizationId, invitation);

           successMessage = $"Invitation sent successfully to {EmailAddress}.";

           EmailAddress = "";
           RoleId = "";
       }
       catch (Exception ex)
       {
           errorMessage = $"Error sending invitation: {ex.Message}";
       }
   }
}
The OnInitializedAsync() method sets the stage for the invitation creation. It retrieves the ID and name of the current Organization, gets an instance of the Auth0 Management client, and loads the user roles to be displayed in the select box.
The HandleInvite() method, triggered by the “Send Invite” button, actually creates and sends the invitation to the user. It prepares an invitation request through an instance of the OrganizationCreateInvitationRequest class and sends it to the user via the CreateInvitationAsync() method.
Handling the invitation
Note that the invitation instance created in the HandleInvite() method needs the value of the application’s client ID among the other parameters. This is necessary to resolve the application’s login endpoint mentioned earlier.
When the user receives the email with the invitation link, they need to navigate to that endpoint to accept the invitation and sign up to the Organization. So, your application must handle the invitation to complete the user onboarding. Fortunately, the Blazor sample app you are using has already implemented it.
For more information on this, please refer to the "Manage User Invitations" section of the Add Auth0 Organizations to Your B2B Blazor Web App blog post.
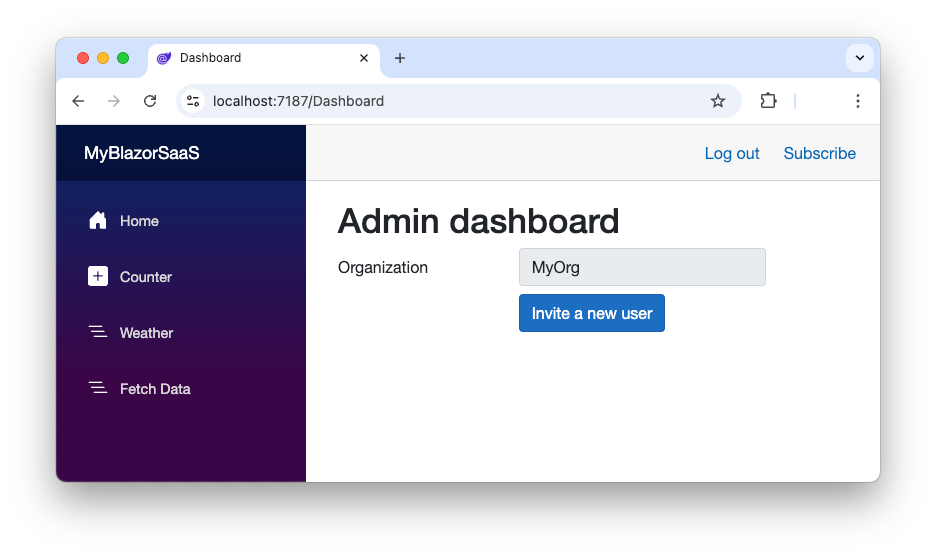
The final touch
To make the Invite.razor page accessible to the Organization's admin, you need to modify the current simple dashboard page of the Blazor application. You will simply add a button that lets the admin navigate to the Invite.razor page.
Open the Home.razor page in the MyBlazorSaaS/Components/Pages/Dashboard folder and apply the changes highlighted below:
@page "/dashboard"
@attribute [Authorize(Roles = "admin")]
@* 👇 new code *@
@rendermode InteractiveServer

@inject IAuth0Management auth0Management
@* 👇 new code *@
@inject NavigationManager navManager

<PageTitle>Dashboard</PageTitle>

<h1>Admin dashboard</h1>

 <div>
   @* ...existing code... *@
 </div>
@* 👇 new code *@
 <div class="form-group row my-2">
   <div class="col-sm-4"></div>
   <div class="col-sm-6">
     <button class="btn btn-primary"
             @onclick="@(() => navManager.NavigateTo("/dashboard/users/invite"))">
            Invite a new user
      </button>
   </div>
 </div>
</div>
@* 👆 new code *@

@* ...existing code... *@
This first change concerns the page’s render mode. Since we are going to allow the admin to click a button to navigate to the invitation page, you need to enable interactivity.
Then, you injected the NavigationManager service to enable page navigation.
Finally, you added a section showing the button to navigate to the invitation page.
This will show as follows:
Now you have everything ready to test your user onboarding through invitation!
Conclusion
Choosing the right user onboarding strategy is a critical decision for any B2B SaaS application. By leveraging Auth0's powerful and flexible Organizations feature, you can implement a variety of onboarding flows that cater to the diverse needs of your customers. Whether you opt for a manual invitation process, a self-service model, or a fully automated JIT provisioning workflow, Auth0 provides the tools you need to create a seamless and secure onboarding experience for your users.
While this article showed how to implement user onboarding through invitation in .NET, and specifically with the Blazor framework, you are invited to explore other user onboarding approaches and implementations. For example, the SaaStart app includes an implementation of the invitation onboarding in Next.js.
By the way, you can download the final code of the Blazor project created in this article on this GitHub repository.
About the author

Andrea Chiarelli
Principal Developer Advocate
I have over 20 years of experience as a software engineer and technical author. Throughout my career, I've used several programming languages and technologies for the projects I was involved in, ranging from C# to JavaScript, ASP.NET to Node.js, Angular to React, SOAP to REST APIs, etc.
In the last few years, I've been focusing on simplifying the developer experience with Identity and related topics, especially in the .NET ecosystem.